|
||||
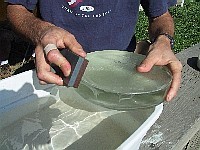
Make Sure your Mirror has a Beveled EdgeWhy do you need a Beveled Edge?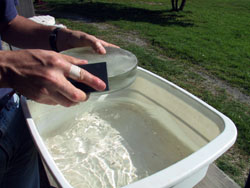 Beveling an 8" Mirror Edge on the bunkhouse porch at the Stellafane Mirror Class with a Dishpan and Sharpening Stone Sharp glass edges are more prone to stress cracks and chipping than rounded edges. Keeping a 1/8-inch (3 mm) bevel on both the front and the back of your mirror help prevent these cracks and chips, which can occur quite easily in the normal handling of your mirror as your grind it. Impacts with the tool, a sink, faucet, bucket, or counter top can result in a chip, which will extend into the mirror surface. If you have a glass tool, be sure to bevel it's edges also. While a chip will not be fatal to a tool, if the glass chip falls onto the mirror while you are grinding, it most likely will leave a deep and hard to repair scratch on the mirror. You may want to put a larger bevel on a glass tool, especially if you are making a "fast" mirror. Putting a 1/4" bevel on a tool usually means you will not have to re-bevel before fine grinding. Tile tools are generally not beveled, although some people do bevel the outside edges of the tiles using the same technique described below for glass. Most tiles do have a slight radius at their edge, and seem much less prone to chipping than glass. When to Bevel an EdgeBevel the edge before you start rough grinding. Maintain a bevel on the edge as your rough grinding brings the curve out to the edge, which often reduces the bevel. Be sure to have established a good bevel before you start fine grinding. You do not want to re-bevel after rough grinding is done, as there is an excellent chance that beveling will result in scratches on the mirror surface, due to grit or glass particle contamination. Note that some molded blanks have a nice smooth rounded edge. If it is at least 1/8-inch (3mm) in size, it would not have to be beveled. How to Bevel an EdgeMaterials and ToolsThe key item is a Sharpening Stone, often called a Carborundum Stone, used for sharpening knifes. You can buy a large stone in hardware, kitchen, sportsman or department stores. Most come with two grades of grit bonded back to back, coarse and fine. The Carborundum is silicon carbide, the same material you will use as a lose powder for rough grinding. In the stone, it is just bonded together to form a block. Some people use a die grinder or Dremel tool instead of a stone. We prefer not to mix electricity and water (and you still must work wet - see warning below) and hence always us a stone. You will need a dishpan or sink to work in. You may want to use a rubber protective mat if you work in a sink, as any slip with your mirror could result in that chip you are working so hard to avoid. Warning!As with any glass grinding operation, you must work wet, to prevent glass dust from entering your lungs. Always keep the glass and tool wet. Inhaling glass dust can result in Silicosis. Keeping your work wet is a proven technique to prevent inhalation of glass dust. Keep your work wet and you should not have to worry! Wet glass is slippery. Keep a firm grip on your glass. 
TechniqueHold the mirror blank flat with one hand, and rub the stone at a 45 degree angle along the edge. Use the coarse side of the stone if you have a choice. Rotate the mirror as you work, keeping the work area and stone wet. You want approximately a 1/8-inch (3 mm) bevel at 45 al around the mirror. Some people might call this a chamfer. Optionally, you might choose to make your bevel smoother with the fine side of the stone, or round it slightly.
|
||||
|
Back to the ATM Index Page |
||||