|
||||
PolishingPolishing Page Contents
Before You StartUse this checklist to make sure you are ready to start fine grinding:
You may click on the hyperlinks in the above checklist to visit the pages where we discuss each of these items. When all the check list items are done, you are ready to start polishing! You may also want to review How to Store Your Lap between polishing and figuring sessions. Polishing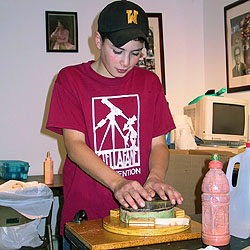 Cody polishes his 6" Mirror The orange bottle holds Cerium Oxide. GOAL: Refine the surface of your mirror to be an optically polished section of sphere. ABRASIVES: Polishing Agent TOOL: Pitch Lap STROKES: Use the Normal Stroke (1/3 Center-over-Center) for all polishing. TIME: A 6" f/8 or 8" f/6 mirror will typically be polished out in 6 to 12 hours or work, depending on mirror size and personal work style. This is very approximately one to two hours per inch of mirror diameter. NOTE: In polishing and figuring, each lap seems to have it's own "personality" and will behave somewhat differently. You need to learn how your lap behaves and adapt to it's needs. Some laps need to be pressed more often than others, some will need channel trimming more often, and some will polish faster or slower. Add this to the variability in technique that you add to the equation, and you find that there is much more variability possible than you encountered when grinding. Be alert, make mental (or paper) notes of what works and what doesn't, and adapt as necessary. PROCEDURE:All polishing sessions should begin by pressing your lap to ensure it has good contact with the mirror. See Hot & Cold Pressing on the Lap Maintenance page. If there is any skipping or sticking when polishing, then you probably need to do additional pressing. Also, make sure your Lap has a Bevel -- if your lap is larger than your mirror, you will press a rim into the lap that will cause it to stick or skip. Finger Trouble Avoid hanging your fingers well over the edge of the mirror close to the lap (keep them to the upper 1/2-inch of the edge only). Low hanging fingers produce local heating which will cause polishing and figure defects. Remember, we are now working at optical dimensions, measured in millionths of an inch, and it doesn't take much local heating to produce a noticeable effect. See also Turned Down Edge Most people polish with mirror on top exclusively, although you can polish with lap on top. [Texereau84] recommends lap on top to avoid edge defects, while [Berry94] recommends alternating MOT and TOT as you did in fine grinding. Berry also claims that polishing too long with MOT cause turned down edge. All the pictures on this page of the Stellafane mirror class show us working with MOT only. Our advice to avoid edge defects is to avoid long strokes -- keep to 1/6 diameter overhang at each extreme. See Turned Down Edge for more discussion of this topic. Shake your polishing agent bottle, then apply a thin coating of polishing agent to your work. Gently place the mirror on the lap and swirl it without pressure to distribute the polishing agent. Then begin the now familiar Normal Stroke (1/3 center-over-center stroke) which is the only stroke you will use for polishing. Rotate the mirror regularly just as you did grinding. A slight downward pressure is recommend, but make it even over the entire mirror, being very careful not to apply extra pressure over the edges. Unlike grinding, in polishing you will feel more resistance to pushing the work. This resistance is a sign of the excellent contact between the lap and mirror, with the entire surface area being well mated. Although there will be be resistance, motion should be smooth and even. If there is any sticking or skipping, stop and press, as working in this condition will lead to surface defects such as "dog biscuit", "orange peel" or ripple. Weekday Evening Work I do a lot of my polishing on weekday evenings after work. I start cold pressing before I sit down for dinner. By the time I have eaten and cleaned up the dinner dishes, the pressing is done, and my mirror is ready to polish. I can get an hours work in without going too late into the night. Your strokes should be slow and steady -- this is not a place for speed. 30 to 40 strokes per minute is about right. If you work standing up, as most do, use your whole body in the stroke, moving your legs and torso with somewhat stiff arms. This will lead to a more steady and smooth stroke, and will not fatigue your arms as much. Try to work at least an hour for each polishing session. The friction of your work will warm up the lap and mirror, and you will find the polishing "feels" better after the initial few minutes of work, as the lap warms and conforms to the mirror (beyond what pressing can do). Since polishing is hard work, many people find an hour is about their limit of comfort or endurance. After a total of 4 hours of work, you can start to check how well polished you are (See When is my Mirror Polished Out?). When this test shows you have a complete polish, you are done. After several sessions of pressing and polishing, you may find the channels in your lap may start to close, and/or the bevel on your lap has started to vanish. You need to keep your channels open and lap beveled -- the channels allow the the lap to more easily conform to the mirror surface by not having to "flow" very far; the bevel on the edge ensures you don't for a rim that can lead to TDE. See Trimming Edges & Channels on the Lap Maintenance page. Be sure to press after trimming. CONGRATULATIONS: You have finished polishing! On to Figuring (page not yet available). About Turned Down EdgeWhile rough and fine grinding, and then polishing, there are a variety of defects that can be ground or polished in. Defects that are polished in can be polished out, and you will be able to see any defects after you finish polishing and begin testing. Don't test or try to correct defects before you are polished out -- that almost always leads to more problems for the beginner. Just concentrate for now on getting a good polish. A very common defect, that is universally disliked by ATM's, is Turned Down Edge (TDE), a (usually narrow) edge problem were the radius of curvature is rapidly lengthening. It is so disliked because it is so time consuming to fix: Since you can't add glass back to the edge, you must remove all the glass inside the TDE, lowering it to the and effectively raising back up the edge. This can be a lot of work, and seems like a cruel long diversion when you are anxious to finish your mirror. Like many things in life, the best cure for a TDE is prevention -- better never to have to deal with TDE. So what can you do when polishing to prevent TDE? Try these suggestions:
When is my Mirror Polished Out?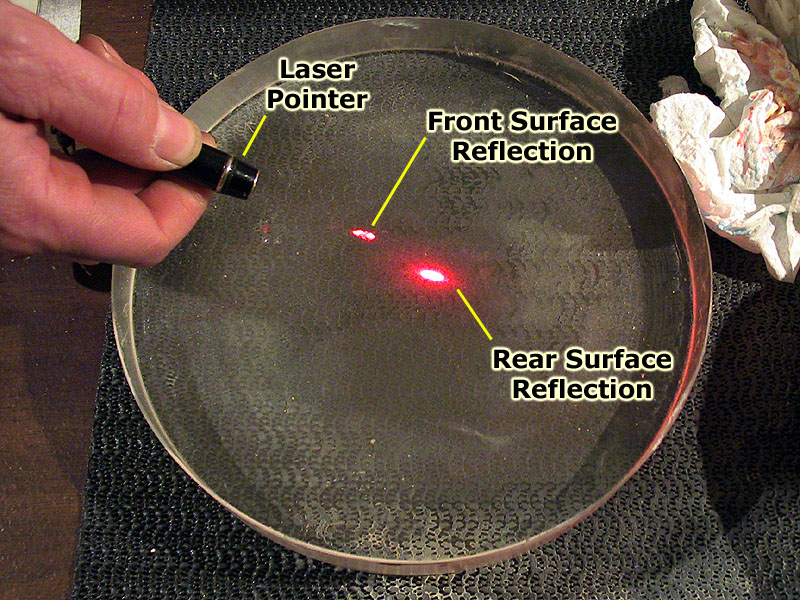 Testing for a complete polish with a laser pointer. This mirror is NOT polished out, there is too much front surface reflection. (Click Image to Enlarge) There are several ways to test that your mirror is completely polished ("Polished Out"). The traditional way is to use a flashlight in a dark room. However, now that laser pointers are commonly available and inexpensive (under $10), they provide the most reliable and easiest test for complete polishing, and can be used in a dim, not fully darkened, room. Note: High power green laser pointers are now widely available. This test does not work well with them. Use a low power (<=5mw) red laser as shown in the photo. Whether you are using a flashlight or laser pointer, the procedure is the same: scan the surface with the illumination source at a 45° angle, while viewing approximately 90° from the beam direction. You should see a strong reflection from the unpolished rear surface. But you should see NO reflection from the front surface. Yes, that is correct, a fully polished mirror will have essentially no reflection (that most people can discern) -- it appears the polished surface is not there at all! If your mirror in not fully polished, the "rough" surface will scatter some light to the side, which you will see as a front surface reflection. Just like inspecting for pits, you must scan the entire surface, and most (but not all) mirrors polish out from the center, so pay special attention to the edge. Most people end up doing this test long before they are done polishing, and have seen the steady brightening of the front surface reflection as it the light source is moved from the center to the edge, indicating a better center polish than edge polish. The mirror surface must be well cleaned and dry for this test - if you see an isolated reflection, it is most likely a spec of dust or some polishing agent you did not clean off. Clean and test again. Do not settle for anything less than a complete polish. An unpolished surface is a rough surface, and your not fully polished mirror will scatter light and be poor performer in a telescope. This is one area where you do not want to compromise: accept nothing less than a complete polish. See also Polish Quality. Temperature & Humidity Considerations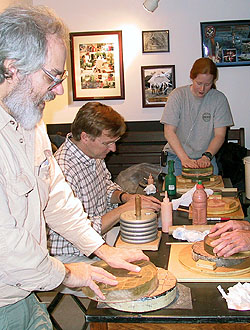 Polishing in the McGregor Observatory Short or rolled up sleeves show it is warm in here, despite the 40° F. outdoor temperature of a cool Vermont autumn. Unlike rough and fine grinding, Temperature and Humidity are important factors when polishing and figuring. The lap and polishing action can behave very differently under different temperature and humidity conditions. In choosing a location to polish and figure, your first concern should be to find an environment which will have a reasonably consistent environment over what may be many weeks of polishing and figuring. A second consideration is to find a warm space -- most of the optics professionals who are also members of Stellafane like to turn the thermostat up to 75° F or higher when we are polishing in the McGregor Observatory. A warm lap means it will better conform to the changing shape of your mirror and maintain good contact without excessive pressing. However, warmth is relative, and if you know you are going to polish in a cooler location, such a basement that is a steady 55° F., you can choose a pitch that works well at cooler temperatures, such as Gugolz 55 (See Pitch on the Grit, Pitch and Polish page). Humidity is a secondary factor, but will control how quickly your wet lasts. If you are polishing in very dry conditions, you may need to spray water on your work during a wet to prevent the lap from grabbing or sticking. You will notice different polishing behavior if the humidity changes significantly between polishing sessions. If you work in an area with high summer temperatures, be aware that you lap will probably be very soft on a hot summer day. A lap that behaves well on a 75° F. day may be too soft to use on 90° F day if you are not working in a climate controlled environment. It may be better to wait for the heat wave to pass, as a very soft lap can easily lead to a very severe turned down edge or other problems. About Polishing Pads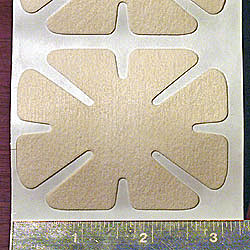 Polishing Pads on a roll You may hear or read about polishing pads. These are primarily marketed to the eyeglass industry, as they are used to produce an acceptable polish on spectacles. They are similar to self adhesive short-nap felt, and usually come cut in a petal pattern. They can be stuck directly to your (dry) tool (glass or tile). Polishing Pads are not good enough to put a final polish on a telescope mirror. You can certainly use them to do initial polishing of your mirror, but you can't avoid making a pitch lap for final polishing and figuring, so there seems to be little advantage to using them. Besides, doing initial polishing with a lap will let you break it in and get it in very good contact with your mirror. I have used polishing pads to put a non-optical polish on the back and sides of a mirror, which is aesthetically nice but not necessary. For this application, polishing pads are fast and convenient. I stuck several of them to a thick disk of plate glass, cutting some with scissors to fit for this application. While you can easily polish a mirror back by hand, you will need some sort of a powered turntable to polish the sides. |
||||
|
Back to the ATM Index Page |
||||