|
||||
Setting up your TesterBefore You Start
This page assumes you are using a Stellafane Tester, with provisions for
switching between Ronchi Screens and Knife Edges. It also assumes you can place an an alignment light source,
such as laser pointer, behind the test head for coarse optical alignment if you are working alone. Setup
is easier with a helper, but many of us do not have one available. If you are not using a Stellafane Tester,
then 95% of this page applies to you, and you will have to improvise for the 5% that doesn't (or enhance
your tester!).
Use this checklist to make sure you have what you need for mirror testing. The links are to our versions of these items, but these instructions work with any Foucault or Ronchi Tester.
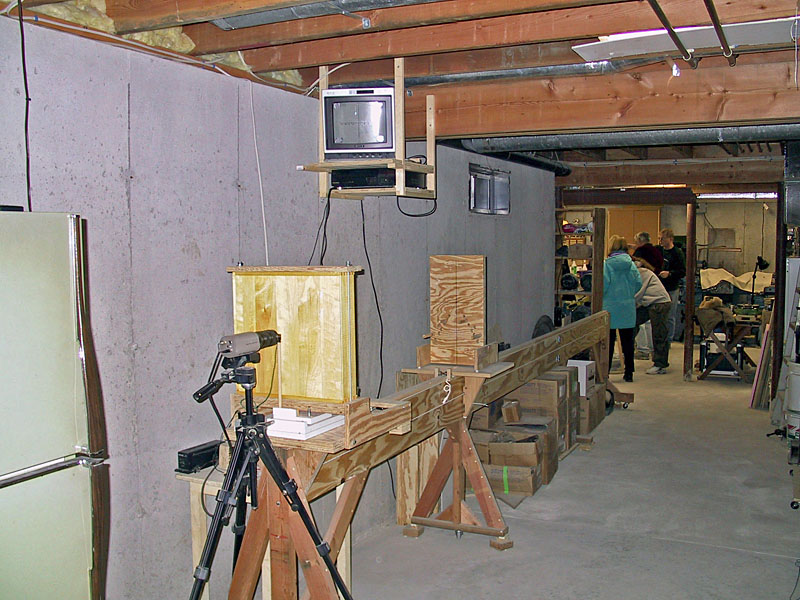
You may click on the hyperlinks in the above checklist to visit the pages where we discuss each of these items. When all the check list items are done, you are have everything you need to set up your Tester. Tester Location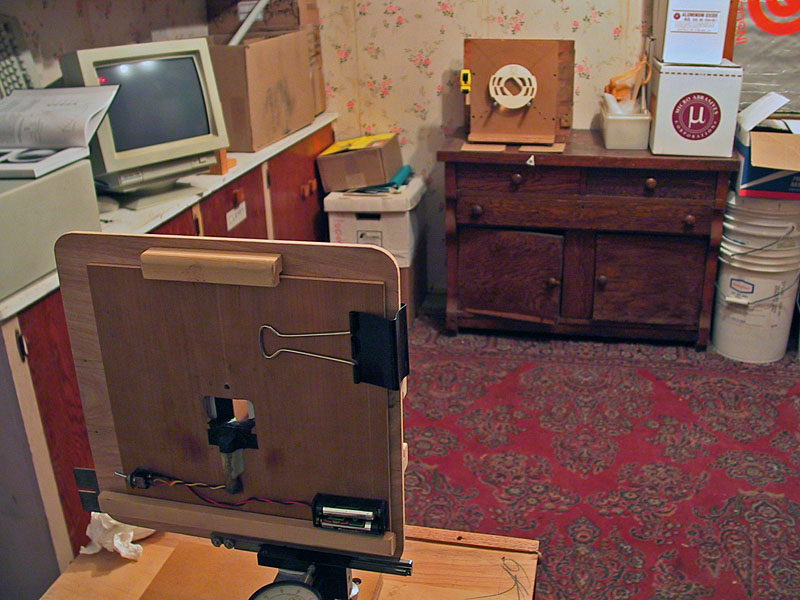 A Setup Tester: This is the 'back room' of the Stellafane Bunkhouse. We are on a wooden floor over a basement in a very old building, and the floor is very springy. Otherwise, this is a good room to test in: dark, clean with steady air. The tester is sitting on an upended (spare) kitchen cabinet. Choosing a location to set up you Tester is important. Please consider these factors when choosing a place to set your Tester.
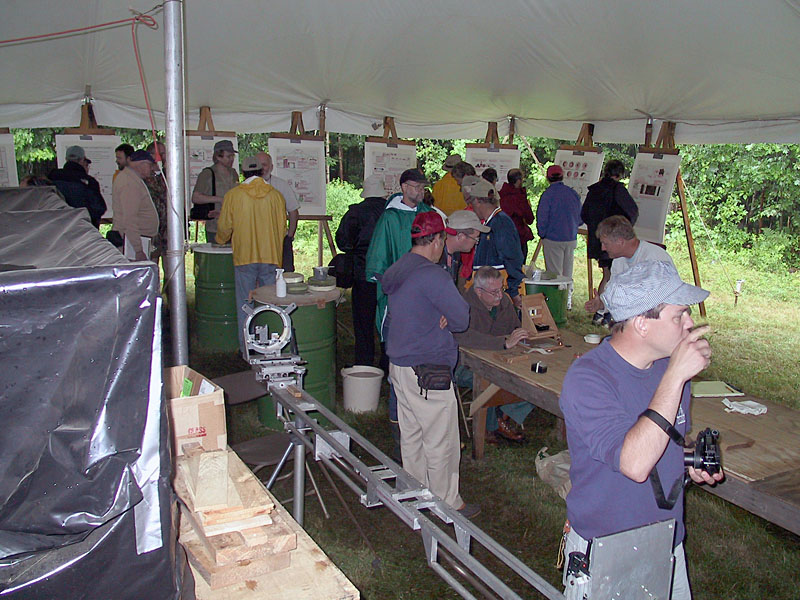 Testing under the Tent at the 2003 Stellafane Convention. A black plastic test tunnel is at left. Center is a machined rail mounted tester. At right, we are testing on a folding table, difficult but successful. The above list is for the ideal situation, rarely do ATM's have all or any of these conditions. At the Stellafane convention, we do testing demos on a shaky folding table in a bright tent in the summer sun with dust blowing in and people moving about; the only thing we do have is space. We successfully test mirrors in this environment, but it clearly is harder to setup and use test equipment here. Try to meet as many of the criteria as you can, but don't despair if you can't meet most of them. The only absolute requirement is to have enough space for your focal length. In the photo at right, you can see two pieces of optional equipment we describe below: A test tunnel (Black Plastic far left) and a rail mounted tester in the middle (this one is a fancy machined version, more basic ones can be easily made). Basic Physical Setup
The radius of curvature for your mirror is twice its focal length. To estimate the radius of curvature,
use our Sagitta to Focal Length Calculator, with your Sagitta
and Mirror Diameter as inputs.
Place your Tester and Test Stand on solid surface and separate them approximately by your mirror's radius of curvature. Many novices make the mistake of trying to test at focal length - this will not work! Next carefully place your mirror on the Test Stand. If your Stand has a safety clip to prevent the mirror from falling forward, engage it. Be sure the back of the mirror is firmly against the back of the Test Stand and seated squarely on the tow support dowels. You might want to mark the edge, so you place the mirror back in the stand at the same (or different) rotation about the optical axis. Adjust your Foucault Tester stage so that it is advanced towards the mirror 25% of its range of travel along the optical axis. Line up the Tester and Test Stand visually so they are in line and facing each other. Now use a tape measure to adjust the distance between the front edge of your mirror and the position of the knife edge to be equal to your calculated radius of curvature. Coarse Optical Alignment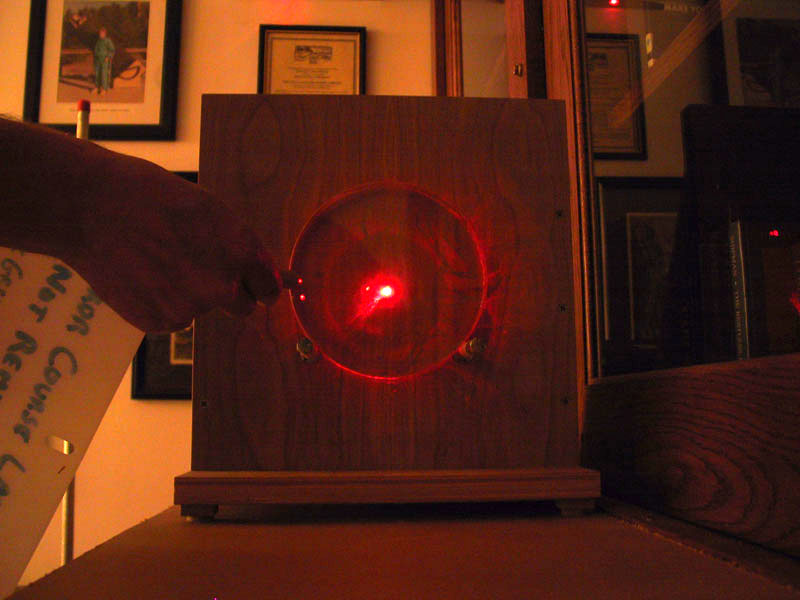 Coarse Optical Alignment: The laser dot is near the center of the mirror, and the mirror stand is being adjusted to reflect the dot back to the source. When lined up properly, the LED light source in the Tester is more than bright enough to do testing with. Unfortunately, it is not bright enough to do the initial, coarse, optical alignment. A laser pointer is the preferred light source for this job, if you don't have one a flashlight can be used (flashlights were used for many years before low cost laser pointers were available). Turn on the laser pointer or flashlight and set it up up so that it shines past the knife edge or through the Ronchi screen if it can't be easily moved out of the way. You want it to shine level and straight out from the Tester, hitting the mirror dead center. (The Stellafane Tester has a movable piece of copper pipe to lay the laser pointer or penlight in, and it can be adjusted for centering on the mirror). Now, look for a return reflection on the Tester from the mirror (your polished mirror will do a fine job of reflecting this bright source). A laser is easiest to use because the reflected spot will be small and bright; a flashlight reflection will be much larger and dimmer because the light is spread out. Hopefully you will see the reflection on the large backboard of the test head (that's why we made the Stellafane Tester's backboard so large!). If not, stand behind the Tester and see if you see the reflection on your body, or hold up a large white card to find it. If you really can't see a reflection, you either have not done a very good job of physical alignment of you test setup, or the area is too bright for the light source you are using. Correct this and don't proceed until you know where the reflection is. Once you have located the reflection, adjust the Mirror Test Stand so that the reflection is returned right back to the source. I suggest you adjust the left right reflection position first, so the the reflection is directly above or below the alignment light source. To adjust the left-right location, gently twist the Mirror Test Stand without moving it in any other direction. To adjust the reflection height, use the adjustable foot on your Test Stand - twist the knob to adjust the mirror tilt (and be careful not to tip the mirror down so far that the mirror tips out of the Test Stand!). Once you have the return reflection gong right back to the alignment source, you are done with coarse optical alignment. Do not bump or move the Test Stand or Tester at this point, and carefully remove the alignment light source, turn it off, and remove or move out of the way any alignment light source holders. Fine Optical Alignment
A Note About the Mirror Images
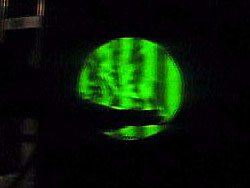
This is a commercial 4¼" f/5 mirror in a Stellafane Tester using a Green LED. The small black ring in the center is a notebook paper reinforcement, stuck on to the mirror to aid in telescope collimation. The mirror has some dust on it, and the sharp-eyed will see an edge problem. Any glow or flare you see outside the mirror is due to slight camera misalignment problems. If you have done a good job in the last two steps, and you know you mirrors radius of curvature to a reasonable accuracy (±½ inch), you should have little trouble completing fine optical alignment. If you are having trouble with this step, see our troubleshooting subsections below for suggestions, but if they do not help, go back to Coarse Optical Alignment and try to do a more precise alignment. Setting up a Tester the first couple of times may be difficult, after a few times it will get easier, as you become familiar with your equipment and the process. Turn on the testing light source, for the Stellafane Tester this is the green LED. If you can slide the knife edge or Ronchi Screen out of the way, do so. If not, you can look through the Ronchi Screen for this step; use the Tester's lateral controls (on the Stellafane Tester, is the adjustable foot screw on the stage that tilts the stage and the knife edge) to move the knife edge as far out of the way as possible. 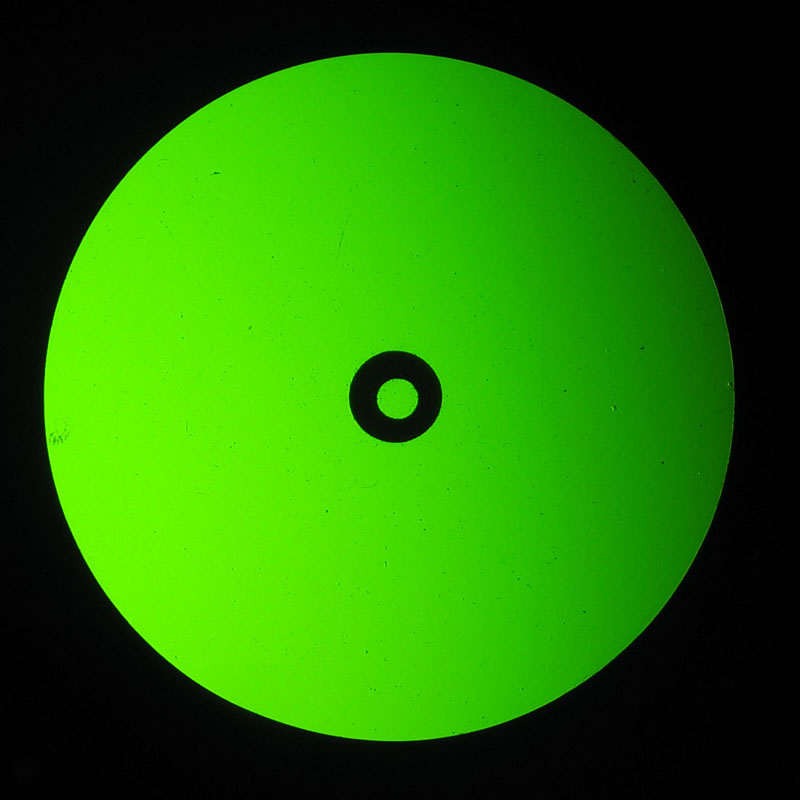 A Fully Illuminated Mirror Some darkening on the upper right is due to camera skew. Place your eye in the testing position, as close to the knife edge or Ronchi screen as possible, and look at your mirror. It should be fully illuminated - that means the entire surface of the mirror should appear bright, reflecting light over its entire surface from your testing light source (If you are using a colored LED, then the entire mirror surface should be glowing in that color). Of course, if you are looking through a Ronchi screen, you will also see dark vertical bars, the more bars you see, the further away from Radius of Curvature you are, and we discuss this later on in this procedure. If you see full illumination, proceed to the next step, Adjusting to RoC, if not read the troubleshooting tips below and don't proceed until you have full illumination. Fine Alignment TroubleshootingOff-Center Illumination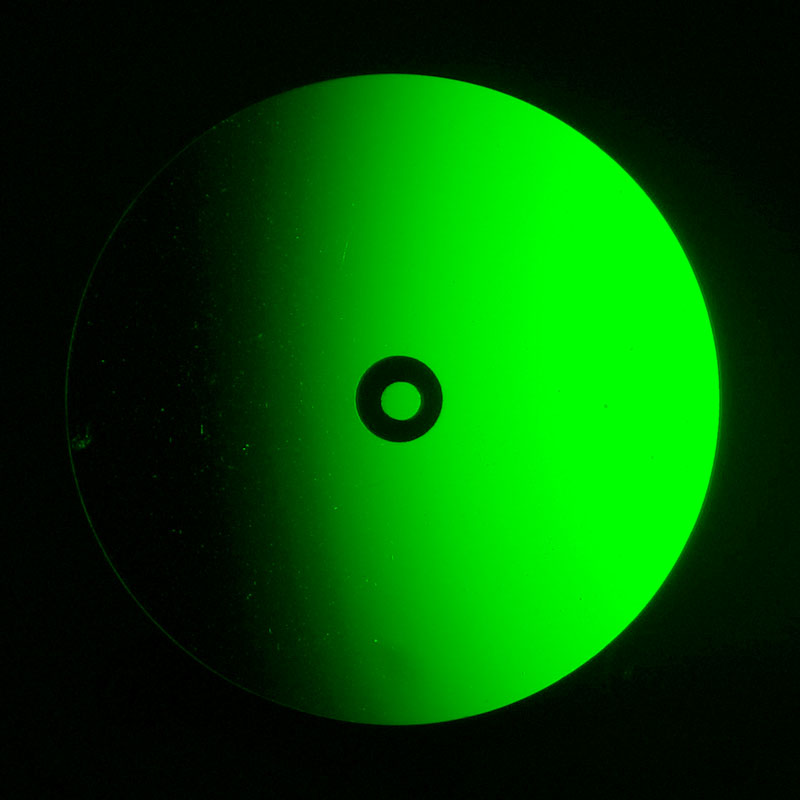 Off-Center Illumination Dust stands out on the dark part of the mirror. If you see Tester source illumination on the mirror, and it appears to be full-sized, but it is not centered on the mirror such that part of the mirror is not illuminated, then you have not properly adjusted the mirror to return the beam directly back to the light source in the Coarse Optical Alignment step. First try to slide the entire Tester gently left or right a little bit. You can also try to adjust the mirror again while looking for the full-illumination (this is obviously easiest if you have an assistant who can adjust the mirror while you look and give directions). Go slow, it is easy to lose any reflection at all. If you don't succeed, return to Coarse Optical Alignment and try to be more precise in doing it. Centered, but Too Small IlluminationIf you see illumination that is centered on the mirror, but it is not full (i.e. it is smaller than the diameter of the mirror), than you Tester-to-Mirror distance is either too large or too small. In other words, you are not near enough to the radius of curvature. 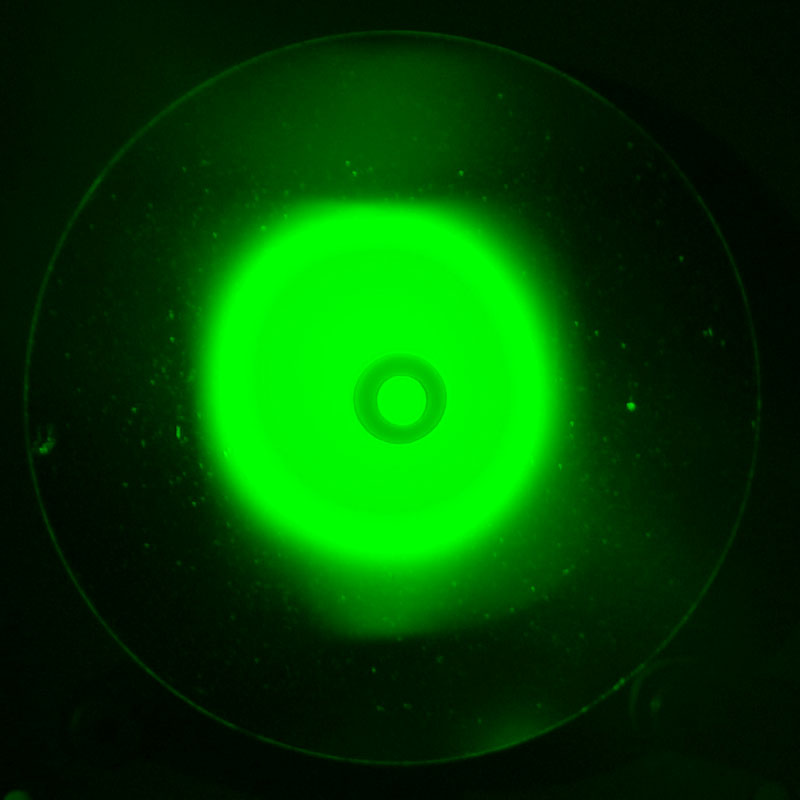 Partial Illumination The mirror-to-tester distance should be 34"; in this shot it was 36" (only 5% off!) resulting in only half the diameter of the mirror being illuminated.. Plenty of dust visible in the large image. Stand, but you don't want the Tester to end up in an uncomfortable spot to far away from the edge of the table for actual testing). If you move in one direction and the illumination gets smaller, that is the wrong direction. If you move in a direction and the illumination gets larger, that is the way you want to go. Continue to adjust the distance between the Mirror and the Tester until you have achieved full illumination. Then measure and record that distance, so you can set up your Tester again more quickly. No IlluminationYou don't see any reflection? Yes, it has happened to us, even with years of experience. Check these things:
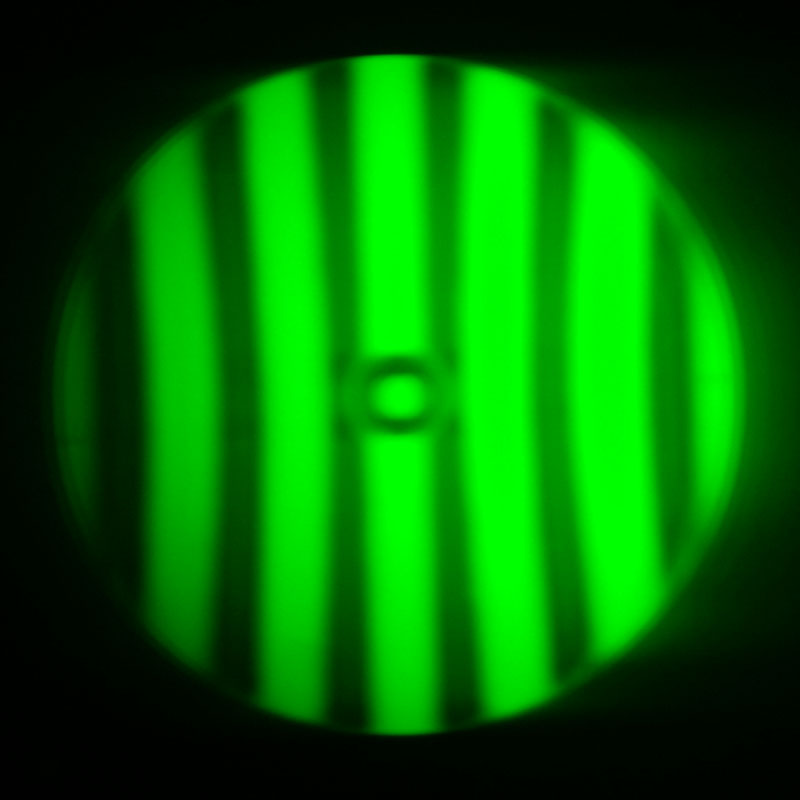 This Ronchigram is well away from RoC - the many vertical bars tell us this. The curves of the bars mean this is not a sphere (it's a parabola). Adjusting to RoC = 2 x FocusIn order to confuse people, mainly beginners, it is not uncommon to talk about this next step as adjusting to focus. But of course, what we are really doing, since we are testing at Radius of Curvature (RoC), is adjusting to twice the focus, so we added a parenthetical "= 2 x Focus" to the subsection title to try to keep the confusion level down. If you are here, you have achieved full illumination, and you are almost done with Tester setup (We are sure you are anxious to get on to the actual testing!) In this step, we are going to adjust the Tester to be near the RoC, a good place to start testing. This next step is very much easier to do with a Ronchi screen especially for beginners - but it can be done with only a knife edge. When you have adjusted to RoC, carefully measure your Mirror (font edge) to Knife Edge or Ronchi Screen distance. This is a very accurate RoC, and you can divide it by two to yield a very accurate focal length. 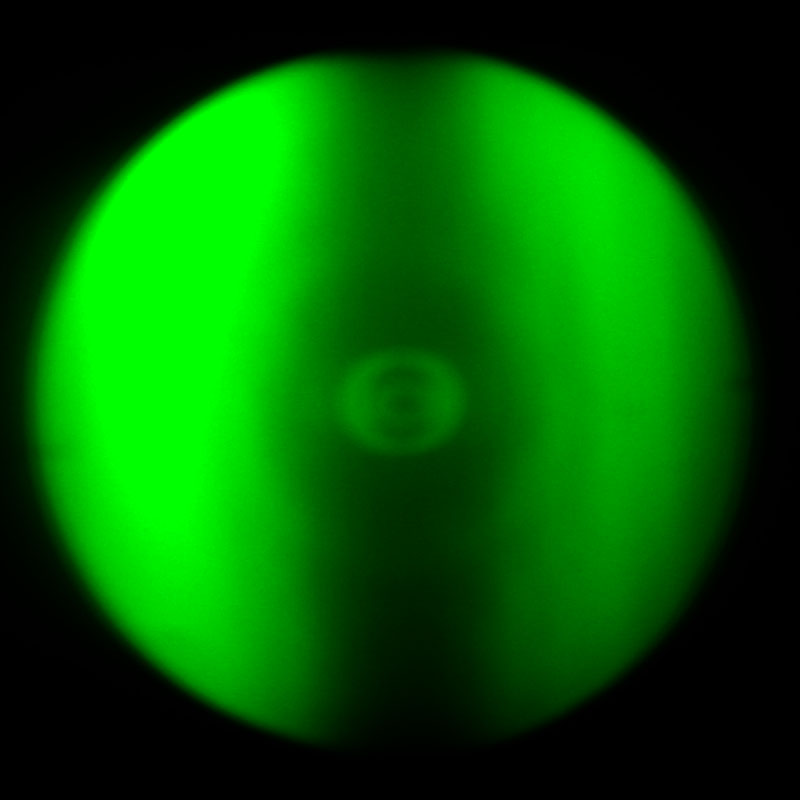 This Ronchigram is at RoC as indicated by the single vertical bar. Note the bar is not at all sharp, which can make testing a challenge. Adjusting to RoC with a Ronchi ScreenYou are done with Tester setup when you have adjusted the Tester to RoC, and the Tester has at least ¾-inch of forward (towards the mirror) travel available for testing. If you don't have enough Tester travel available, carefully move the Mirror Test Stand and Tester closer together until you do, and readjust the Tester to RoC. You will find the tester is very sensitive when it is operating near RoC. These still photos can't show you the jitter and wiggle you see when just placing your hands on the tester controls without trying to move them. In the image at right, the reinforcement ring at the center of the mirror is fuzzy. Despite using a tripod mounted camera, and a timer for delayed shutter release so no hands were touching the camera when the picture was taken, I could see the vertical bar jumping about in the view finder (this picture was taken on a basement slab in rural Vermont, no traffic or train vibrations). Fortunately, your eye and brain can eliminate some of jitter you see here, but it there still will be a lot when you test. We have a move about Finding the Radius of Curvature with a Ronchi Grating you may wish to view; it is a 14.7 MB, 4:02 minutes long and in .wmv format. Adjusting to RoC with a Knife Edge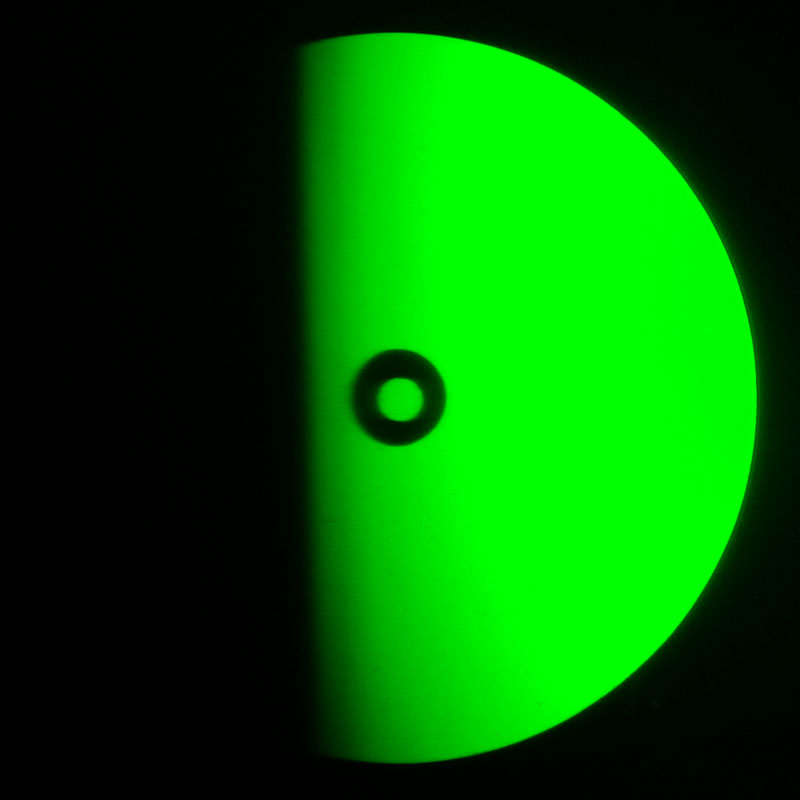 Shadowgram: The shadow is moving left-to-right across the mirror, the same direction the physical knife is moving. We are inside of RoC, too close to the mirror. Notice in the larger image, the diffraction effects along the knife edge shadow. The curve at the bottom is due to slight camera skew. Carefully slide your knife edge if it not already (it should cover about one third of the light source on the Stellafane Tester). Place you eye in the testing position, close behind the knife edge so you can look past it. You should see a fully illuminated mirror. If you don't the knife edge is cutting off some or all of the reflection. First, use the lateral control (knife edge control) on your Tester to back off the knife edge until you see a fully illuminated mirror (In some cases, if you have a moveable knife edge, it might have to be slide back a bit). Using the lateral (knife edge) control, begin to cut the knife into the beam. At some point, you should notice the shadow of the knife moving across the mirror. If the shadow is moving in the same direction as the physical knife, you are inside RoC and need to move the Tester back. If the knife's shadow is moving in the opposite direction of the physical knife, you are outside of RoC and need to move the Tester closer to the mirror. Turn the axial motion (towards or away from the mirror) control in the needed direction. Move the knife edge again, observe the shadow direction, and repeat. If your mirror is a perfect sphere, the knife edge shadows will have a straight, vertical edge. If you mirror has a more complex shape, you may see areas of light and dark shadows, and in some cases shadows that appears to move in opposite directions. If this is the case, observe the shadow direction in the central portion of the mirror, and ignore the other shadows for now. When you are at RoC, there will be little, if any, shadow motion. Instead, as you cut the knife in, the mirror (or the central portion you are observing) will go dark without any movement of shadow across the area. Congratulations, you have observed your first 'null' and you are at RoC for the center of your mirror. You are done with Tester setup when you have adjusted the Tester to RoC, and the Tester has at least ¾-inch of forward (towards the mirror) travel available for testing. If you don't have enough Tester travel available, carefully move the Mirror Test Stand and Tester closer together until you do, and readjust the Tester to RoC. Optional EnhancementsHere are some suggestions for enhancements to your test setup. In some situations, they can be very helpful and convenient. Tester Rails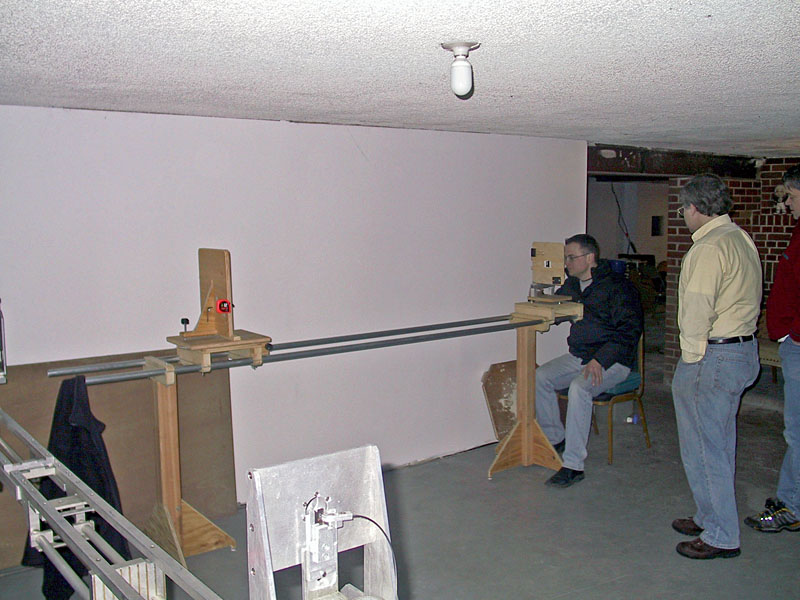 A Tester on Rails: All wood with two 1½" by 10' steel electrical conduit rails. The legs can move along rails; keep them close to the tester and stand to minimize flexure. See also Dick Parker's Railed Tester, which he uses in his ASGH Mirror Class. Adding rails to keep your Mirror Test Stand lined up with your Tester can be a real help in aligning your Tester and keeping it aligned over long periods of time if you leave it set up for days or weeks while you work on your mirror. Rail stiffness is required if you intend to slide your Test Stand along to many different positions (as we would do in mirror class with many students working on different types of mirrors). However, for the single-mirror-at-time situation, being able to locate a support close to the Mirror Test Stand position will generally allow use of rails that are much more flexible than would be the case otherwise - when they are not supporting the weight of the mirror or Test Stand, lighter weight rails can be used just to maintain parallelism. Test Tunnel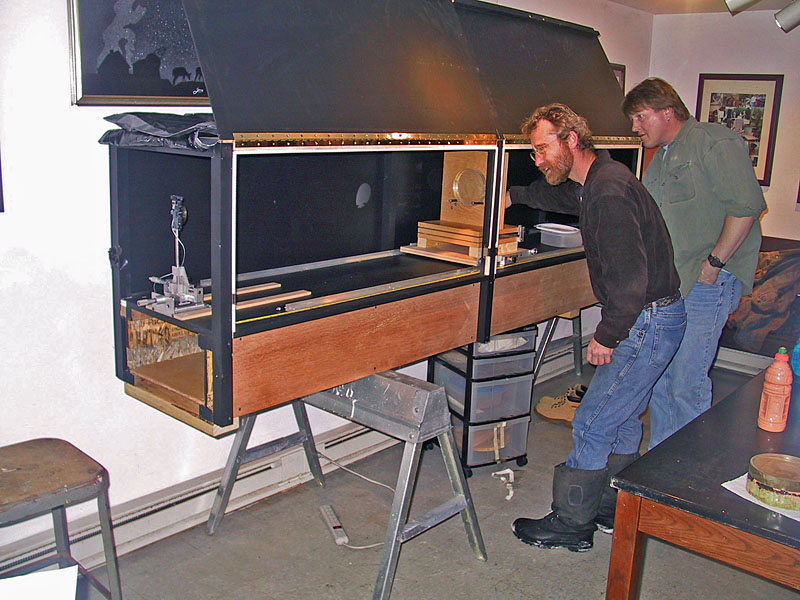 Stellafane Mirror Class Test Tunnel with ¼" plywood doors open. Rails keep the mirror stand lined up. If you want a darker or more air-current free test environment, and you cannot control the space you are in, you might consider making a test tunnel. A very inexpensive and lightweight tunnel can be made from 1x2 strapping and black plastic sheets stapled to the strapping (We have used this under the tent at Convention with good success, see photo above). Obviously, a more permanent tunnel can be made in a variety of ways, and because we often work in crowded conditions at mirror class, we have a test tunnel made from some surplus engineered floor joists, 2x2 lumber for a framework and a ¼-inch plywood skin (photo at right). |
||||
|
Back to the ATM Index Page |
||||
