

Installing a Primary Mirror in a Cell
Optics can be easily bent. Your full thickness primary mirror may feel sturdy, but optics work at a tiny scale and it does not take much to distort them. At the center of the visual spectrum, green light has a wavelength of 550 nanometers, which is 21.7 millionths of an inch. A ¼ wave distortion requires only a 5 millionths of an inch 'bend' in your mirror, which is very easy to do!
Why do we bring this up? Because it is not too uncommon to find telescopes with 'Pinched Optics', a slight but critical bend put in them from improper mounting in mirror cells. We want to be very careful not to apply any stresses to our mirrors when we mount them. Fortunately, it is somewhat easier to avoid this problem with home made cell like ours; those that use retaining clips, like most commercial cells, are more prone to this problem.
Mounting a Mirror in a Retaining Clip Cell
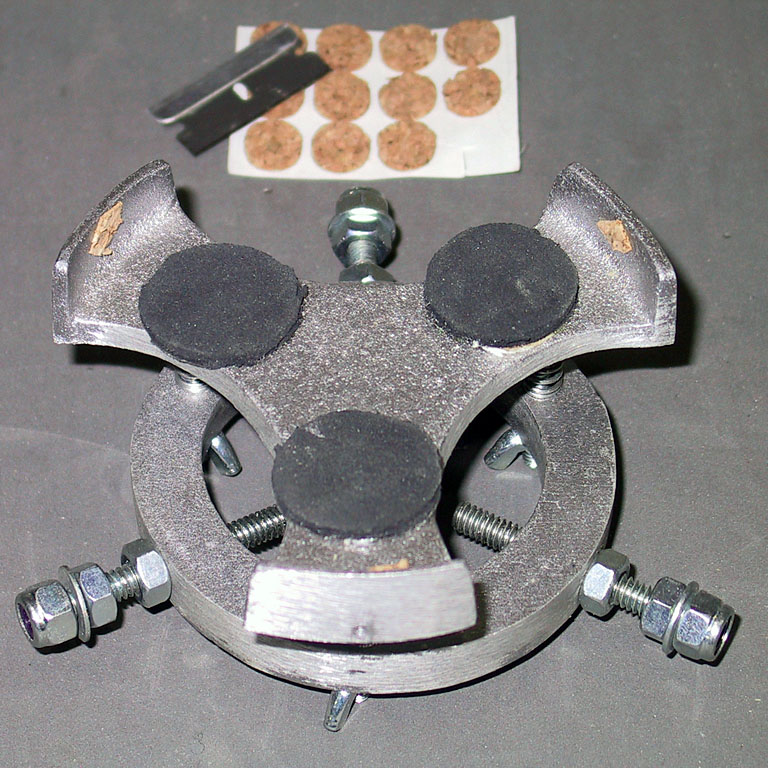
Loosen the retaining clips and position them out of the way or remove them. Carefully place the primary mirror into the cell, which should have three soft pads, usually cork or rubber, for supporting the mirror from the back. The cell should have a rim and/or side posts to prevent the mirror from sliding from side to side.
If there is more than 1/16 of an inch of side-to-side motion, you need to carefully shim the sides of the mirror cell. Self adhesive cork, felt or soft rubber pads work best, and usually need to be cut down in both size and thickness for this job. Remember, you do not want to put any pressure or strain on your mirror, you just want to keep it from sliding around in the cell. If you can't rotate the mirror easily in the cell, the side pressure is too much.
Once the side-to-side fit is good, it is time to install the retaining clips. The part of the clip that will touch the mirror's surface should have a soft pad on it (cork, felt or rubber). Most pinched optics occur from over tightening the retaining clips; they should barely touch the mirror's surface, and certainly should not apply any pressure to the mirror. They are there to prevent the mirror from falling out of the cell should the telescope be pointed downward, they are not there to press the mirror onto it's mounting. As you tighten the bolts that hold the clips, they will try to twist the clip, resulting in pressure on the mirror from one edge of the clip - be sure to keep the retaining clips straight with their tabs parallel to the mirror's surface. As a check for the right adjustment of the clips, make sure you can lift the mirror slightly under each clip with very slight force.
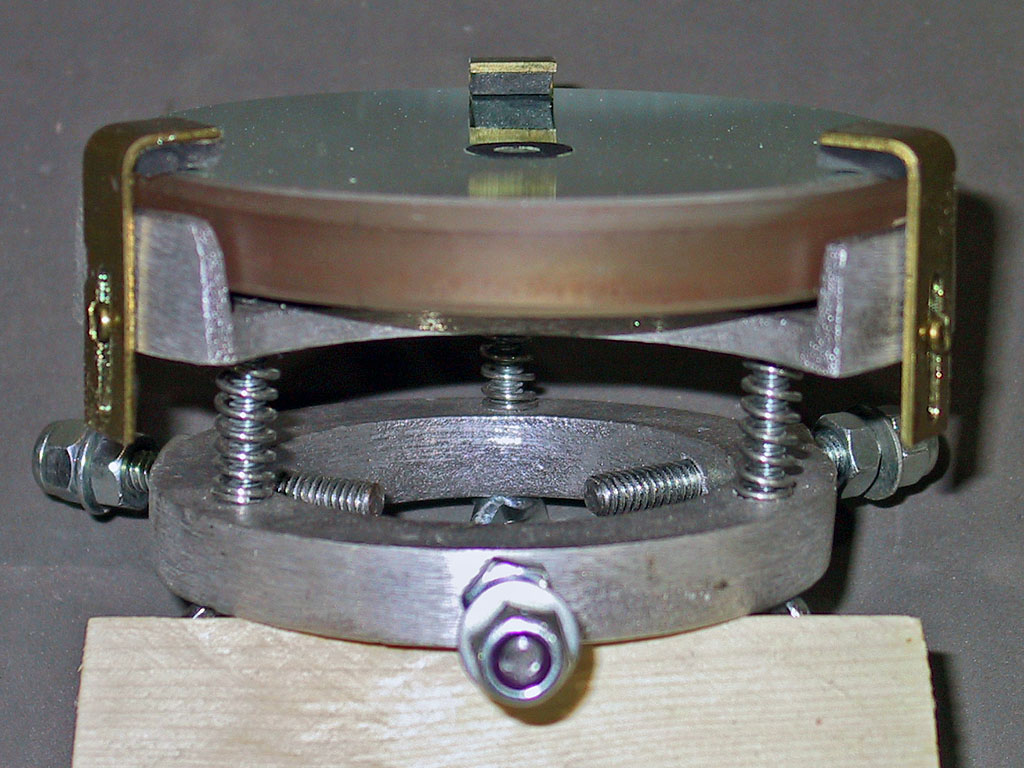
Mounting a Mirror in our Home Made Cell
We are going to attach our mirror to our cell with Silicon Rubber RTV adhesive. GE is the manufacturer, and they sell it in a wide variety of sizes and types. From what we have read, the variations have more to do with packaging and marketing and very little to do with the formulation. We purchased a 2.8 fluid ounce tube of clear "Premium Silicon Glue" for "General Household Repairs" at our local hardware store. It is also sold as exterior caulk, interior bath and kitchen caulk, aquarium glue, sealer for mortar joints, and many other things. Marketing it directly as a glue is fairly recent, earlier telescope makers bought the aquarium or exterior caulk versions. Most any will work, clear is preferred (no need for coloration).
What is critical is that you use a fresh, unopened tube; there have been reports of failures related to the use of previously opened (and assumedly partially cured) tubes. The newer small tubes with a screw top seal seal pretty well, unlike the older, larger tubes that have no top and are indented for use in caulking guns. We will want to use this material again on our diagonal mirror, and if you have a screw top tube it should be fine to use it again for that purpose in a few weeks. Just make sure the silicon does not appear to have any lumps, a sign of partial curing. If you see that, buy a new tube.
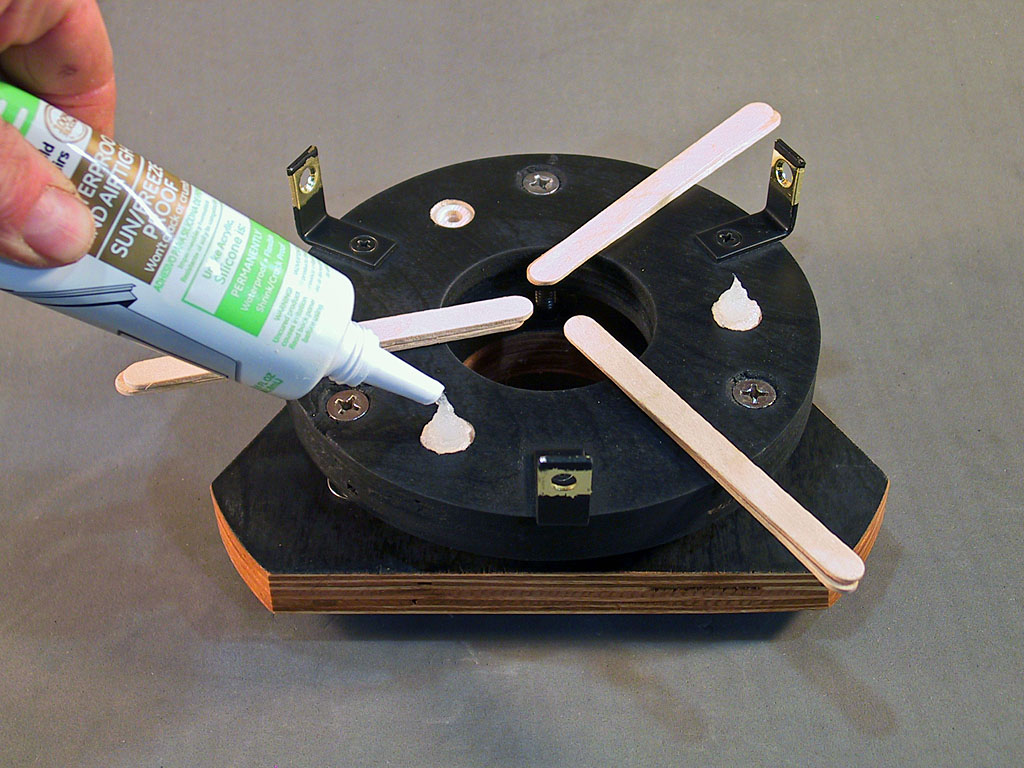
applied to the mirror cell
Place your mirror cell face up on a sturdy, level surface where it can be left undisturbed for 24 hours. You need to find three temporary spacers to prevent the mirror from totally flattening out the silicon adhesive while it dries. These need to be between 1/8 and 3/16 inches thick: Two popsicle sticks or a 16 penny nail are about the right size. Place these spacers evenly around the mirror cell away from the glue dimples.
Prepare you primary mirror by making sure the back and sides are clean and grease free. You can use alcohol to wipe down the surfaces. You should wear latex or rubber gloves so your hands do not leave grease or oil on the mirror when you handle it.
Now open your silicon rubber adhesive, and squirt a big blob into each glue dimple, making sure each blob rises about double the height of your spacers. Now carefully lower you mirror onto the spacers, centered in the cell, squishing the silicon rubber adhesive onto the mirror's back. Check centering again, which should be easy, as the mirror diameter and cell diameter should be roughly identical.
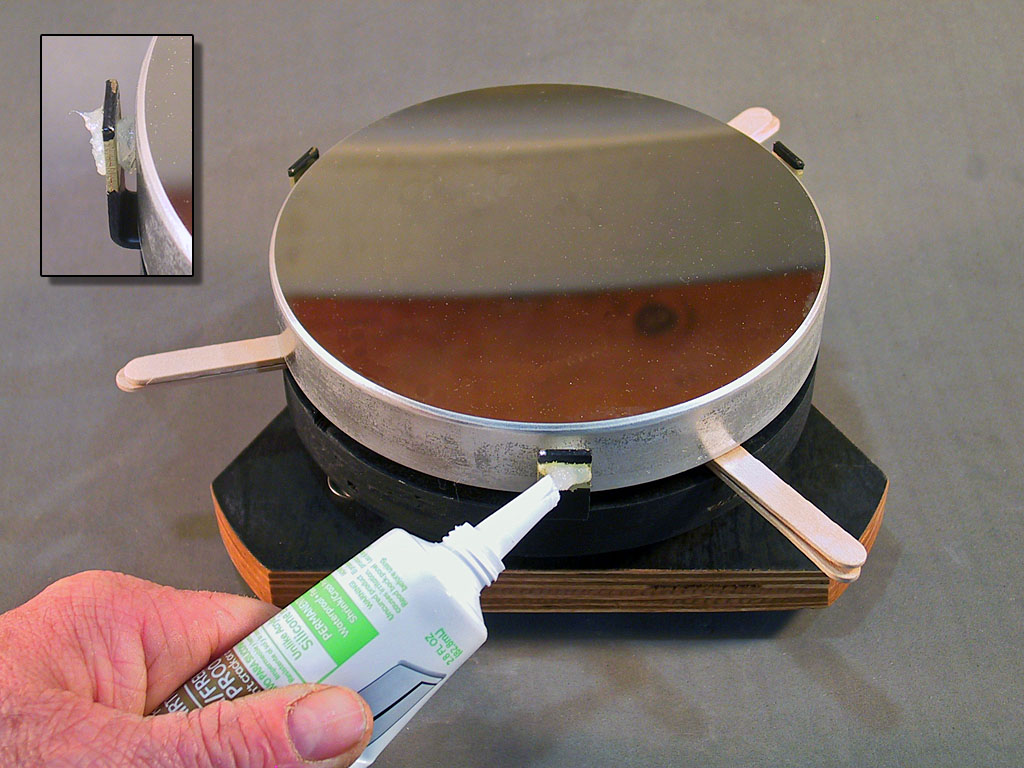
Next, squirt adhesive through each side support hole so that it forms a blob between the mirror and side support, and make sure some passes through the hole and forms a little blob on the outside of the side support.
That's it - leave the adhesive to cure 24 hours, gently pull out the spacers, and your mirror should be firmly but gently held in place in your mirror cell.
Mirror Removal: At some point, you may need to remove your mirror from the cell, perhaps for recoating. How do you do this safely, without risking damage to the mirror? Use a piece of dental floss or monofilament fishing line to carefully cut through each silicon rubber attachment. Once your mirror is free from the cell, use a razor blade to carefully remove the remaining silicon rubber.
Previous: Finishing a Mirror Cell Next:
The Focuser
Back to the Build a Dobsonian Master Index