
Designing Your Telescope
In this section we will work out the detailed design of your telescope using the free Newt-Web design web application. We should open by saying that any design process is not linear, but rather iterative, as you often have to loop back and change something you thought was decided as you learn more about your design, or the parts and material available to you, or how various design decisions interact with one another. We know you want to get building, but spending some extra time here will lead to a better performing telescope and reduce or eliminate rework and wasted materials if you start building too soon.
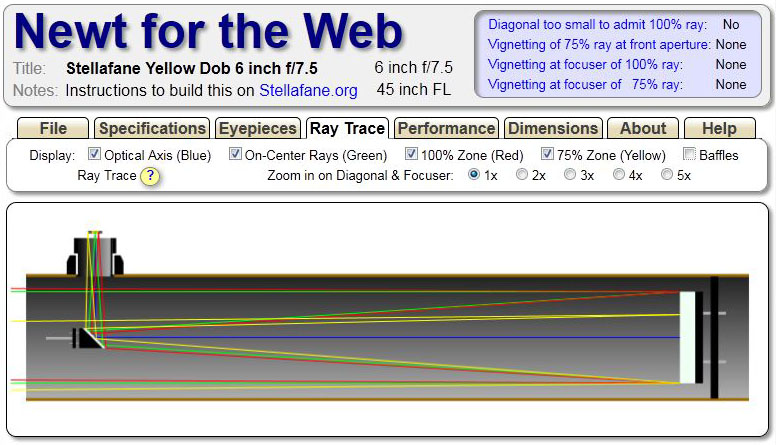
Now would be a good time to take a look at the Newt-Web design application, and update your browser if necessary (). I would encourage you to try it out and become familiar with it, It comes with several examples to get you started - and the Yellow sample design in Newt-Web is the sample telescope we build here.
At this point, if you have read our previous introduction, you should have selected or know the diameter and focal ratio of your primary mirror. This is the major starting point for designing your telescope. However, we need to specify to Newt-Web a few more items to successfully design our telescope. Many of these items will be covered in more detail in subsequent pages, but here we will try to give you enough information to complete a workable design. If you need more information on a particular item, try reading ahead to the page about that item.
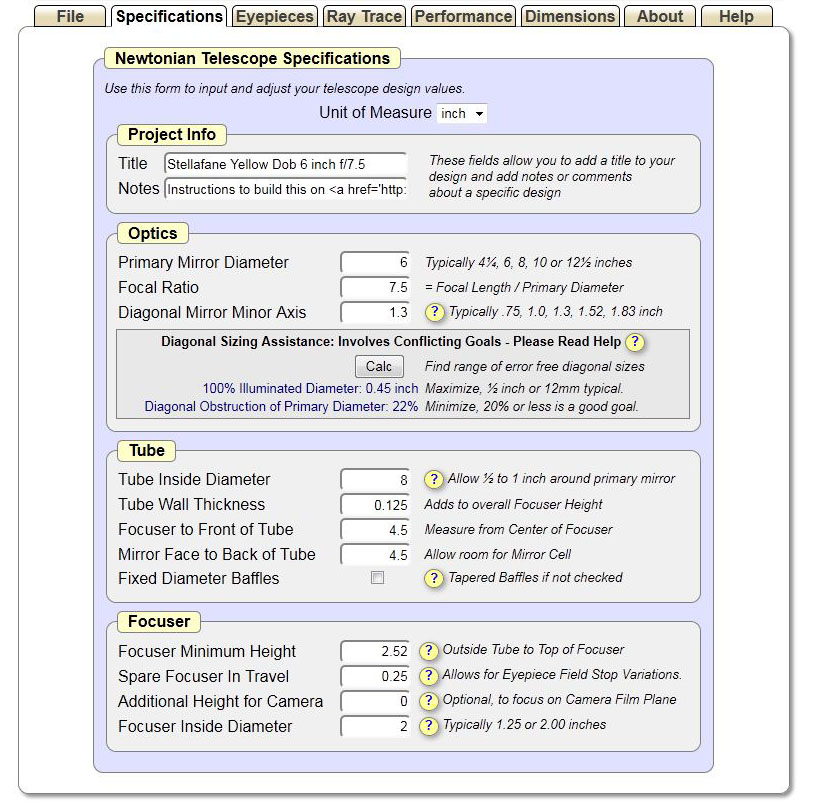
Open Newt-Web in your browser. It will come up with one of the default sample telescope loaded. We will modify the specifications and then save them as our own design. Select the Specifications tab, which is where you enter all your design specifications. First, select the Unit of Measure you will be working in (we will use inches, you should use the units you are most comfortable working in). You can also enter anything your would like into the Project Info fields.
Now, in the Optics section, enter the Primary Diameter and Focal Ratio of the primary mirror. The last item in the Optics section is Diagonal Minor Axis. The diagonal mirror is shown in the Newt diagrams on the left hand side bending the light 90° up to the focuser. It is has an elliptical shape, and is a flat, front surface mirror that is angled at 45° to the optical axis. Newtonian diagonals are specified by their minor axis dimension.
Diagonal Design Considerations: The diagonal casts a 'shadow' on the primary, effectively reducing it's surface area and hence light gathering ability. From this standpoint, you want the smallest diagonal possible. However, the diagonal must also be big enough not to miss any reflected light so it can bend all the light up to the focus plane at the top of the focuser, where it must present a reasonably sized 100% illuminated area to the eyepiece; therefore tube diameter and focuser height enter into this decision. Further, diagonals are only sold in certain 'standard' sizes, so you do not have free reign to pick any size you want, you must choose one of the sizes you can purchase (very, very few telescope makers make their own diagonals - it is possible, but it is hard to make a very flat mirror and measure it's flatness). To see what sizes are available, check our Links Page for Secondary & Diagonal Mirrors. Common sizes for small Newtonians would be 0.75, 1.00, 1.30, 1.52, 1.83 and 2.14 inches.
Sizing a diagonal is one of the more complicated decisions a telescope maker faces. Newt-Web provides additional help in the Diagonal Sizing Assistance box on the Specifications Tab. Please be sure to read the help associated with this area, it has good advice about choosing the diagonal size.
For our telescope, we are using a 6 inch f/7.5 primary, and a 1.3 inch minor axis diagonal is our starting point. If we find it is not big enough, or it is too big, we may have to change its size.
Next, we need to enter four items about our tube. Let's deal with the Tube Inside Diameter and Tube Thickness first.
Tube Design Considerations: We plan to use a cardboard concrete form tube for our tube, sold under many trade names such as Sono-tube and Quick-tube. Telescope tubes for Newtonians should be about 2 inches bigger in diameter then the primary mirror to allow turbulent convection currents to "hug the walls" and stay out of the optical path and to allow a little room for mounting mirror cells, spiders and focusers to the tube outside of the optical path. So a 6 inch mirror should be housed in about an 8 inch tube, and so on.
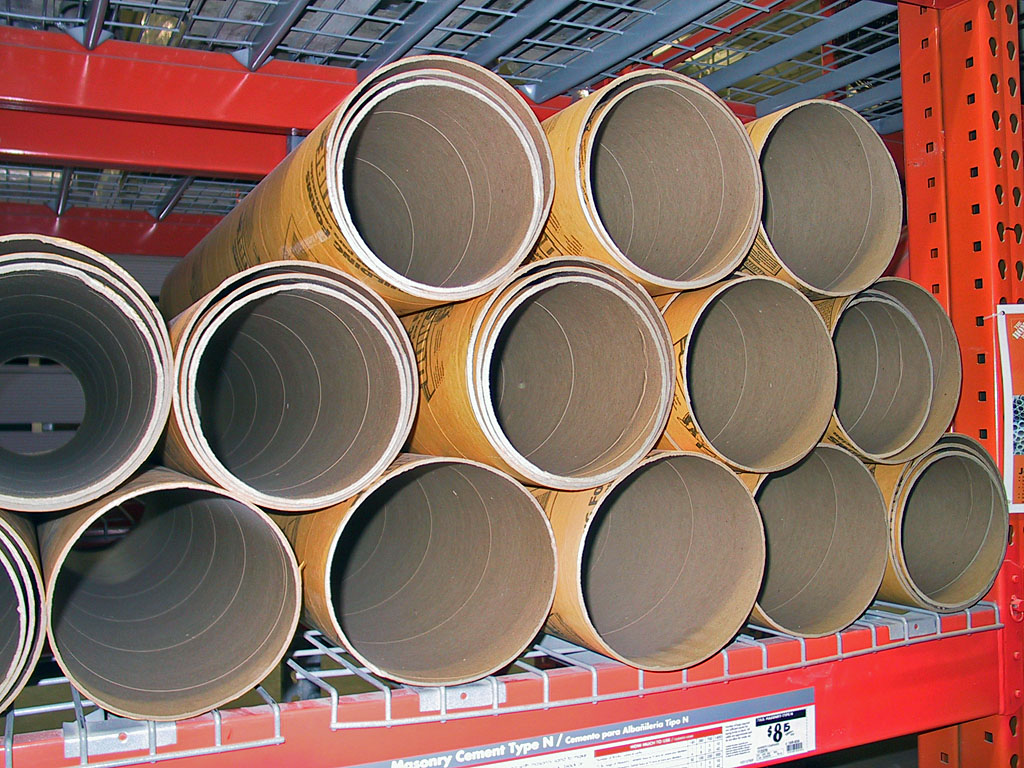
on display at a retailer.
Like diagonals, concrete form tubes only come in certain discrete sizes. The smallest commonly available diameter is ~8 inches, good for 6 inch mirrors. If you want to use a 4 inch mirror, you want 6 inch tube; 6 inch concrete forms are available, but are not as commonly stocked as larger sizes. You could also try to locate a suitable mailing tube (We have done this, but it was a challenge!). If you go to consumer outlets, like national home centers or large hardware stores or lumber yards, you may find a limited selection of tubes. For instance, Home Depot in Claremont, NH only carries 8 and 10 inch tubes in 4 foot lengths and 1/8 inch thickness. If you need a bigger diameter, longer length or thicker wall (1/4 inch would be best for heavier 10 and 12 inch mirrors) you would have to locate a dealer to the trade to find such tubes (Try Concrete Construction Forms & Accessories in the Yellow Pages). Also, realize that concrete form tubes specify nominal diameters, actual diameters may vary by almost an inch, as manufactures make a range of sizes so tubes can nest for shipping and storage.
For our telescope, we purchased a tube at a national home center a few months ago in anticipation of this project. The measured inside diameter is 8 inches and the tube thickness is 1/8 inch (which means our tube outside diameter is 8¼ inches).
Now Newt-Web needs to know the Focuser to Front of Tube and the Mirror Face to Back of Tube measurements. We would like the tube to extend some distance beyond the focuser to allow room for the spider, vane or stalk holding the diagonal to be mounted without projecting outside the tube, and the tube projection beyond the focuser will help shield the optics from stray light. But if the tube projects too far, it might cut-off some of a wide-field view.
Similarly, we need to allow room at the back of the telescope to mount the mirror cell without having it stick out beyond the end of the tube.
Both of these measurements are ones we will take an educated guess at, and then after looking at the results, we will go back and change them if necessary. You might look at one of the Newt examples closest to your desired scope, and use those numbers as a starting point.
For our telescope, we have chosen 4.5 inches for both measurements as a starting point.
We will not be using baffles in this design, so the check box for Fixed Diameter Baffles is not important to us (but you are welcome to add baffles on your own if you would like).
Finally we need to enter information about the focuser: Focuser Height, Spare Focuser In Travel, Additional Height For Camera and Focuser Diameter.
Focuser Design Considerations: Taller focusers are easier to make and generally have more total travel, but they require the light cone from the primary be bent further outside the tube, which could result in needing to increase your diagonal size. Lower profile focusers can help mitigate this, but usually cost more and have less total travel. You might want to skip ahead to the focuser page to see what types are available, and if you plan to buy a focuser, check out what is available through our Links Page under Focusers. We will show you how to build a simple friction focusers out of plumbing parts; the height on this should be a bit under 2 inches.
Standard eyepiece diameters are 1¼ and 2 inches. The 1¼ incher focusers have served well for years and few beginners have 2 inch diameter eyepieces, so this might be your first choice. A 2 inch diameter focuser has an important plus: its wider opening at its base is less likely to vignette the light cone coming from the mirror. Newt-Web will check for this problem, so feel free to start with a 1¼ inch model if that is what you would like. If you opt for the 2 inch focuser, you have both added clearance at the base and added flexibility should you acquire larger eyepieces in the future (almost all 2 inch focusers are provided with 1¼ inch adapters - check that the one you select has this included).
The Spare Focuser In Travel parameter allows for eyepiece focal planes that are above the barrel stop; ¼ to ½ inch is a good amount to allow here. There is only an informal standard that the focus point on eyepieces is coincident with the shoulder stop on the eyepiece barrel; many eyepieces vary from this. If the focus point on one of your eyepieces is above the shoulder stop, then you will need to rack the focuser in more to achieve focus with such an eyepiece; hence we allow a bit of extra in-travel to accommodate this. Even if you don't own such an eyepiece right now, you might might own one at some future time.
Additional Height For Camera is camera specific, and we are not building this scope for photography, so we will leave this at 0.
For our scope, we will use a 2 inch Crayford focuser with 2.52 inch height and 2 inch diameter; 0.25 inches of spare in travel and no additional height for a camera. Our focuser is a mid-priced model that retails for about $100 in 2010; we got a very good deal on it and paid considerably less than that - it's just too nice not to end up on this scope! You should expect to pay about $40 for a basic 2 inch focuser, and a bit less for a 1¼ inch model.
Enter all of your parameters into the Specifications tab. Now save your data on the File tab, so you don't have to re-enter it every time you use Newt-Web.
You may notice in the Newt-Web Status box there is some red text warning you of problems (or maybe your choice did not result in problems). Not to worry, we will review your design and tell you how to improve it in the next section, Checking & Correcting Your Design.
Previous: Newtonian
Introduction Next:
Checking & Correcting
Your Design
Back to the Build a Dobsonian Master
Index