|
||||
Measuring Sagitta (Depth of Curve)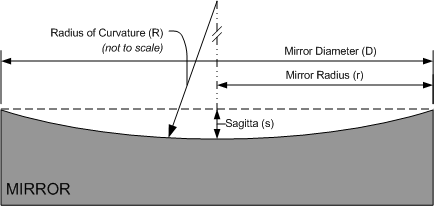
During grinding, the mirror is too rough to measure the focal length optically to any reasonable precision. Therefore, we take a mechanical measurement of the Sagitta, or Depth of Curve, and using some simple formulas calculate the focal length. This section will describe how to make this measurement accurately with simple tools. See the (greatly exaggerated) illustration at right for basic definitions. Don't confuse lower case r (mirror radius) with upper case R (Radius of Curvature) which is twice F (Focal Length). Calculating SagittaBefore you start grinding, you should have decided on your mirror's desired focal length. The two most common beginners' mirrors, the 6" f/8 and 8" f/6, both have 48" focal lengths. Use this formula to calculate your target sagitta: or use our Telescope Formula and Design Comparator to do the math for you. If you have measured a Sagitta and want to know the resulting focal length, use: or use our Sagitta to Focal Length Calculator to do the math for you. Note: The above formulas are for a parabolic curve but close
enough to the spherical solution to be used in making most amateur
mirrors. If you are making a very steep sphere, the formula s = R -
sqrt( R2 - r2 ) should be used Ruler & Feeler Gauge Method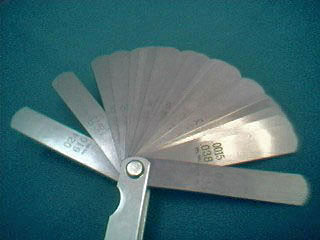 A Feeler Gauge with blades fanned out; Note markings in inches and millimeters. ToolsThe simplest and least expensive method to measure the sagitta requires two items: A straight edge and a feeler gauge. The Straight Edge needs to be a bit longer than your mirror diameter, and it is usually best if it is made metal -- I like to use a 12" stainless steel ruler (seen in photos below). A Feeler Gauge is set of stainless steel blades of various known thickness. By sliding these blades into a gap, you can "feel" when you have the exact thickness in the gap. The feeler gauge is often used in adjusting automobile engine valve clearances, and hence you should be able to find one at an automotive parts store. The one in the photo at right was bought for $5.00 in a general merchandise discount store. It has blades that range in thickness from 0.0015" thru 0.025", about 20 blades total. They can also be found larger home improvement centers and some hardware stores. Method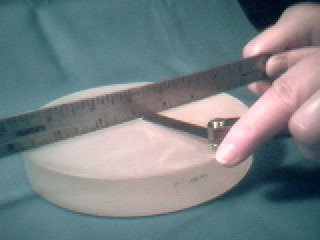 Measuring Sagitta with a Ruler &Feeler Gauge The ruler is held across a diameter of the mirror; The feeler gauge, with appropriate blades selected, tries to slip under the ruler at the center. Select a small set of blades that correspond to your target sagitta. For example, a 6" f/8 mirror has a target sagitta of 0.047". I would select the 0.024" and 0.023" which have a total thickness of 0.047" to measure this gap. Put the mirror face up on a table. Hold the steel rule vertically across a diameter of the mirror (i.e., make sure it passes over the center of the mirror). Now try to insert the selected feeler gauge blades under the ruler at the center. If they just fit with a very slight friction, you have exactly achieved your target sagitta. If they don't fit, you have more grinding to do. If they fit loosely, you have ground deeper than necessary, and you will have to make the curve shallower. Of course, if you want to measure you current sagitta, you can try various blade combinations until you get a snug fit. They you need only to add together the thickness of each blade to get the current sagitta. An older variant of this method uses drill bits instead of a feeler gauge. While this does with with some practice, it is harder to get a good reading, as the drill bits must be inserted at a slight angle under the ruler, and they generally people do not have as wide a selection of fractional sized drill bits as is needed. Given the fact that feeler gauges are fairly inespensive, I've recommend them over drill bits. Dial Indicator Method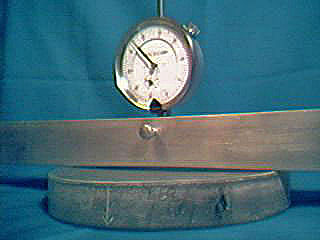 Using a Dial Indicator to measure Sagitta You can make a direct reading sagitta measuring tool out of a Dial Indicator and piece of bar stock. You might already have a dial indicator, or you might plan to buy one to use on our Foucault Tester (click on the dial indicator link for information on where to purchase one for about $10 to $15). You will also need a piece of solid bar stock. If you can't obtain locally, there are several firms that sell metal on the web (search for ASAP Source, Metal Source, Metal Mart, Online Metals, etc.). Pictured is a 1" x 1" x 12" piece of aluminum. At the midpoint of the bar, drill a hole to accept the shank of your dial indicator. Perpendicular to this, drill and thread a hole for a thumbscrew to hold the dial indicator shank firmly in the bar. After drilling, lap the bottom of the bar flat - I glued fine grit sandpaper to the cast iron table of a table saw. You might also want to scribe marks in the bar at common mirror diameters to aid in centering. To use, place the tool gently on a good, flat surface, and zero the indicator dial. I use another lapped piece of aluminum bar for this. Then center the tool on your mirror, and read the sagitta directly (be sure to use the correct scale - you are reading the scale that increases as the indicator extends). With a little care, this method is just as accurate as the feeler gauge method and more convenient due to the direct reading at any sagitta. |
||||
|
Back to the ATM Index Page |
||||