Make a Tile Tool
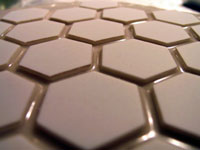 Close up of the business end
of a Tile Tool
A tile tool is less expensive than a glass tool (either Pyrex or plate), and because it is naturally
grooved, it works much faster than an un-grooved glass tool - many people find it works about twice as fast.
We use tile tools in all our mirror courses at Stellafane.
Alternative backing materials have been used - a concrete disk is shown at the bottom of this page. Two 3/4"
plywood disks, bonded together, can also be used. But for low cost, light weight and all around good durability,
Plaster of Paris can't be beat.
To make a tile tool, first you need to Make a Plaster Disk, and then
you epoxy tiles on to it. So follow the link to the plaster disk page, and then return here to make your tile
tool when you plaster disk is cured.
Making a Tile Tool
Using the plaster disk you made above, you will epoxy glue unglazed bathroom tiles to the face
of your disk. Do not cut tiles, you do not have to cover every square inch of the disk. Do not let tiles hang
over the edge of the disk. Leave sufficient gaps between tiles to be able to clean the grit out easily - at
least 3/16 of an inch.
Materials & Equipment:
- Plaster Disk (see Make a Plaster Disk)
Alternative: 1-1/2" waterproofed plywood disk (two 3/4" disks laminated together).
- Epoxy Glue (No Alternatives - you need epoxy's strength for this
job)
- 1" Bathroom Tiles, Solid Porcelain or Industrial Grade - Hex or Square
Alternative: Glazed tiles, but many have soft centers and wear through too quickly. If it's shiny on
the scuff surface but not on the bottom it's usually an indication that the center is soft. You can tell
real fast by scraping the bottom with you finger nail and if it scratches, it's not the best for this purpose.
You should be able to find appropriate tiles locally at your home center or tile
store. One-inch unglazed hex tiles can be mail ordered from Willmann-Bell,
P.O. Box 35025, Richmond, VA 23235 in one square foot lots. (Catalog item only, not on their web site).
- Cardboard* (to mix epoxy on)
- Mixing Stick*
- 1" Disposable Brush* (to apply epoxy)
- Level Work Surface in a room-temperature work environment.
*Items that are suggested to be disposable, single use items.
Procedure:
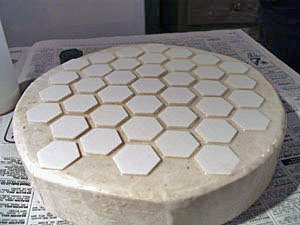
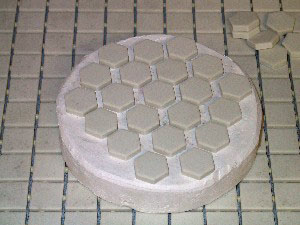 Hex Tiles laid out on a 6" Plaster Disk. The disk rests on a sheet of
1" square tiles, which can be used instead of hex tiles.
Hex Tiles laid out on a 6" Plaster Disk. The disk rests on a sheet of
1" square tiles, which can be used instead of hex tiles.
1. Lay Out the tiles on your disk
DO NOT CENTER! Offset the pattern so it is not symmetric. Make a few pencil marks so you
know how to put them back on. Remove tiles from disk.
There is no need to cut tiles to fill up all the space. Some open areas at the edge are fine. Cover as
much area as you can with whole tiles.
2. Mix the epoxy glue. If you have quick setting epoxy, only mix what you can use quickly.
3. Brush the epoxy onto disk. This first coat will soak in. The epoxy is being used to waterproof
the front of the tool, so make sure the entire surface is covered, and overlap it onto the waterproofing
at the edges.
4. Curing: Let the first coat of epoxy cure. This can be a few hours (quick setting) or over night
(slow setting).
5. Examine the disk. You might need to apply a second waterproofing coat. Do so now, if necessary,
and let it cure.
6. Mix the epoxy glue that will be used to attach the tiles. If you have quick setting epoxy,
only mix what you can use quickly.
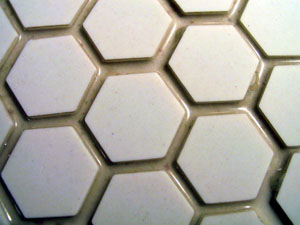 Epoxy partially fills the gaps between tiles.
7. Glue the Tiles on the disk. Use your alignment marks. Work the tiles into
the epoxy by wiggling them about, and seat each one so it is flat. It is good to have applied enough epoxy
so that there is slight filling of the channels, and some epoxy along the lower tile sides (See
photo at right). Pay attention to spacing. Cover the entire surface with whole tiles. Don't cut
tiles, and don't let tiles hang off the edge. Don't worry if some epoxy gets on the surface of the tiles
- it will grind right off.
If you are using tiles that come arranged and spaced in a single sheet, brush epoxy onto the back of
the tiles and the surface of the disk, and press the tiles flat everywhere. While the spaced
single sheet is a great convenience, getting good adhesion with these is more difficult.
8. Curing: Cure on a flat, level surface. Tiles may slide out of position if not level.
9. Examine: When cured, examine the tool. Make sure it is fully waterproofed, and make sure all
tiles are flat and firmly attached.
Congratulations - you now have a durable Tile Tool to grind your mirror with!
The tile tool to the left has been used to grind through 12 micron grit. Note how thin the
tiles are at the edge.
Maintenance / Problems
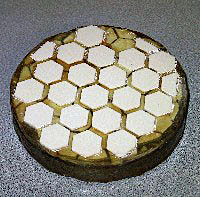 This tool is using a concrete disk as a substrate, hence the dark gray color.
The well used tile tool at right illustrates a couple of maintenance issues.
1. Tiles Grind Away: You may grind through your tiles at the edge, especially if you are making a
very fast (low focal ratio) mirror. In that case, you can epoxy a second layer of tiles on over the first. This
was done with the tool shown at left.
2. Tiles Come Off: You can see a tile has come off near the top of this tool. In general, if you lose
one or two tiles, it is best to just leave them off and keep working. If you try to epoxy them back on, they
will likely sit high, and your will have to grind them back down, with a good chance you will grind an undesirable
figure in your mirror. If a lot of tiles come off, due to poor construction of your tool, it would probably
be best to make a new tool. If you have ground a reasonable curve in your mirror, pour the new plaster disk
against that curve, so that the new tool will be closer to mating with the mirror.
|