This page will provide a quick reference guide to common mirror making strokes. We aim to provide
text, diagrams and a short video of each stroke, explaining when it is used and showing how to do it.
The videos on this page are of file type .WMV for use with Windows Media Player. The are generally 0.75 to
1.0 MB in size, so they may take a long time to download on a slow link. They are approximately 30 seconds long,
and are intended to illustrate the proper execution of each stroke.
Index to Strokes
The first three strokes are the basic ones used to produce a mirror, while the last four
are used in figuring to correct errors:
There are many other strokes that can be used to correct other figuring problems or that are alternatives
to the strokes we present here. Please refer to books in our bibliography
for additional information, particularly [Berry94],
[Brown96] and [Texereau84].
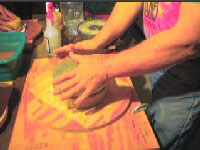
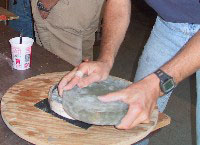
The Chordal Stroke
USE: Used at the beginning of rough grinding to initially "hog out" a lot of glass and generate the
initial curve in the glass.
MIRROR POSITION: Mirror on Top, Tool on Bottom
ABRASIVE: Your coarsest grit (usually #60 or #80)
PRESSURE: Firm downward pressure will result in short wets and faster glass removal.
DESCRIPTION:
With mirror on top, overhang mirror about 40% of its diameter over the tool, so that most of the grinding
action is concentrated on the center of the mirror and the edge of the tool. Take straight strokes such
that the center of the mirror travels along an imaginary chord1 on the tool (The red arrow in
the diagram). This stroke will rapidly remove glass from the center of the mirror. After 5 to 10 chordal
strokes, rotate the mirror and the tool in opposite directions a random amount, and repeat.
As a depression begins to develop in the center of your mirror (check with a straight edge after 15 to
20 minutes of work), reduce the overhang amount. Now you will be taking longer strokes, as the chord has
moved inward towards the center of the tool. The effect of this reduction in overhang is to grind more of
the mirror surface and tool surface, and spread the depression over more of the mirror surface. You may
find your progress seems to slow as you do this, but this is because you are grinding a large surface, and
therefore removing more glass which takes longer.
Continue to examine and measure your mirror, and continue to reduce the amount of overhang so that the
depression in the mirror finally spreads to its edge. When this happens, you need to change to a 0% overhang
stroke, the Normal Stroke.
1Chord: A line segment that joins two points on a curve.
DIAGRAM:
Click
Picture at right to View Diagram
Illustrates initial chordal stroke with maximum overhang of 40%.
Gradually reduce overhang as curve develops to spread curve to edge.
In the diagram, the red arrow would move to the right (towards the center of the tool) and grow longer to
keep in contact with the tool edge.
VIDEO:
Click
Picture at right to Play Video
Format: Windows Media Player Format (WMV) Size: 859 kB Length: 30
Seconds Please ignore the background chatter; this was recorded in the busy and crowded Stellafane Mirror
Workshop - but please listen to and appreciate the grinding noise.
Proper use of this stroke creates and maintains (a section of) a spherical surface
on your mirror.
MIRROR POSITION:
Mirror my be on Top or Bottom. Alternate regularly to maintain Radius of Curvature
(RoC).
Put Mirror on Top to Deepen Curve and Shorten RoC.
Put Tool on Top to Flatten Curve and Increase RoC.
ABRASIVE: Used with all grit sizes, and in polishing and figuring with a Pitch Lap and Polishing Compound
(usually Cerium Oxide. Well thinned CeO seems to work better and faster than thick CeO.)
PRESSURE: With coarse grits, firm downward pressure will speed glass removal. Less pressure is called
for with finer grits. Polishing calls for slow, steady strokes and moderate downward pressure will speed results.
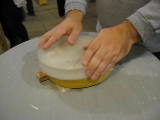
DESCRIPTION:
(Written from the perspective of Mirror on Top. Just reverse Mirror and Tool in the description below
if you are working with Tool on Top) Carefully place the mirror on the tool so they are concentric.
Pull the mirror straight back towards you until it is overhanging 1/6 of the mirror diameter. Then push
straight forward, passing the center of the mirror directly over the center of the tool, until the mirror
is overhanging 1/6 diameter on the far side. Continue pushing to and fro, with a 1/6 overhang at each extreme
for 5 to 10 strokes. Then rotate the mirror and tool in opposite directions a random amount, and repeat.
A common error for beginners is to overhang 1/3 at each extreme, resulting in a 2/3 diameter stroke.
This will deepen the center of the mirror, and will not maintain the Radius of Curvature.
In order to maintain your desired Radius of Curvature, you should use this stroke with equal amounts
of work with Mirror on Top and Tool on Top, reversing every few wets. If you are drifting away from your
desired Radius of Curvature, you can correct small deviations by doing more work in one position over the
other:
Use Mirror on Top to deepen the sagitta and shorten the RoC and Focal Length.
Use Tool on Top to flatten the mirror and lengthen the RoC and Focal Length.
DIAGRAM
Click Picture at right to View Diagram
Illustrates the normal stroke.
The red arrow indicates the path of the mirror center, which passes directly over the tool center. The total
stroke length is 1/3 of the mirror diameter, which indicates a 1/6 diameter mirror overhang on either side
at the beginning and end of the stroke.
VIDEO:
Click Picture at right to Play Video Format: Windows Media Player Format (AVI) Size: 42.8 mb Length:
30 Seconds Recorded at the Stellafane Mirror Workshop - No Audio - Using
very fine grit (Aluminum Oxide) but the same stroke, albiet with
more effort and therefgore a slower pace, is used for rough
grinding and polishing.
This is an 8" mirror, so the
stroke overhang is about 1.3" on each side for a 2.6" stroke
length. The end of the video moves to an overhead view and you
can see this stroke length quite well through the narly
transparent mirror.
The W Stroke
USE: Used to parabolize a mirror when figuring. Note that some people use a slight W movement when
grinding and polishing, augmenting the normal stroke which we do not recommend
or describe; here we are describing a wide W stroke used for parabolization.
MIRROR POSITION: Mirror on Top, Tool on Bottom
ABRASIVE: Use with polishing compound (usually Cerium Oxide) and a Pitch Lap Tool
PRESSURE: Light - with good contact between lap and mirror, no additional downward force is necessary.
DESCRIPTION:
The W Stroke is just what it sounds like, the center of the mirror traces a broad, wide W pattern over
the face of the tool. The normal stroke amplitude is 3/4 mirror diameter - that means the mirror center
comes to within 1/8 diameter of the tool edge on all sides. In the diagram, you can see the imaginary dotted-line
ring drawn at 3/4 diameter - the spacing from the tool edge is uniformly 1/8 diameter.
For a 6" or 8" mirror, the 7 segment W as shown is just about right. Use proportionally more segments
for bigger mirrors. Work to keep the spread (right-to-left motion in the diagram) even, so that the edge
and center deepen the same amount.
On a small mirror, this stroke can work fast. Berry in [Berry94]
claims a mere 72 strokes with CeO will fully parabolize a 6" f/8 mirror. So take it easy, and test often.
Better to under-correct, and do a few more W strokes, than to over-correct and have to flatten back out
form a hyperbola.
DIAGRAM:
Click Picture at right to View Diagram
Illustrates the normal W-Stroke, which evenly deepens the center and edge.
VIDEO:
Click Picture at right to Play Video Format: Windows Media Player Format (WMV) Size: 378 kB Length: 30
Seconds Please ignore the background chatter; this was recorded in the busy and crowded Stellafane Mirror
Workshop.
The W Center Deepening Stroke
USE: Used to parabolize a mirror when figuring, after testing shows the center needs deepening more
than the edge.
MIRROR POSITION: Mirror on Top, Tool on Bottom
ABRASIVE: Use with polishing compound (usually Cerium Oxide) and a Pitch Lap Tool
PRESSURE: Light - with good contact between lap and mirror, no additional downward force is necessary.
DESCRIPTION:
Very much like the W Stroke except there are additional strokes when the
mirror center is near the tool edge at both extremes. This causes the mirror center to wear more than the
mirror edge, deepening it.
DIAGRAM:
Click Picture at right to View Diagram
Illustrates the W Center Deepening Stroke, which deepens the center more than the edge.
VIDEO:
Click Picture at right to Play Video Format: Windows Media Player Format (WMV) Size: 343 kB Length: 27
Seconds Please ignore the background chatter; this was recorded in the busy and crowded Stellafane Mirror Workshop.
The W Edge Deepening Stroke
USE: Used to parabolize a mirror when figuring, after testing shows the edge needs deepening more
than the center.
MIRROR POSITION: Mirror on Top, Tool on Bottom
ABRASIVE: Use with polishing compound (usually Cerium Oxide) and a Pitch Lap Tool
PRESSURE: Light - with good contact between lap and mirror, no additional downward force is necessary.
DESCRIPTION:
Very much like the W Stroke except there are additional strokes when the
mirror center is near the tool center. This causes the mirror edge to wear more than the mirror center,
deepening it.
DIAGRAM:
Click Picture at right to View Diagram
Illustrates the W Edge Deepening Stroke, which deepens the edge more than the center.
VIDEO:
Click Picture at right to Play Video Format: Windows Media Player Format (WMV) Size: 364 kB Length: 29
Seconds Please ignore the background chatter; this was recorded in the busy and crowded Stellafane Mirror
Workshop.
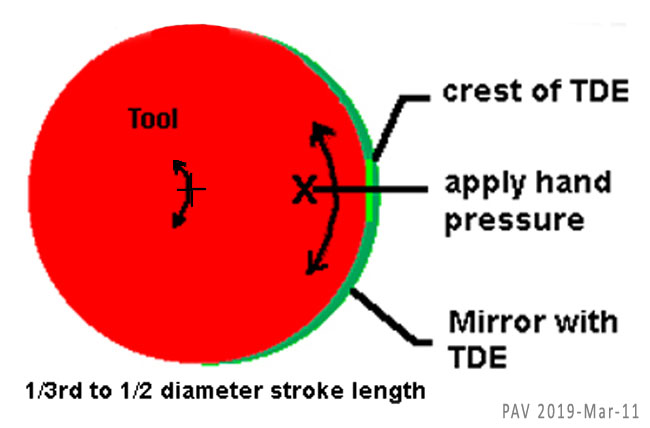
Edge-Pressure Chordal Stroke
USE: Correct Turned Down Edge (TDE)
MIRROR POSITION: Tool on Top
ABRASIVE: Use with polishing compound (usually Cerium Oxide) and a Pitch Lap Tool
PRESSURE: Hand pressure of edge of tool which is over TDE area.
DESCRIPTION:
This method of reducing Turned-Down Edge is attributed to Dave Kelly, a long time ST member and Stellafane Mirror Class instructor.
Make 8 to 10 arc-shaped strokes, 1/3 to 1/2 diameter in length, putting accented hand pressure at the 'Break' or 'Crest' of the TDE. Then rotate the
mirror 20 to 30 degrees
or walk around the barrel. Repeat 15-20 minute polishing spells with intermittent tool rotation. Test to monitor progress.
DIAGRAM:
1/4 Center-Over-Center Stroke
USE: Correct Turned Down Edge (TDE)
MIRROR POSITION: Mirror on Top
ABRASIVE: Use with polishing compound (usually Cerium Oxide) and a Pitch Lap Tool
PRESSURE: Light - with good contact between lap and mirror, no additional downward force is necessary.
DESCRIPTION:
This is just a short-stroke version of the Normal Stroke. The short,
1/4-diameter strokes tend to work more on the mirror center. Deepening the center, and spreading this deeper
curve to the edge while avoiding edge wear should bring the whole mirror to a nice sphere without TDE.
DIAGRAM:
Not provided. See diagram for the Normal Stroke, but make total stroke
1/4-diameter, with overhang on each side 1/8-diameter.
1/2 Center-Over-Center Stroke
USE: Correct Turned Up Edge (TUE)
MIRROR POSITION: Mirror on Top
ABRASIVE: Use with polishing compound (usually Cerium Oxide) and a Pitch Lap Tool
PRESSURE: Light - with good contact between lap and mirror, no additional downward force is necessary.
DESCRIPTION:
This is just a long-stroke version of the Normal Stroke. The long, 1/2-diameter
strokes tend to work more on the mirror edge. This stroke works very quickly, test often! It is far more
work to correct the Turned Down Edge you may get if your overshoot with this stroke. You can moderate the
effect of this stroke by not going the full 1/2-Diameter, but you need
to stroke more than the 1/3-diameter
used by the normal stroke to get the desired effect.
DIAGRAM:
Not provided. See diagram for the Normal Stroke, but make total stroke
1/2-diameter, with overhang on each side 1/4-diameter.
 Click
Click
 Click
Click