Pouring a Pitch Lap
A pitch lap is used to polish and figure your mirror. It is used with a polishing abrasive such
as Cerium Oxide.
Traditionally, the lap is poured on the tool used to grind the mirror. But this means the that tool is no
longer available should you need to return to fine grinding due to a scratch or other problem. Since plaster
disks are so simple and inexpensive to make, most people today pour their lap on a separate disk.
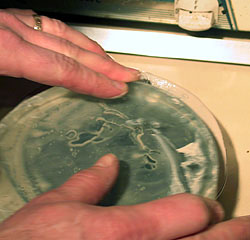
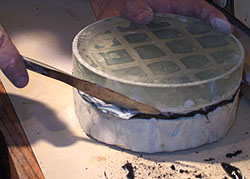
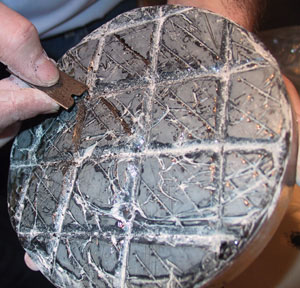 Close up of the business end of a Pitch Lap.
Diagonal facets are being cut into the face.
To make a pitch lap, first Make a Plaster Disk
using your partially or fully ground mirror as a mold. Since the plaster can take some time to cure, a good
time to make the curved disk is when you finish with #220 grit. So follow the link to the plaster disk page,
and then return here to make your pitch lap.
Removing an Old Lap from a Tool
If you need to remove an old lap from a tool, place it in the freezer overnight. You may than use a wooden
or metal rod to strike the frozen pitch, which will shatter and fall off in large pieces. Use an old putty
knife to scrape the remaining pieces off the tool. You do not need to remove every last piece of pitch,
a thin layer of old pitch will help a new lap stick to the tool. This is messy a job, do it outside and/or
work inside a trash barrel or large plastic bag.
Cautions & Warnings
FIRE HAZARD: Pitch is flammable. Do not heat on or near an
open flame. Have a fire extinguisher available.
FUME HAZARD: Heating pitch will produce noxious fumes. Work
in a well ventilated area.
BURN HAZARD: Hot pitch can produce serious burns. It can stick
to your skin. Wear protective clothing and work carefully and safely.
Making a Pitch Lap
Using a plaster disk molded on your ground mirror, you will pour heated pitch to form a layer
1/4 to 1/2 inch thick. As it cools, you press it against your mirror so the pitch conforms to the mirror's curve.
You will then press or cut channels into the pitch, press again, and trim the excess pitch off the edges.
Materials & Equipment:
- Plaster Disk: Alternative: Tile or Glass Tool you used for
grinding this mirror.
- Pitch: You need about 0.5 kg or 16 oz for a 6" or 8" lap. Use Gugolz 64 or Tempered Burgundy
for working at room temperature. See our Grit, Polish & Pitch
page for more information.
- Pitch Pot*: Something to melt the pitch in and pour it from. Many people use coffee cans, or
buy a very inexpensive pot at a yard sale or dollar store. A double boiler arrangement works well, and prevents
overheating the pitch; you can stand a coffee can on a metal ring made from a cat food can in a pot of water.
- Hot Plate or Electric Stove: To melt the pitch. (Fire hazard - do not use
an open flame burner)
- Mixing Spoon or Stick*: To stir the pitch, smooth it when poured and pop any bubbles.
- Liquid Cerium Oxide: Used as a release agent, so the mirror will not stick to the pitch when
pressing.
- 2" Wide Masking Tape: Used to make a dam around the plaster disk.
- Razor Blade or Utility Knife: Used to trim the lap, and clean up the channels.
- Channeling Tool: Used to press channels into the soft pitch. 3/8" Wood Dowel, 1/2 Aluminum Angle
or Thick Metal Bar will all work.
- Level Work Surface in a room-temperature work environment. Cover it with newspaper or a drop
cloth.
*Items that are suggested to be disposable, single use items, or items
that will be dedicated to this job.
Procedure:
|
1. Clean: Make sure your plaster disk is clean and dry. If you are using a glass substrate
or tile tool, clean the surface with turpentine.
|
| 2. Build a Dam: Using 2" wide masking tape, build a dam at least 3/4" high around
the edge of the disk to hold the pitch in when you pour it.
Leave a tab at the end by to facilitate later removal.
|
 |
| 3. Load Pitch: Load pitch into your pitch pot. The easiest way to remove pitch
from its container is to shatter it into little bits with a hammer. |
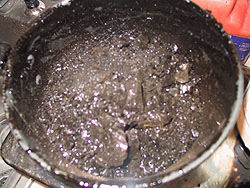 |
This photo shows
shattered pitch,
large and small chunks,
in the pitch pot
before melting. |
| 4. Warm Mirror: Place your mirror in warm water or under a heat lamp or a warm
oven to warm it up. You don't want the warm pitch to be rapidly cooled by a cold mirror when pressing.
A plate glass mirror could shatter from thermal shock when it is pressed into hot pitch (Pyrex mirrors,
like Pyrex cookware, handle thermal shock without problems).
|
 |
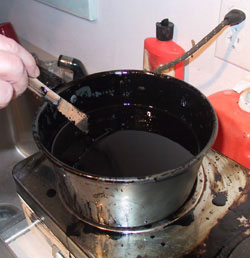
| 5. Melt Pitch: Melt the pitch slowly on low heat - don't let it boil. You want
to keep the volatiles in it, so it won't get too hard. Stir occasionally. Heat it just enough to be
able to pour it.
See Cautions and Warnings above!
|
 |
| 6. Pour the pitch onto the tool. Pour to a depth of about 1/2" (this will press
down to be thinner when done). |
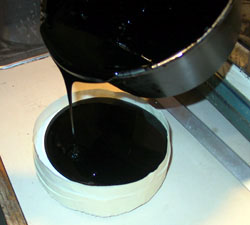 |
| 7. Stir & Mound: Stir the pitch slowly to remove trapped air bubbles and allow
it to cool uniformly. Try to make a small mound at center (so that when you press, the air will be forced
outward from the center). Be patient, let it cool slowly, and continue on only when the mound is firm
enough to not flow quickly away. |
 |
Work quickly on these next steps,
you must not let the pitch cool down before you are done. |
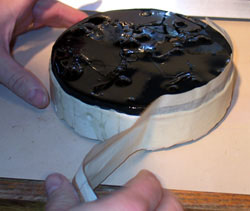
| 8. Remove the Dam: Using short, sharp tugs, pull the masking tape
dam off the tool. If you pull slowly, the pitch will be stretch out like taffy. |
 |
| 9. Coat your warm mirror with a thick layer of Cerium Oxide, so
the mirror will not stick to the pitch. |
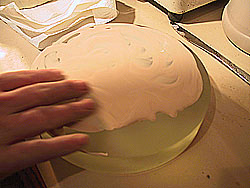 |
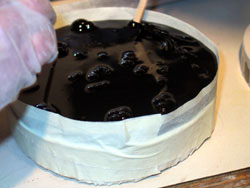
| 10. Press the mirror onto the pitch, flattening out the mound and
pushing any air bubbles out the sides. Wiggle the mirror and press some more, until all the pitch is
in contact with all the mirror, and the pitch is uniformly about 3/8" thick. |
 |
11. Channel: Press your channeling tool into the pitch, making squares
about 1 to 1.5 inches square. Do not center the squares or channels - a little randomness is good.
Optionally, you can choose to channel with a heated lap
cutter, which melts the pitch away. See an example of this
on Electric
Channel Cutter on our Lap Maintenance page. |
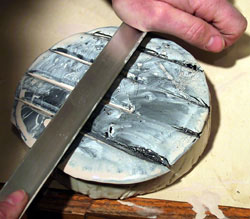 |
Using an aluminum angle
to make "Vee" channels. |
| 12. Press again, to get the squares in good contact. Rotate the
mirror, take a few short stokes, press, rotate, stroke, press.
Don't press the lap too thin, or close up all the channels. Look through the back of the mirror,
and make sure all the squares are in good contact with the glass.
|
 |
|
Relax now, you can let things cool down, you are almost done. |
| 13. Trim the Edge: Trim the excess from the edges with a knife
or razor. If the pitch has cooled, it will be quite brittle, and with the mirror on top you can just
knock it off with a knife.
Then, remove the mirror, and bevel the lap edge inwards at a 45 angle. The lap should always be slightly
smaller than the mirror, so that when you press, the lap will not grow a "turned up edge".
|
 |
| 14. Trim the Channels: Open the channels back up if necessary with
a knife or razor blade. This is messy work - many people like to do this underwater to contain the pitch
particles. |
|
| 15. Facet: Use your razor blade or knife to make little facets
in the face of each square.
An alternative to making facets with a razor blade is to "Micro-Facet" by pressing a plastic mesh
bag, such as is used to for onions or potatoes, between the lap and mirror when hot or warn pressing.
|
| Most of the pictures above are from a single 6" lap;
however there are few from an 8" we did the same day, and the last photo is of a totally different lap. |
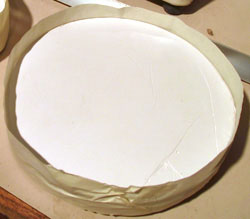
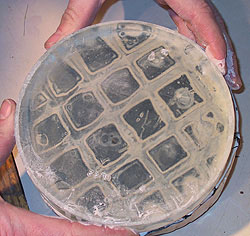
 A finished lap seen through its mirror.
Congratulations - you now have a Pitch Lap to Polish and figure your mirror with!
See How to Store Your Lap
on the
Lap Maintenance page.
|