Mirror Quality
or How Good is Good Enough?
By the time you are reading this page, you have probably polished out
or are close to it, and are beginning to read about the final steps of figuring. You
have been working on your mirror for quite a while now, and are anxious to finish it
and get it in a telescope. This is a good time to stop and think about the quality
level you want in your mirror. In general, given the investment of your time and
energy in making a mirror, you want it to be of good quality so that you can use it
for many years and be pleased with the images it produces. On this page, we will
discuss three key items that determine the overall usability of your mirror - often
only the last topic is considered, but the first two have a major impact on the
overall quality.
Polish Quality

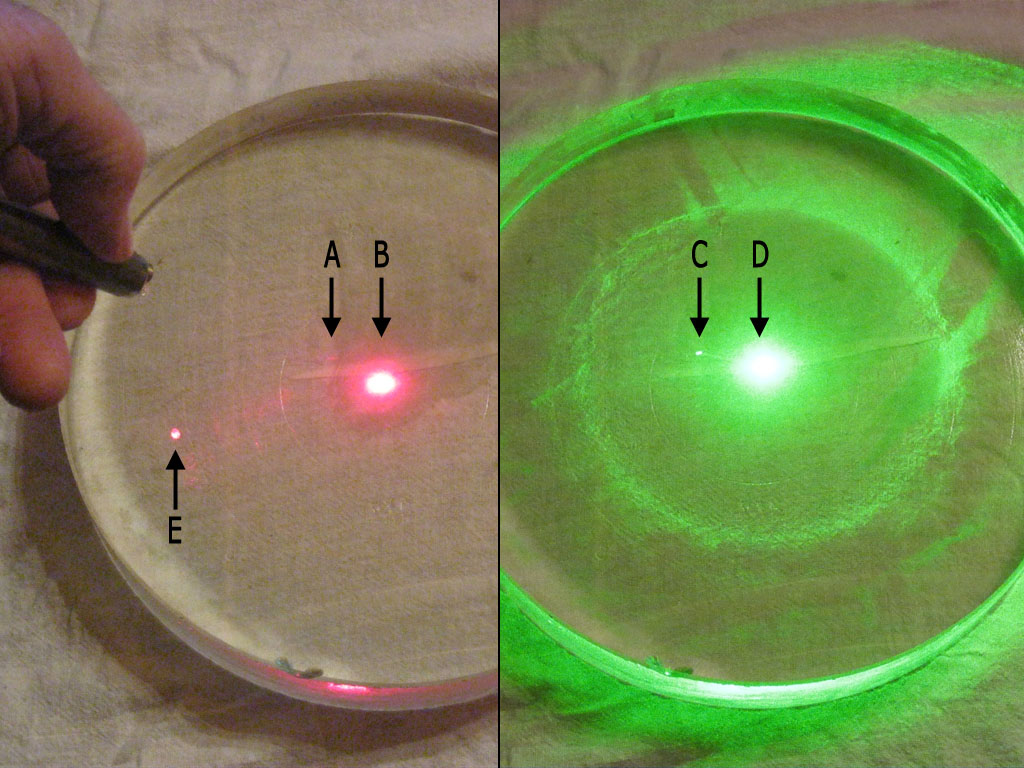
This is a well polished mirror, and front surface
laser reflections should not be visible.
Red Laser:
[A] Front surface reflection, captured by camera, not visible to unaided eye;
[B] Back Surface Reflection;
[E] Spurious image of laser aperture not typically seen.
Green Laser (painful to look at - too bright!)
[C] Front surface reflection, very visible to unaided eye;
[D] Back Surface Reflection causes entire mirror to 'glow'.
Don't use a Green Laser for the Polish Test (click for details)
We cover this issue in a section on another page:
When is my Mirror Polished Out?
There we state "Do not settle for anything less than a complete polish. An
unpolished surface is a rough surface, and your not fully polished mirror will
scatter light and be poor performer in a telescope. This is one area where you do
not want to compromise: accept nothing less than a complete polish."
We stand by this advise. Be aware that many mirror coaters will
refuse to coat a mirror that is not fully polished - they know such a mirror will
not be useful. Perhaps an analogy is in order: Standard window glass can produce a
reflection from its polished surface (works best when the far side is dark and you
see reflections of a lighted room); But frosted or ground glass, which is similar to
a not fully polished mirror, produces at best only diffuse blurs.
In recent years, green laser 'star pointers' have become widely
available. Some mirror makers have attempted to use them for the "Polished Out' test
(no front surface reflection when the mirror is polished out). But these green
lasers are too powerful, and besides being painful to use for the test, they always
produce a visible front surface reflection (see photo). So the laser polish test is
still the best available - but you must use a 'low power' red laser pointer for it
to work.
The bottom line for Polish Quality is that nothing less than a completer
polish is acceptable - anything else just won't work.
Surface Quality
Heading text
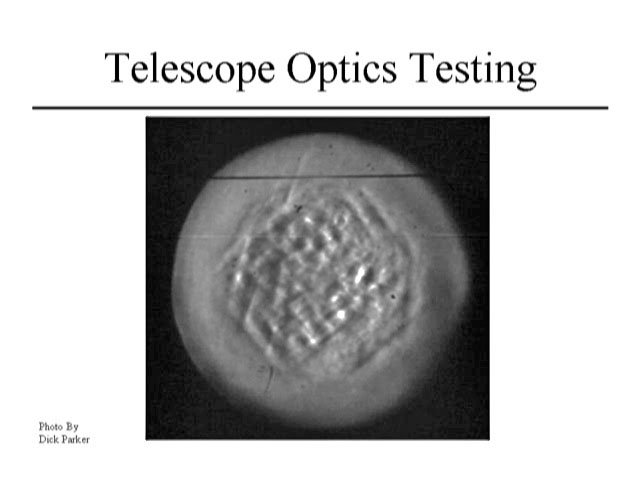
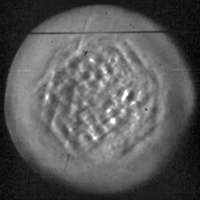
The outer ring of this mirror is smooth (with a scratch or two) while the central portion of this mirror shows severe
roughness under the knife-edge test. The horizontal black line is a mirror
retainer. (From the video Telescope Optics Testing)
Central Zone: Very Rough
While polish is a microscopic quality of the glass, Surface Quality
is a macroscopic feature - it can be seen quite clearly in the knife edge test. The
photo at right shows both the expected smooth surface around the outside edge, and a
horribly rough central area.
A rough surface scatters light in unpredictable ways, significantly softening the image and reducing contrast (because light is being
scattered into what should be the dark areas). Worse yet, all of what we tell you in
the next section on Figure Quality is predicated on having a smooth surface with no
sharp transitions. There is no easy way for an amateur to measure the figure quality
of rough surfaced mirror, but then there is no need, as you should be able to fix
this defect without much difficulty, once you recognize it is a problem.
A rough surface is usually caused by (1) a hard lap; (2) insufficient
contact; or (3) polishing too fast. All 3 items result in the lap 'skipping' across
the mirror surface creating a 'washboard' effect like cars on a dirt road. If your
lap is too hard, work in a warmer area or make a new lap suitable for the
temperature you are working at. If you have poor contact,
hot or warm press more often. And keep your polishing strokes slow and steady,
unlike grinding fast strokes can be harmful.
Scratches & Chips are surface quality issues too. A few
scratches or a couple of edge chips, while not aesthetically pleasing, are actually
not a big problem - the surface area they cover is quite small and will have little
impact on your overall mirror performance. If your chips get coated with aluminum,
you might want to darken them with some black paint; just ignore the scratches. Also
remember anything directly shadowed by the diagonal mirror in the center of the
primary will not impact your telescope's performance.
Figure Quality
 Validating Your Mirror Quality Part I
WMV Format 51:25 165 MB
 Validating Your Mirror Quality Part II
WMV Format 53:50 176 MB
When most people talk about mirror quality, they are talking about
Figure Quality - how close to the ideal parabolic shape is the mirror? This is an
extremely complex subject, and entire books have been written on it. In this section
we will provide the basic information and advice the beginning amateur needs to end
up with high quality mirror. If you want additional information, we provide the two
excellent videos at right, (the second being
more advanced than the first). The complexity and level of math used change from
section to section in the video, if a topic is more complex than you can comprehend
don't stop watching, the next section may in fact be easier to comprehend.
Your mirror will be part of an optical system that includes your
telescope, eyepiece and your eyes. Each element of this optical system will
contribute errors, as no optical system can be perfect. Concentrating on the
telescope, both the primary and secondary (diagonal) mirrors, and their collimation
(alignment) will contribute to the aggregate errors of the telescope. See
here for a discussion of necessary
diagonal quality and here for
collimation instructions.
The widely accepted minimum quality criteria for a telescope is the
Raleigh Criteria, which requires smooth optics and no more than ¼-wave
Peak-to-Valley error on the wave front. This would be a very nice telescope,
although better can, and regularly are made. Due to the limits of human vision, most
people can detect no further improvement after 1/10-wave P-V on the wave front is
achieved, and it is likely impossible for anyone, no matter how good their vision,
to detect improvements beyond 1/16-wave.
You should work to make a mirror that is a bit better than 1/4-wave
P-V on the wave front, to allow a bit of margin for system errors (diagonal,
collimation). You will have a fine telescope if you achieve or exceed these error
ratings.
The Foucault, or knife-edge, test measures Peak-to-Valley errors on
the wave front, after the knife-edge readings are suitably processed - as we have
mentioned elsewhere, free programs like FigureXP do this for you with minimal effort
(see here). You should understand that your mirror will
have a surface accuracy of twice this rating; i.e. a mirror that produces a
¼-wave P-V on the wave front has a surface accuracy that is 1/8-wave P-V.
Also, we repeat that these criteria are only valid for smooth optics, with no
significant zones: holes, hills, rings or turned edges. If your mirror has such
defects, it is hard for an amateur to take enough measurements to characterize the
overall wave rating - it is best to work on fixing these defects.
Do
not be concerned at this time with other quality measures such as RMS Wave Front
error or Strehl Ratios - these require significantly more measurements than you can
possibly make to be meaningful (See Video Part II for an explanation of this).
Mirrors that are worse than the ¼-wave criteria will be
noticeably 'soft' - they will not be able to focus crisply, and the images will be
dimmer. That is because they will have enough spherical aberration so that many of
the light rays will not focus at single point, and much of the collected light will
be spread out of the focus area. While they may form an image, detail and contrast
will be lacking.
|