
Checking & Correcting Your Design
At this point you should have entered an initial design into Newt-Web. On this page will will describe common problems that Newt-Web may flag and approaches to fixing them.
General Remarks: Dale Keller provides some excellent advice in in the help file supplied with NEWT 2.5, we have kept this in Newt-Web as the Newtonian Telescope Design Help page - we suggest you read it, it is not that long and quite informative.
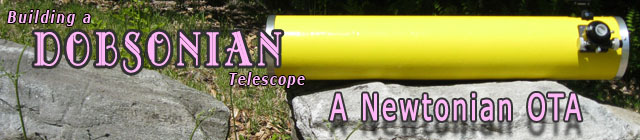
You need to understand that your telescope has a field of view, and in order to cover this field of view light rays must enter the tube not only straight on but at a slight angle to cover the field. Many problems that occur in Newtonian design involve these off-axis rays. In Newt-Web, the green lines represent the on-axis (straight in) rays. The red rays represent those off-axis rays that define the edge of the 100% illuminated eyepiece field, while the yellow rays have the most angle and define the edge of the 75% illuminated eyepiece field. You want all these rays to reach the eyepiece without missing the diagonal mirror (and shooting right back out of the tube, unused) or colliding with an obstacle and failing to reach the eyepiece (vignetting).
Eyepiece illumination is a complicated topic. The basic thing you need to understand is that the 100% illuminated field, which is the brightest, central part of the image, does not fill the entire eyepiece in most telescopes. The higher the focal ratio of the mirror, the wider the field of view of the telescope, and the smaller the 100% illumination area will be. Increasing the size of the diagonal mirror generally will increase the size of the fully illuminated area, but at the cost of casting a bigger shadow on the primary, effectively reducing its size. Most people choose the smallest diagonal they can get away with, but that is not always the best choice, you need to balance the 100% illuminated area size against the diagonal size. Newt-Web offers some very good guidelines for doing this in the Diagonal Sizing Assistance box on the Specifications tab.

The 100% illumining rays represent the brightest central region of the view in your eyepiece, while the 75% rays comprise a slightly dimmer outer ring of the field of view. You eye will probably not notice the difference in brightness as long as it falls off smoothly. If the 75% rays are vignetted, then you may get a sharp and noticeable drop off in illumination, and you are wasting light collected by your primary mirror. So pay attention to the vignette warnings, and work to fix them.
Diagonal too small to admit 100% ray: This is a very serious problem. You have selected a diagonal that is just to small to handle the light cone of this primary mirror. To solve this problem, select a larger size diagonal mirror.
Vignetting of 75% ray at front aperture: The front of your tube is clipping the wide field view. Either your tube needs to be of a larger diameter, or your need to shorten the "Focuser to Front of Tube" dimension. If you followed our guideline of making the tube 2 inched larger in diameter than your primary mirror, you will likely not see this problem. However, if you entered a very large value for the "Focuser to Front of Tube" dimension, the extended tube "nose" might be long enough to to block the wide field rays. Try shortening it, but remember to leave enough room for the spider not to hang out of the tube.
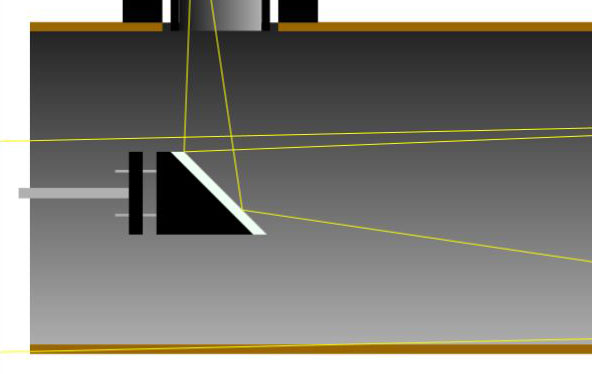
Vignetting at Focuser of 100% or 75% ray: This is a common problem, with the bottom end of the focuser being too narrow to admit all the light from the light cone entering it (the problem occurs at the bottom of the focuser because that is where the light cone is widest). The best fix is to select a wider and/or shorter focuser; that is why 2 inch low profile focusers are so popular today. Selecting a slower, narrower field primary mirror can also cure this problem, but that is not a typical choice that telescope designers make. You absolutely need to fix a problem with the vignetting the 100% ray; you could possibly live with vignetting the 75% ray but your telescope will not be performing optimally.
Check the tube length: Selecting the Dimensions tab, display the dimensions. In particular, check the computed tube length, especially if you want to fit your scope in the easily available 4 foot tubes. Our scope has a calculated tube length of 47.105 inches, so we will fit in a 48 inch tube.
Don't rush to finish you design - look it over several times. Try adjusting some of the specifications to see how they impact the result, and if you can make your design best fit your needs. We spent time on each of four days doing this, until we were satisfied the design we had come up with would meet our needs and could not be made significantly better.
Now, with a design to work from, we can start to obtain parts and build a telescope!
Previous: Designing Your Telescope Next: The Primary Mirror
Back to the Build a Dobsonian Master Index