

Build a Curved-Vane Diagonal Holder
In looking for a simple to build yet very functional diagonal holder, we found Gary Seronik's Curved-Vane Diagonal Holder to be an excellent choice. This design is clever, by orienting the vane 90° from the focuser axis, the usually complicated tip-tilt mechanism is replaced by a simple pivot of the hub on the vane.
With his permission, we will present construction details here, and elaborate on some details a bit more than his excellent page does. Parts count is minimum: a piece of hardwood for the diagonal holder and hub; a threaded rod, a stainless steel ruler, and some assorted nuts and bolts - it couldn't be simpler. We suggest you read through his page first, then come back here for step by step construction details.
Parts List
Here is what you will need to build this curved-vane diagonal holder:
- [1] 4 inch long 1¼ inch diameter hardwood dowel (see text for other sizes and shapes)
- [1] 3 inch long ¼-20 threaded rod (can use completely threaded bolt - cut off head)
- [1] ¼ inch flat washer (for rod)
- [1] ¼ inch lock washer (for rod)
- [1] ¼-20 wing nut (for rod)
- [3] 3/8 inch long 10-32 pan head bolt (attaches vane to hub and tube) (can use 10-24)
- [2] #10 flat washer (attaches vane to tube)
- [1] #10 lock washer (attaches vane to hub)
- [3] 10-32 nut (attaches vane to hub and tube)(can use 10-24)
- [1] Thin stainless steel ruler (vane). 12 inch will work for all but the very largest tubes. You can also use thin brass, 0.020 inch thick is about right, can be found in some hobby shops and hardware stores.
- Epoxy glue (attaches rod to diagonal holder)
- Black paint
The Diagonal Holder & Hub

The diagonal holder and hub is made from a single piece of hardwood that is cut in two after some drilling. We use hardwood (such as oak or maple, not pine or fir) because it will hold up better to drilling without splitting, which is especially important in the hub. The wood can be round or square. It needs to be slightly small in size than your diagonal. We are using a 1.3 inch diagonal, and will use a 1¼ inch hardwood dowel. You will only need about 4 inches, but if you purchase one 3 feet is probably the smallest length you will find. We use less than 4 inches, but start with a piece this long to make holding it while cutting easier.
Scaling: The dimensions we present for a 1¼ inch round dowel should work for a 1.3 inch and 1.5 inch diagonal, the two most common sizes. If you are using a smaller or large diagonal, you will need to use a smaller or larger width of wood. The other dimensions given will not change from our drawing.
Drilling the Central Hole: Using a 7/32 inch drill, carefully drill a hole through the center of the wood, taking particular care to make sure it is straight (a crooked hole here will make optical alignment a bit more challenging). Drill all the way through if you can, or at least 3 inches deep if you can't. If you don't have a center square, you can find the center of the a round piece by cutting out a circle of the same diameter as your work piece; then fold it carefully to make two diameter creases about 90° apart - where the crease cross is the center.
Cutting: Make the 45° cut first. This is best accomplished with a miter box, which will hold your hand saw at a 45° angle as you cut. An exact angle is not critical, but you need to be close, you can adjust away some of the error in this design. Then make the straight cut to separate the diagonal holder from hub (we have allowed for a 1/8 inch saw kerf on our diagram, even if your saw is 50% wider, this is fine, these dimensions are not critical either). Clean up the parts with sandpaper.
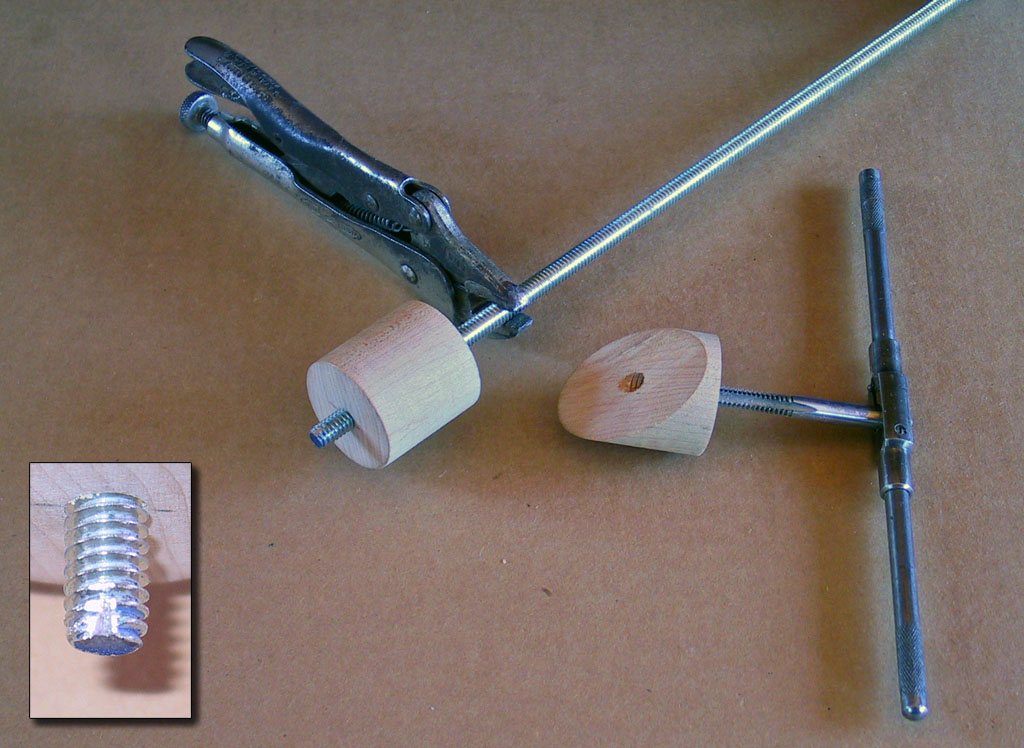
Tapping: We need to thread both holes to ¼-20, which is why we drilled them undersized at 7/32 inch. If you have a tap that will work very well, if you don't have a ¼-20 tap, they are not that expensive and are a good size to have in your toolbox. If you don't want to invest in a tap, you can thread with the threaded rod we use in the next step - it will work best if you file a little notch in one end to make the end thread a sharp cutting tooth (see photo). You can use a pair of locking pliers to hold either the tap or threaded rod (hold it away from the section we will use, at least 4 inches away from the end you will use, as you are likely to damage the threads where you pinch them.
Completing the Diagonal Holder
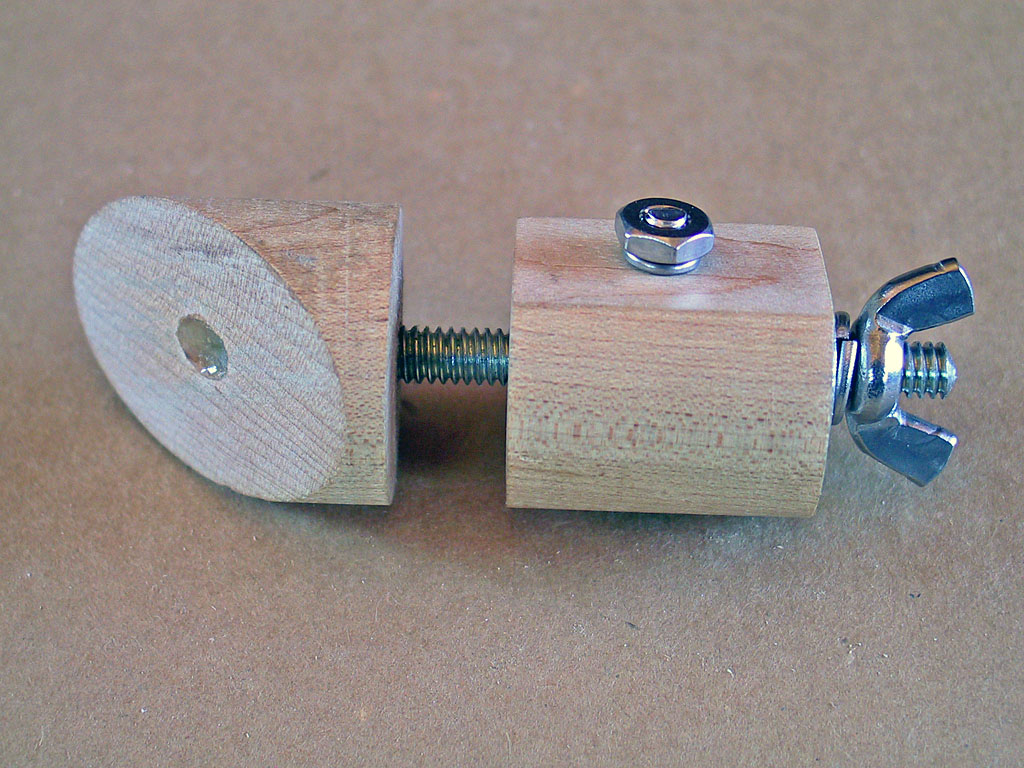
This step requires a ¼-20 threaded rod 3 inches long; the can be bought in 12 inch lengths as shown in the photo above. Use a hack saw to cut it to length. If you can't locate a threaded rod, you can use a completely threaded bolt - just cut the head off. And if your hub and diagonal holder are bigger than ours, you might need to use a slightly longer rod. After cutting, clean up the cut threads with a file, and run a nut over them to make sure they are usable.
Now we will permanently attach the threaded rod to the diagonal holder using epoxy adhesive. Mix a small batch of epoxy and spread it on about 1 inch of the threaded rod and into the threaded hole in the diagonal holder. Thread the rod into the diagonal holder at least one inch, but do not let the end protrude out the diagonal side. Set it aside to dry.
Completing the Hub
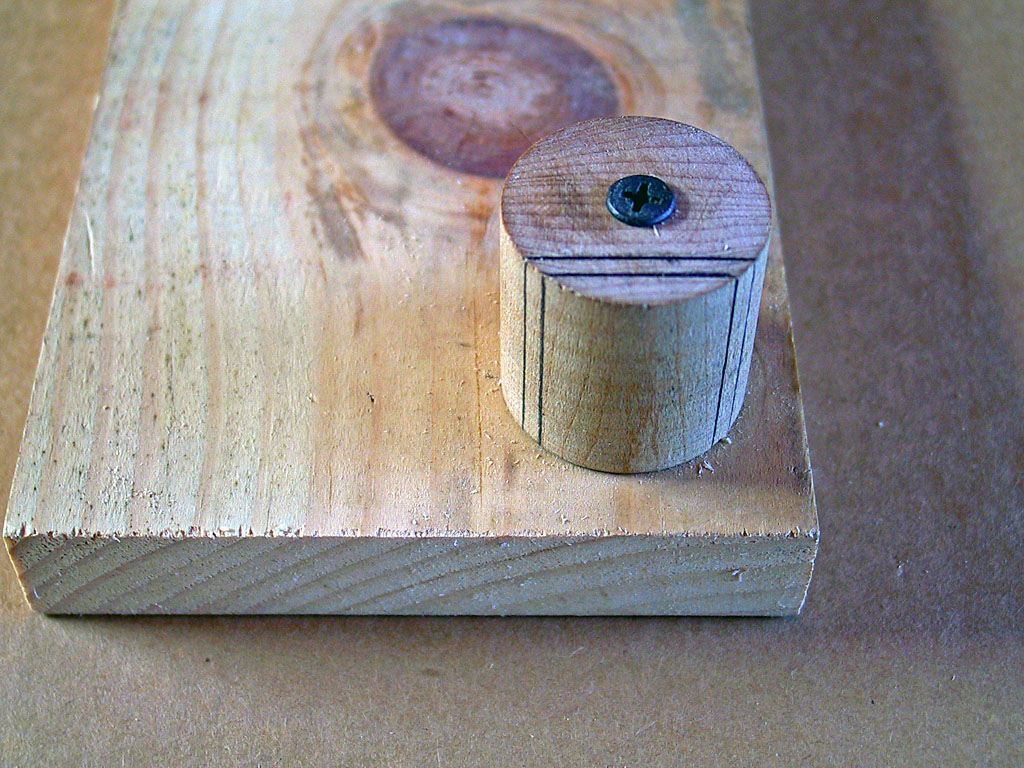
If you are using a round piece of wood, we need to flatten one side of the hub (the side that will rest against the vane). Using a square, mark the hub for a 7/8 inch flat parallel with the grain. Then, using a screw attach the hub to a scrap of wood to hold it while you cut it. Using the guidelines, carefully cut the flat, and clean it up with sandpaper.
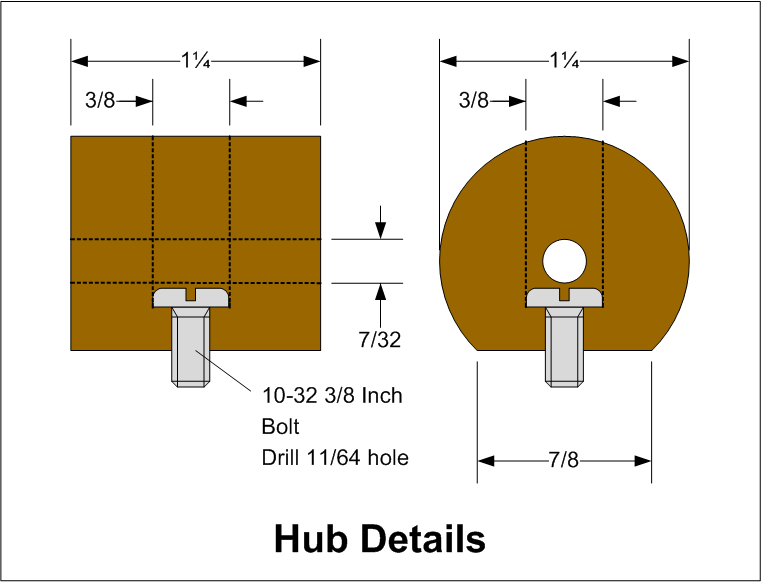
Obtain a 10-32 or 10-24 3/8 inch long bolt, and matching split lock washer and nut (the finer 32 pitch threads are preferred, but 24 pitch coarse thread will work). This bolt will hold the hub to the vane. We now need to drill out the hub to for this bolt.
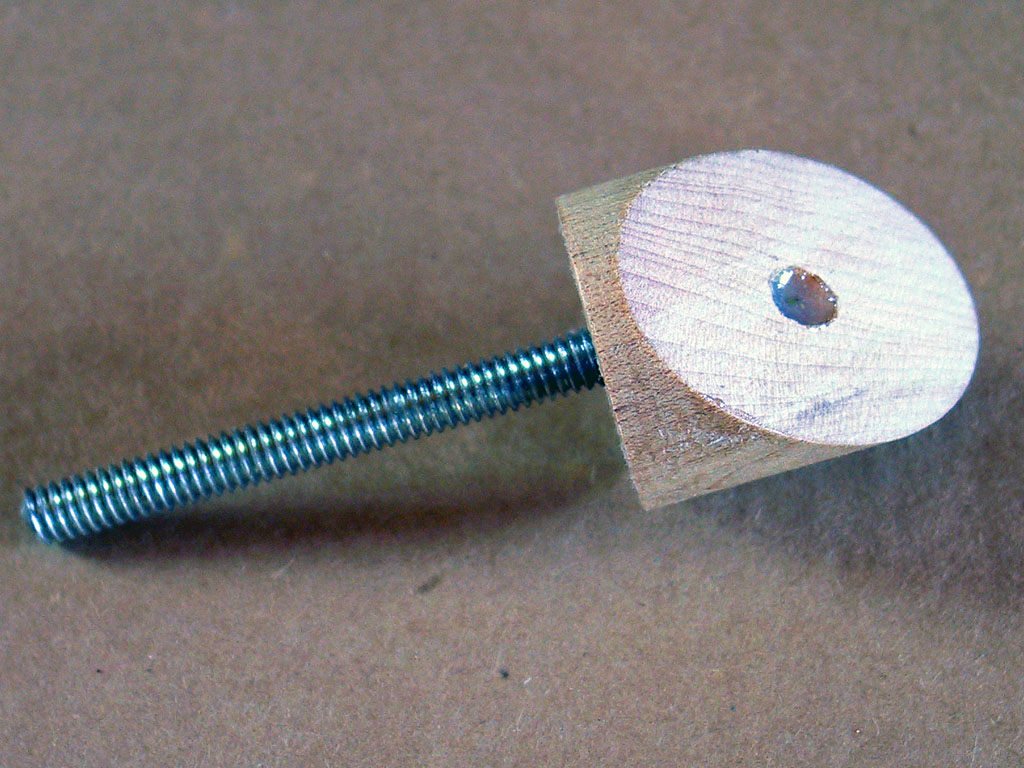
Start by placing the hub flat side down. Then, measure and mark the center top. Using a 11/64 inch drill, which is slightly smaller than the #10 bolt diameter of 0.190 inches, drill all the way through. Now we must drill out part of this hole to allow the bolt head to rest under the ¼ inch rod hole. Measure your bolt head - our pan head bolt was 0.36 inches, and the closest larger drill size was 3/8 inches (0.375). If you drill too far you will ruin this part - you need to drill just deep enough so the bolt head clears the rod hole. Take you time and test the fit, deepening the hole slowly. When you think you have it, make sure the rod will screw in and pass over the bolt head without hitting it. Do a test assembly of the hub and diagonal holder - it should look like ours in the photo at right. A flat washer, lock washer and wing nut have been put on the free end of the threaded rod - these will lock the rod in place after alignment.
Making the Vane
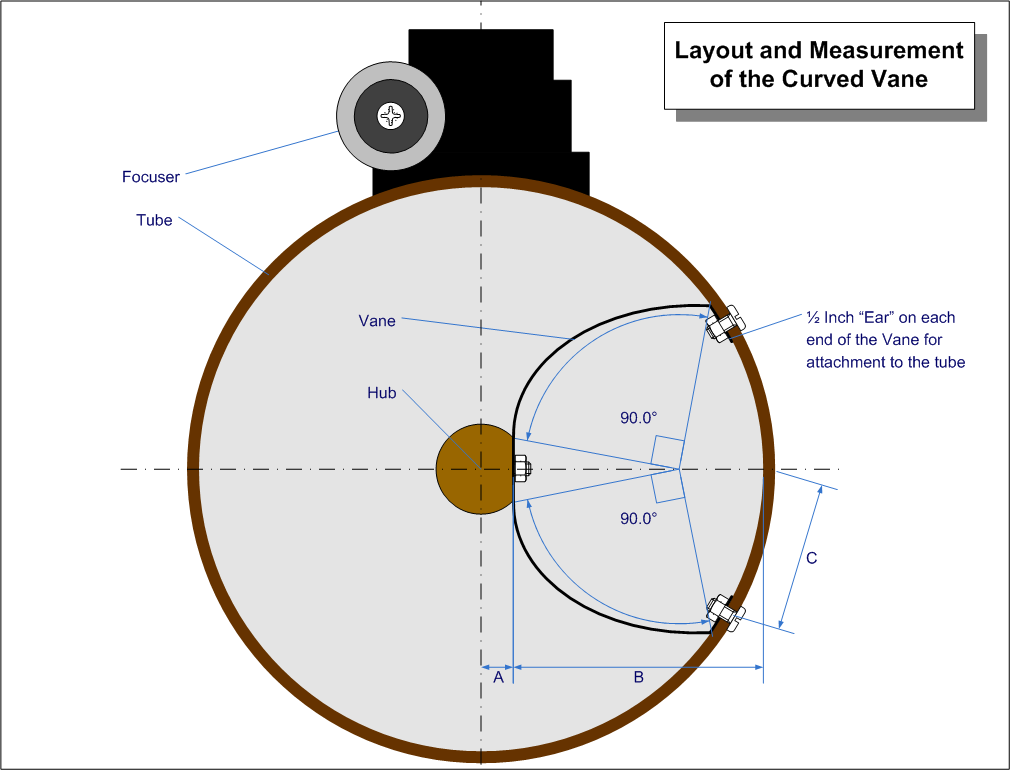
Design & Measurement: In order to determine the length of the vane, we draw a full-sized drawing of our tube (see diagram at right). Draw your hub in the center, and the flat on it at the appropriate distance from the center (dimension A in the drawing). Then using a compass, draw the inside diameter of your tube (all you need is the section the vane will attach to, no need to draw the whole tube as we did). When adjusting the diagonal in the tube, it will be handy to know dimension B, tube wall to hub flat. Now, draw in a smooth curve to represent the vane, noting that we want the vane to curve about 90° on each leg (this is not critical, but is the ideal). You might want to sketch in the 90° lines first as we did, then draw the curve to fit them. At each end of the vane, we add a ½ inch "ear" which is bent over so we can bolt the vane to the tube.
Now lay a piece of string or wire along the main part of the vane (no need to do the ears, you can add them back in later), cut to length, straighten it out, and measure it to get your vane length. Add 1 inch for the ears. While you have your diagram and string handy, measure curved length C - we will need this to drill the attachment holes.
Our measurements worked out like this (all in inches): Tube Inside Diameter: 8; Vane length with ears: 9-5/16; Dimension A: ½; Dimension B: 3½; Dimension C: 2-1/8.
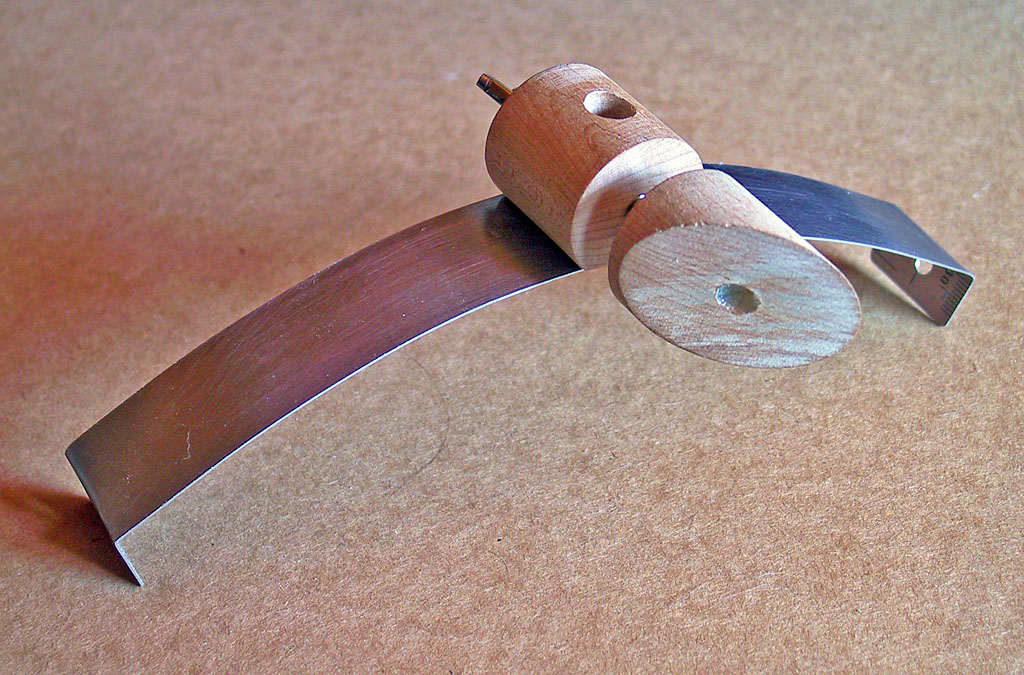
Material: The vane will be made out of a thin piece of metal (thin is important both for flexibility and minimizing diffraction). Gary Seronik uses a thin stainless steel ruler in his example, and this is a great idea. You should be able to buy a thin (about 0.020 inches), flexible ruler (usually with a cork backing) at an office supply or art supply store, often with a thin cork backing. Remove any cork and adhesive. We purchased a 12 inch long, 1¼ inch wide, 0.020 inch thick ruler at a major office supply chain for a few dollars. You could also use a thin piece of brass, often available in hobby and some hardware stores.
Fabrication: Layout the cuts, bends (for the ears) and 3 holes - one in the center for the hub, and one on each ear for attachment to the tube (center in the ear area). Center punch the hole locations to prevent the drill bit from 'wandering' when starting to drill. Cut to length and drill the holes. We used a #10 bolt for the hub, and we will also use #10 bolts to attach to the tube, so drill your holes with a 13/64 inch bit. Then carefully bend over the ears being sure to keep the bend perpendicular to the length of the vane. Clamping between blocks of wood or in a small vice can help you do this accurately. Bend them over about 90°. Then you can gently bend a curve into the vane using your hands; you will not make the final curve doing this, just get it started.
Painting
We need to paint most of this assembly flat black. Remove the vane, scuff it up with sandpaper, and spray paint it with a metal paint. Screw the holder out of the hub, and paint the holder and ½ inch or so of the threaded rod, but don't paint the face of the holder where the diagonal will attach - we want to bond to wood, not paint, with the adhesive. Paint all of the hub black, and it's OK if you paint the vane attachment bolt. Using pieces of an old wire coat hanger, we made hangers for these pieces to facilitate their painting.
Completion
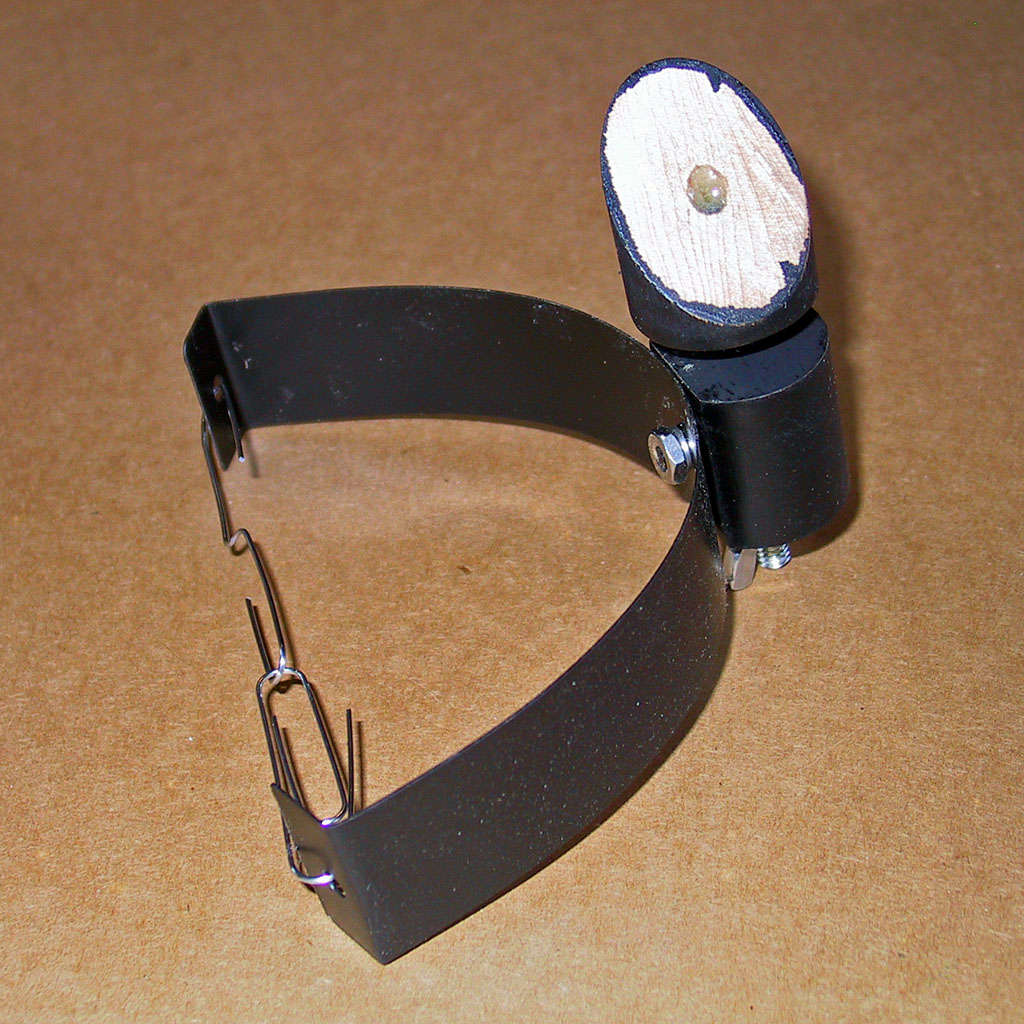
After all the paint is dry, reassemble the parts. You have some shinny nuts and washers, we can touch those up with black paint after final assembly of the tube. See the beginning of the page for a photo of our completed diagonal holder. On the next page, we will describe how to mount the diagonal to the holder.
Previous: Spiders, Vanes & Stalks Next:
Mounting a Diagonal on a Holder
Back to the Build a Dobsonian Master Index