

Sawing, Shaping, Drilling & Sanding
This page is a short introduction to working with plywood - making the parts you need to build a Dobsonian. It is brief, and is not intended to be a wood shop course, but rather to give you enough information on tools and techniques so you can successfully find additional information elsewhere if you need it.
Working with wood, like most other things in life, takes some practice and skill development - nothing major, but don't expect perfect results the first time you try something. If you are new to woodworking, plan time in your project for learning, and practice techniques on scrap if warranted.
Most tools we describe are sharp and can hurt you if you are not careful. Wear eye protection when working, and beware of sharp teeth on saws and shaping tools. If you use power tools, read and follow all of the manufacturer's safety precautions.
Since our project uses plywood, we talk about working with that. In general most of this advise applies to regular wood also.
Sawing Straight Lines
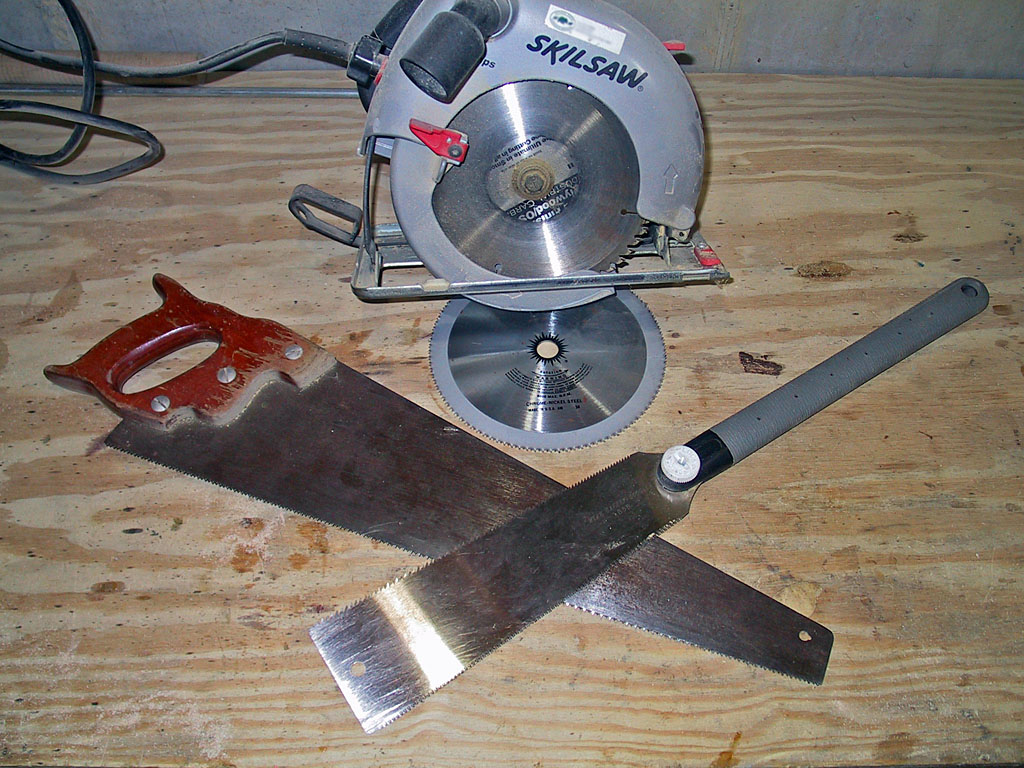
The most basic operation is to be able to saw a straight line. To cut plywood, you want a cross-cut saw (its teeth are bent outwards to the left and right slightly. A rip saw has straight teeth, and is used for cutting along the grain of regular wood). A hand saw has a reasonably stiff blade and allows you to make very straight cuts with a little practice. Theses cut on the push stroke.
A Japanese hand saw (Ryōba) is smaller, has a thinner more flexible blade and has both cross-cut and rip teeth on different sides. It cuts on the pull stroke. The teeth are usually finer pitch and more numerous than western hand saws, so they make a smoother cut, especially in plywood. But their shorter, more flexible blade makes it harder to cut a straight line. However, we use this tool often, it works well for us.
Moving up to power tools, the portable circular saw, often called a contractors saw or Skil saw after a popular brand, is powerful and fast (and can be dangerous). On plywood, it will make the smoothest cuts and do less tearing of the face plies if you equip it with a fine tooth plywood blade.
Sawing Curved Lines

In building a telescope, you inevitably have to cut curved lines, usually to make circles. The hand tool used to do this is a coping saw. It comes with a thin blade used vertically on the wood which makes following a curved line easier. The blade can be rotated in the frame to allow maximum flexibility in cutting out shapes. You can remove the blade, pass it through a drilled hole, and then reassemble the saw to cut interior holes.
The power version of this tool is called a jig saw. A thin blade moves up and down vertically to allow you to follow curves. Metal cutting blades are also available. Low end versions can be had for under $40 (in 2010), the inexpensive one shown has been in use since 1977, and while very basic is has gotten the job done.
Shaping Plywood
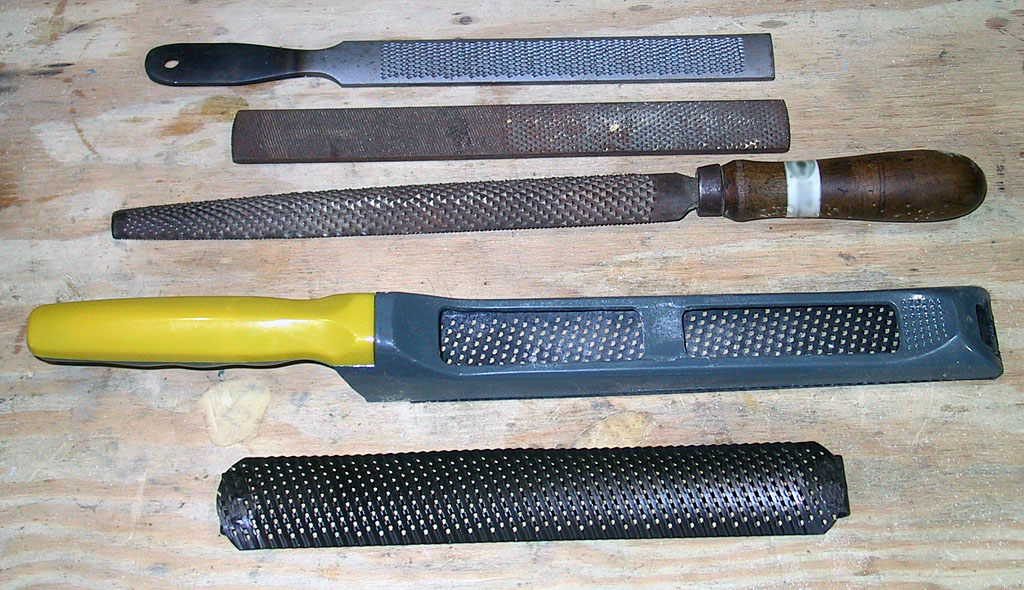
Regular files do not work well on wood - many beginners make the mistake of trying to use them on wood and get frustrated.
The traditional tool for shaping wood is a rasp, which has projecting teeth to gouge out and remove wood. This can be a bit rough on plywood.
We recommend using a Surform, which is the trademarked name of a tool Stanley brought out in 1956. The blade reminds you of a cheese grater for wood. Unlike the rasp, which gouges, the Surform slices wood away with its sharp teeth and leaves a much nicer finish in its wake. Also, it is clog resistant, as the hollow teeth pass the shaving through to the back of the tool and away from the work surface.
There are now generic versions of this tool from many different manufacturers; the one shown in the photo is a file-style single handle tool called a Shaping File from Empire. The 10 inch flat blade has 450 sharp teeth. Wood plane style frames are also available with a large rear handle and front knob. Replaceable blades can be flat or curved. This is what we use to trim our rough cut curved lines to the pencil mark, and in general to remove small bits of wood that are too small to cut and too large to sand.
Drilling Holes
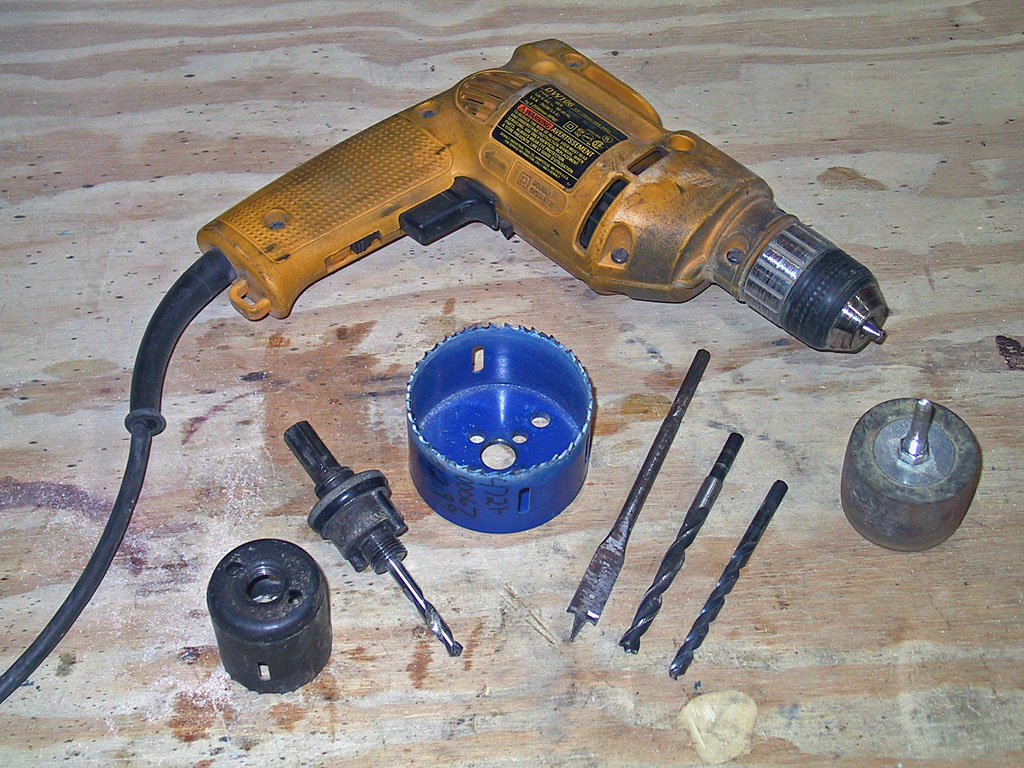
As stated in the introduction, we expect you have an electric drill, they are not that expensive and can be used for may tasks. Drills are easy to use, but you need to take care to keep the drill perpendicular to the surface when you use it - you don't want slanted holes.
With regular and plywood, splintering can (and often does) occur when you break through the back side with the drill. Two ways to prevent this are (1) clamp a piece of scrap wood to the back, and drill into it, or (2) first drill a small pilot hole all the way through, then drill halfway through the wood with the desired sized bit. Then drill from the other side to finish the hole.
Most people are familiar with the common 'jobber' bits that work in both metal and wood. Brad pointed drill bits only work in wood, but are easier to align on a center mark and don't slop off to the side very often. Spade bits can be used to make rough larger holes - we use them to make flat bottomed indents in plywood for washer and tee nuts.
Very large diameter holes can be done with bimetal hole saws - drill slowly with them, they are not meant for speed. One versions shown in the photo has a single mandrel with ¼ inch pilot drill; various sized hole saws can be screwed onto it. These work well in plywood and cardboard, two materials we are using in this project.
Sanding
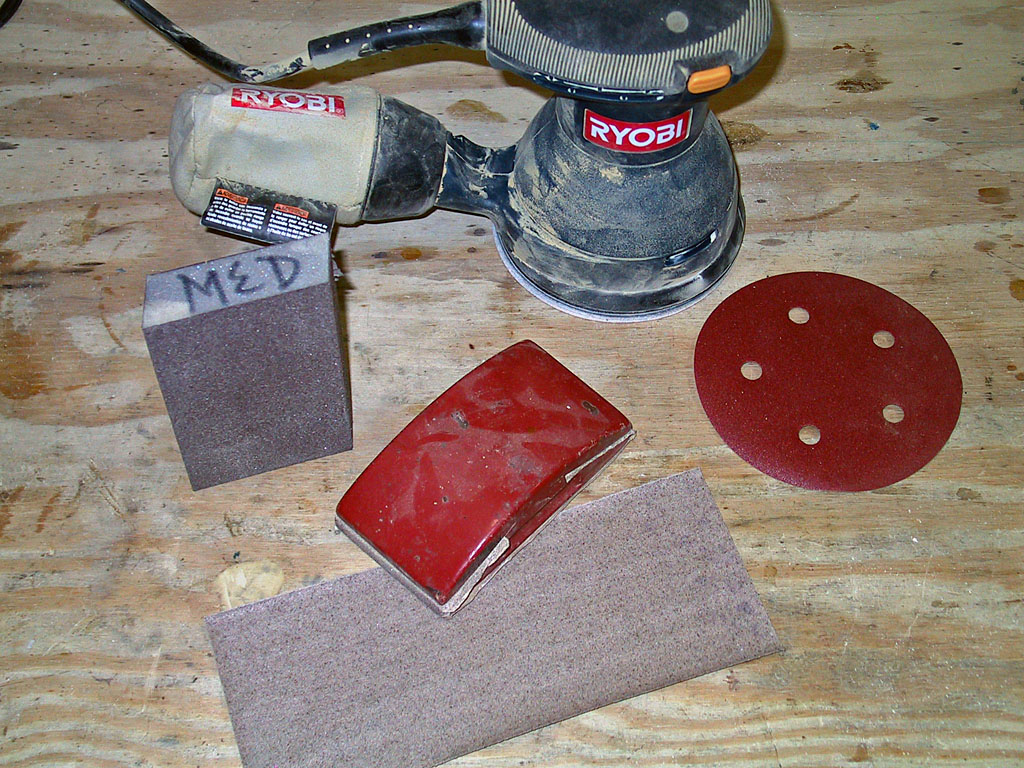
Sanding is used to put the final surface on wood before finishing. Use a sanding block with sandpaper to prevent uneven surface finish, or a foam core sanding block as shown in the photo (the foam blocks cost more but work very well on curved parts). Rough sanding can be done with 100 or 120 grit paper, and finish sanding at 220 grit will generally leave a nice, smooth, surface that can be stained or painted and look great.
The best power tool for surface sanding is a random orbit sander, which because it uses a randomized circular motion, does not leave grooves in one direction that older oscillating power sanders did. Most of these now use hook & loop technology to attach the 5 inch diameter sanding pads, and most have dust collection holes in the pads, both of which work well. In 2010, these are in the $50 price band.
Previous: Obtaining Materials
Next: Dobsonian Bearing Material
Back to the Build a Dobsonian Master Index