How to Make a Plaster Disk
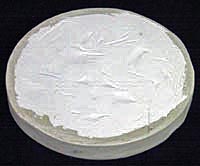 A Finished Plaster Disk.
Note overlap of waterproofing around the front edge. You can also see slight wrinkles in the front surface
due to wrinkles in the plastic food wrap.
A plaster disk is needed as a substrate for a Tile Tool or Pitch Lap. This page will tell you
how to make one from plaster, and to waterproof it. Once you have a plaster disk you will to learn:
You should plan to make your plaster disk at least the same thickness as your mirror blank. Plaster is
a light weight material, so a little extra thickness will not add much weight and will increase the stiffness
of the disk and be easier to grip when grinding.
Note that Dental Stone is a great alternative to plaster. It mixes and pours like plaster, but it is waterproof
when cured so does not need to be waterproofed. It is also somewhat stronger than plaster. However, it is more
expensive than plaster, and not available in retail outlets. But if you can get some, you might consider using
it. You can still follow these instructions to make a Dental Stone disk.
Making a Plaster Disk
You will use your mirror blank as a form for your plaster disk, as it should be the same diameter
and approximately the same thickness as your mirror. For a tile tool, you will use your flat mirror blank to
make a plaster disk that is flat on both sides. If you are making a plaster disk for your pitch lap, you want
one side to match the curve of your ground mirror. You can make the disk anytime after your finish with 120
grit, and since the disk can take a week to cure, you may want to do it before you are finished fine grinding.
In both cases, you want the back to be flat, as the tool will often be on the bottom and needs to rest squarely
on the grinding table.
As always with ATM, there are many ways to do this. Here we present the most common way we do it in the Stellafane
Mirror Classes, and also note a few alternatives. This is simple stuff, do what works for you, based on the
materials at hand, and your own preferences.
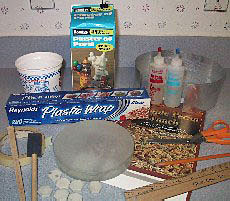 Various materials needed to make a plaster disk and tile tool.
The plastic cup at rear is for mixing. The aluminum flashing can be used instead of cereal box cardboard.
The Plaster of Paris is from a Hobby Shop, but larger bags from the hardware store work just as well (and
are probably less expensive).
Materials and Equipment:
- Plaster of Paris
- Clean Water
- Mixing Container*
- Mixing Stick*
- Measuring Cup
- Mirror Blank (as a form)
- Plastic Food Wrap (to cover mirror surface)
- Cereal Box Cardboard (as a dam)
Alternative: Aluminum Roof Flashing
- Masking Tape (to secure cardboard form)
Alternatives: Big Rubber Bands or Big Hose Clamp
- Sandpaper or File (for cleaning up the disk and beveling the edges)
- Waterproofing (Polyurethane Finish or Epoxy Adhesive)
- Paintbrush* (to apply waterproofing)
- Level Work Surface (helps in making a flat back)
in a room-temperature work environment.
*Items that are suggested to be disposable, single use items.
Procedure:
1. Make the Mold:
1.1. Place your mirror blank, mirror surface up, on a clean, level hard work work surface
covered with newspaper or cardboard.
1.2. Cover the mirror surface and part of the sides with plastic food wrap. Smooth the wrinkles
on the surface as best as possible, as they will imprint themselves on your plaster disk. A few small
wrinkles are no problem.
1.3. Cut a strip of cereal box cardboard (or similar material) to be exactly twice as thick
as your mirror and longer than it's circumference. Wrap it tightly around your food wrap covered mirror
blank, and secure it with masking tape. Make sure the cardboard is flush with the work surface on all
sides.
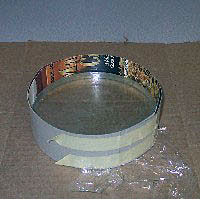 Cereal Box Cardboard Mold:
Printing inside is slightly more waterproof. Note plastic food wrap pulled taught by cardboard,
protecting mirror surface.
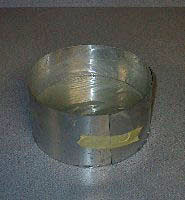 Aluminum Roof Flashing Mold:
Taller than recommended in the text, because we use it on larger, thicker mirrors also. Be careful
of the sharp edges!
2. Mix: Estimate how much plaster you will need, and read the information on your Plaster of Paris
container as to the plaster to water ratio (usually about two or three parts plaster to one part water).
Fill you mixing container with the estimated amount of water. Sprinkle the Plaster of Paris into the water
(never pour the water into the plaster) and mix until it is a thick, soupy and lump-free mixture.
 Mix by pouring the Plaster of Paris into the water until it is thick, soupy
and lump-free.
3. Pour the mixed plaster onto your mirror form. Use the mixing stick to slightly stir the plaster
in the form, working air-bubbles out. Pour right up to the rim, and smooth the plaster out to form a flat
back. Work quickly, the plaster will start to set up in a few minutes.
 Pour the Plaster of Paris into the mold, then stir gently to release air bubbles
and level the back.
4. Wait one hour for the plaster to set up. Leave the mold undisturbed during this time.
5. Remove from Mold: After one hour, the plaster should have set. Peel away the dam. Gently remove
the plaster disk from the mirror, and place in a warm, dry location to cure.
 Release the mold by gently unwrapping the cardboard. Then remove the disk
from the mirror.
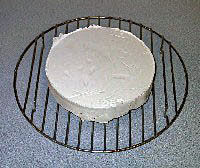 Curing can be done on a cake rack to improve air circulation. Note the
minor wrinkles from the food wrap, and the "flash" from the mold, which is easily sanded off when cured.
6. Curing needs to be done in a warm (at least 60° F), dry place where it will not
get bumped or knocked. I place my disks on a cake rack, to
ensure air can circulate over all sides.
Resist the urge to clean up the disk until after it has cured.
Curing times vary by disk size, temperature and humidity, but it will take at least one week, maybe more.
Your disk is cured when it does not feel damp to the touch, and does not leave a chalky residue on your
fingers.
 Sanded plaster disk. Back is flat with a slight bevel around the edge
7. Sanding: You can use sandpaper or a file to remove any mold marks, put a slight
bevel on the edges and flatten any bumps. It will work fast and make a white, dusty mess, and is best done
outside. A few light strokes on a concrete patio block is a great way to flatten a bumpy back.
The disk in the photo had a couple of chips off the edge - no problem, just smooth them with the sandpaper
a bit. Also, don't worry if the disk is not perfectly round - you can see our disk has a few bulges and
flats around the edge.
8. Waterproofing: Your plaster disk needs to be waterproofed. You should waterproof the back and
sides. The front depends upon the use:
- If this disk is for a tile tool, put one coat of epoxy on the front of the tool (you will use a
second coat to adhere the tiles)
- If this disk is for a pitch lap, the pitch will adhere best to the raw plaster, so only waterproof
about 1/4-inch of the front edge, but not the front itself.
We use epoxy glue to waterproof at Stellafane, it is rugged and durable, but that can be expensive in
small quantities. Polyurethane finish is a less expensive alternative. In any case, plaster is very porous,
and it may take several coats of whatever you choose to get a durable, waterproof finish. Since you will
be dunking your tool in water buckets, do a very good job at waterproofing - Plaster will disintegrate if
it gets wet!
Note that some people have found 5-minute epoxy setups up too fast to soak in well on a first coat, and
may peel off under heavy use. Slow drying epoxy has plenty of time to soak into the plaster, and therefore
usually takes two coats.
 Waterproofing: Here we are using Devcon 5 minute epoxy to waterproof
the back and sides with a disposable foam brush. Mix all the epoxy right on the plaster disk to avoid
any waste. Be sure to mix thoroughly, then spread evenly over the back and sides. Make sure all air
bubbles in the plaster are covered. The disk is sitting on a roll of masking tape, so we can run the
brush along the lower edge and cover 1/8" to 1/4" of what will be the tool face.
Finished Plaster Disk:
A thick, glossy coating of epoxy covers the back, sides
and about 1/4" of the front edge.

This disk took only a single coat, and the "5 Minute" epoxy was ready
to handle in an hour. Inspection showed a couple of pinholes (Bright white plaster peeking though the
dull epoxy as shown in the insert) - these will be filled up with epoxy to
ensure the disk is waterproof.
Congratulations - you now have a durable Plaster Disk.
You can now
Make a Tile Tool or Pour a Pitch Lap.
|


