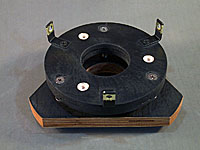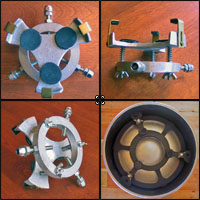

The Primary Mirror Cell

The purpose of the primary mirror cell is to hold the primary mirror gently but firmly in the center of your tube, and provide tip-tilt adjustment so your telescope can be collimated. It should also provide adequate air circulation so that your mirror will cool down quickly.
Buy or Build?
You may choose to buy or build a primary mirror cell. Of the tube components we need to have (primary mirror cell, diagonal holder, spider, vane or stalk and focuser), the primary mirror cell is the easiest to build and performance will be as good (or in some cases better) than a purchased cell. Certainly if you are planning to build the Dobsonian mount we present in the second part of this series, you have adequate skills to build a really good cell. Unlike commercial cells, which usually bolt on, our cell will slide into the tube and be held by wood screws through the tube wall, resulting in better support, tube stiffening, and the ability to pre-test the optical layout during construction by allowing easy sliding of the cell up and down the tube. We encourage you to build a cell.

Commercial Primary Mirror Cells
These are simple to buy - you just need to specify your primary mirror diameter, and verify the cell will fit in your tube. You need a basic, 3-point cell for a full thickness mirror, no need to buy a multipoint floatation cell required for 'thin' mirrors.
Pull or Push-Pull?
The tip-tilt adjustments come in two basic styles: pull or push-pull. In a pull cell, three bolts pull the mirror cell back against springs. In a push-pull design, three more bolts are added to push along with the springs; they are backed off while you make adjustments and then are tightened to lock the adjustment into place. For light mirrors, the springs will likely be able to hold their positions and the push bolts are unnecessary; with heavy mirrors the springs can sag and push bolts are required. Since it is so easy and inexpensive to add push bolts, we will use them even on our with our light little 6 inch mirror.
Material and Parts
We will build our mirror cell out of plywood and "nuts & bolts". The plywood will by ¾ inch N-N Birch (because that is what is on hand); for 6 inch and under mirror cells you could use ½ inch material (but you will need to reduce the bolt lengths by ½ inch). If you haven't read our section on Selecting Plywood for Your Dobsonian, you might want to do that now. You will need two pieces, one the diameter of your tube and the other the diameter of your mirror. Note that if you plan to make plywood tube rings later, the inside waste from these are ideal to use for your mirror cell.

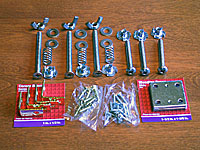
Hardware: We purchased all of the following in the local Springfield, VT (population ~9,000) hardware store (see Shopping for Lumber & Hardware). As noted in Rustproof Hardware, we selected Stainless Steel whenever possible (the Tee-nuts, springs, corner braces and mending plates are not stainless). All of the nuts, bolts and washers are ¼-20. [Quantities in square brackets]
- [3] 2½ inch Flat Head Bolts (pull bolts)
- [3] 1½ inch Pan Head Bolts (push bolts)
- [6] Washers (pull bolts)
- [3] Wing Nuts (pull bolts)
- [6] Tee Nuts (push & pull bolts)
- [3] 3/8 inch diameter, ¾ inch long Compression Springs (pull bolts)
- [3] Corner Braces (Mirror Supports) These should be about as long as your mirror is thick (ours are 1 inch)
- [3] Mending Plates (for push bolts to push against)
The corner braces came in a package of four; we only need three. The mending plates came in a package of four and are too big, we will cut two in half for the three smaller ones we need. We were also disappointed in the spring selection, the size is right but we wanted a stiffer spring. Since we are using push bolts, this should not be critical, and if it is a problem we can easily replace them later.
Previous: The Tube
Next: Building the Mirror Cell
Back to the Build a Dobsonian Master
Index