

Installing a Primary Mirror in the Tube
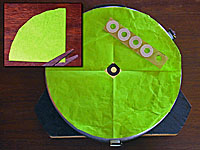
Collimation Mark: It is easier to collimate a telescope with a center mark on the primary mirror, so let's do that now before we mount the mirror in the tube. Since the mark is in the center of the mirror, it is in the 'shadow' of the diagonal mirror, on a part of the primary mirror that will not be used, so it does not impact performance.
Most people use a self-stick, loose-leaf page reinforcement for this. Blacken it with a marker. Now, using a scrap of tissue paper, make a circle the same diameter as your primary mirror. Then fold it carefully in quarters, and snip off the a piece near the center about one forth the size of your reinforcement. Unfold and lay it on the mirror, using as a guide to place you collimation mark.
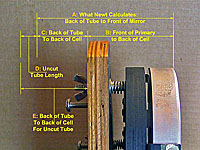
Calculate Mirror Position: We now need to figure out where the mirror should go in the tube, using design information from Newt-Web. Referring to the diagram at right, Newt-Web has length A for us - The back of the cut tube to the front of the primary mirror. We need length E, which is the back of the uncut tube to the back of the mirror cell.
Adjust your primary mirror cell as follows: If you have push bolts or locking devices, back them off. Set the cell so that you have adjustment room in both directions, making sure that the springs are partially compressed. Using a ruler make sure the mirror is flat with respect to the back of the cell by setting each adjustment to get the same mirror height from the back of the cell. Then measure length B, which is the back of the cell to the front of the mirror.
We now know A and B, and C = A - B. C is the back of the cut tube to the back of the mirror cell. It is likely that your tube is longer, as we instructed you not to cut it to length yet. So you most likely have to add in length D, which it the difference from the tube length that Newt-Web calculated and the tube length that you bought.
Length E, the distance from the back of the uncut tube to the back of the mirror cell is C + D. If your tube is already cut to length, then D is zero.
Test Your Scope: In a perfect world, you would take distance E and use it to permanently mount you primary mirror cell in the tube. However, this is one time when you want to test before you drill. Years of experience by many telescope makers indicate you are better off testing that the primary mirror cell position is correct before you drill holes in your tube (We have certainly seen many tubes with extra holes!). The purpose of the test is to insure your telescope can focus on distant objects. To do this, you will need a view to an object at least 1 mile away, and you will need a low power eyepiece (we used a 25mm eyepiece for our 6 inch f/7 scope).
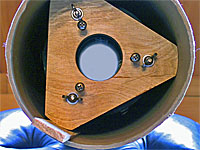
Mark distance E on the inside of the scope tube, and slide in your primary mirror in its cell (if you used our mirror cell design, this is easy. If you are using another type of cell, it may be more difficult, or impossible, in which case you will have to drill, mount and hope it is good). With the heavy primary mirror attached your cell may not stay in position, so use some wood shims if necessary or enlist the aid of an assistant to hold the cell in place.
We assume here you did the rough alignment when you installed your diagonal and it is still good. When we wedged our mirror cell into the tube, a quick look through the eyepiece and a little movement of the tube confirmed light from the primary was reaching the eyepiece, even through it was not in focus. and that we should be able to focus an image. You may have to recheck your rough alignment or the tip of your primary mirror if this is not the case. Sweeping your telescope while out of focus, you should see light and dark 'blobs' sweep through the eyepiece as the scene varies.
If you already own several eye- pieces, try them all when testing focus. Stewart Longly of New Zealand wrote to report that while the Newt calculated position worked perfectly for his 30mm 2" eyepiece, he had to move the mirror up about ½ inch to focus his other eyepieces. You need to position the mirror as far up the tube as necessary, you can always add some focal length by using an extension tube or pulling the eyepiece up out of the focuser a small amount; however you can't reduce focal length in any practical way once the focuser is racked in all the way.
Set yourself up so you can see a distant object, hopefully while sitting. Of course, if you have a clear night, stars are the perfect object. But if you are clouded out, or want to work in the day, a building, tree, mountain or utility pole at least one mile distant is a fine target (we live in a wooded Vermont valley, and had to climb to the top of a cleared meadow to find a hilltop far enough away to use as a distant target). Try to be seated in a chair or on a rock or wall (or in our case a tree stump) and hold the telescope in your lap to steady it. Use your leg angle to adjust aiming height, and with the focuser about ½ inch racked out to start with, see if you can focus on the distant object or something closer. Hand holding a telescope like this is challenging, but it can be done at low powers for a focus check. Of course, if you can manage to support the tube on some object (patio lounge chair?) that still allows you to aim it at your distant target, all the better.
Close objects (1,000 feet or so) will focus with the focuser racked all the way out - they 'focus long'. Distant objects will focus with the focuser racked in much more. Ideally, with a typical eyepiece, we want to have 'objects at infinity' (objects located in space, and very distant terrestrial objects) come to focus at about the 'spare focuser in travel' distance we used as input to Newt-Web (in our case, we specified ½ inch).
If you can focus on closer objects, but you can't move the focuser far enough in to focus on distant objects, you need to move the mirror further into the tube. Conversely, if you can focus on distant objects, but the focuser is extended way out, you need to pull the mirror down the tube some. Of course, if you can't focus on anything, you are way off in mirror position (or more unlikely you are not aligned well enough to focus on anything) so you will have to experiment until you find the proper mirror position.
Lucky for us that we did this test. Our calculations indicated we should position the primary mirror cell 2-3/8 inches into our uncut tube. But after about 30 minutes of testing and adjusting the mirror position, it was found that the primary mirror cell really needed to be 3¾ inches from the back of the tube to allow us to focus on a distant object with the focuser about ½ inches racked out and to focus on a nearby object about 1,000 feet away with the focuser fully racked out. After rechecking our design, the best explanation for this problem is that mirror focal length was not measured correctly by the maker (No one to blame but ourselves!).
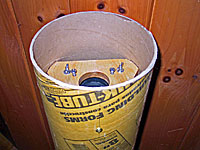
Permanently Installing the Cell: Once you are certain of the required primary mirror cell position from the rear of your uncut tube, mark that depth on the inside of your tube. Then, reusing your layout disk from installing your spider or vane, mark the radial position required for the mirror cell mounting holes (most mirror cells use three attachment points spaced 120° apart). Lining up one hole on the full tube length line that runs through the focuser, mark the positions on the end of the tube, and then mark lines down the outside of the tube as you did for mounting your diagonal. Then mark on these lines the bolt hole positions, adding the appropriate thickness for the cell (in our case, we have a ¾ inch thick plywood mirror cell, so we would add half that thickness, or 3/8 inch to the length E so that the mounting hole ends up in the middle of our plywood). Drill with the appropriate sized drill, using a wood block inside the tube to prevent tear-out. Then, slide your cell into the tube, line the back up with the inside marks, and bolt or screw the cell into place (we used an 11/64 inch drill, brass #8-½ inch oval head screws and brass shoulder washers).
Done! You have a working telescope! If you would like, give the scope another test after permanently mounting the primary mirror. But you are not totally done, you need to disassemble the scope so you can cut the tube to length if necessary, and paint and finish the tube. Cutting the tube is next.
Previous: Installing a Spider or Vane in the Tube
Next: Cutting the Tube to Length
Back to the Build a Dobsonian Master Index