
Mounting a Diagonal on a Holder
Now we need to attach the diagonal mirror to the diagonal holder. We will describe the two most popular ways: Using a (usually manufactured) shell-with-rim holder; and using adhesive.
The Shell-with-Rim Holder

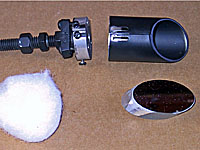
Many purchased diagonal holders use a shell-with-rim mounting technique (see photo). In this type of holder, a wad of medical cotton is used to provide gentle pressure to press the diagonal against the rim of the shell. This type of holder requires an exact match to the size of the diagonal you are using.
Some, but not all, shell-with-rim holders have adjustment slots to vary the pressure on the mirror; the one pictured has these slots.
As always in mounting optics, the goal is to not 'pinch' them with undo pressure, resulting in optical aberrations. You may need to experiment with how much cotton to use - you want just enough to press the mirror against the rim, but not so much that the mirror will distort. Slip the mirror into the shell, then put some cotton behind it, and assemble the shell to the back plate. That's it, if you have used the right amount of cotton, you are done.
Adhesive Mounting


Adhesive mounting is popular in many home made and some commercial holders. While thick foam double-sided adhesive tape has been used with success by some people, it has been known to fail in very high heat conditions (if your scope is outside in the sun on a hot summer day). Having your diagonal mirror crash into your primary mirror is not good for either of them, so we prefer to use the same silicon sealer adhesive we use for mounting our primary mirror in our mirror cell. Please go back and read about using fresh silicon sealer, and a clean grease free mirror on that page, as the same requirements apply to the diagonal mirror (note that if you bought a fresh tube of silicon sealer to mount your primary, you resealed it well and only a few weeks have gone by since you used it on your primary, you should be able to use it a again for your diagonal).
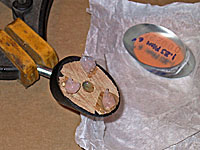
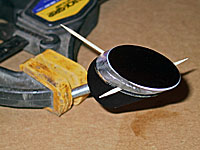
Figure out how to hold your diagonal holder so that the elliptical surface is level. We clamped the rod in a soft-jawed workshop clamp (see photos). Then apply three small blobs of silicon sealer to the bare wood. We then laid two toothpick between the blobs to act as spacers (the smaller diagonal needs less of a gap then the primary mirror). Now press the diagonal into the blobs and center it on the holder. Clean up any silicon sealer that got squeezed out, and put it aside for a day to cure. Remove the toothpicks when cured - if the stick a bit because they got some silicon sealer on them, they should come free by first twisting them in place, then pull them out. Make sure none of the toothpick remains between the mirror and the holder.
Should you ever need to remove the diagonal (perhaps for recoating), you can slice through the silicon sealer with dental floss or monofilament fishing line.
Next we will mount the diagonal in the tube under the focuser.
Previous: Build a Curved-Vane Diagonal Holder
Next: Installing a Spider or Vane in the Tube
Back to the Build a Dobsonian Master Index