|
||||
Selecting a Surface to GrindThe ProblemYou have one, possibly two, glass disks and therefore two or four glass surfaces to consider. One surface of a disk will be ground, polished and figured to become your parabolic telescope mirror, and the opposite surface will become the mirror back (and mirror mounting surface). Which to use? (Experience shows this to be a very common question from beginners that is not very well addressed in the literature). Simple ObservationsIf your mirror kit came with two glass blanks, check to see if they are essentially identical (for instance, kits purchased from Willmann-Bell come with two identical Pyrex blanks). If this is the case, you should consider all four surfaces. If you mirror kit came with two glass blanks, but they are different, chances are one is intended to be the tool and one the mirror (for instance, many kits from Newport Glass come this way). If one piece of glass has concentric rings molded into it, this is the grinding surface of the glass tool, so put it aside and only consider the other blank. If one disk has a greenish tinge and other is yellowish or clear, the greenish one is plate glass and is the tool, while the yellowish or clear disk is most likely a Pyrex mirror blank. Checking Surface & Subsurface Quality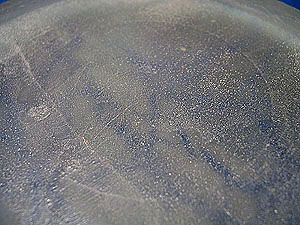 Normal Bottom Surface of a Molded Pyrex Blank Note Mold Ring & Slight Surface Defects which will grind right off quickly. Once you have identified potential mirror blanks, you should examine each one for surface and subsurface quality. It is normal for blanks to have a slight ripple, roughness or waviness on the surface. It is also normal to have a few small bubbles below the surface. Normally, blanks do not have chipped edges or large gouges or voids. In grinding your mirror, you will remove glass from the surface (for a typical 6" or 8" mirror, not more than 1/4"). You would not like to grind into a bubble and leave a defect in your mirror surface. Therefore, you should avoid using any surface that has bubbles so close to the surface you risk exposing them. You should also check to see if there are any cracks or discontinuities, and avoid using a surface that has them. They can cause problems with your mirror as you work on it. Many mirror blanks these days are molded. You may see chalky mold release powder on the surface, a dendritic pattern on the glass surface, or mold tooling marks (such as a slight central boss on one side). These are all harmless, and will quickly grind off. 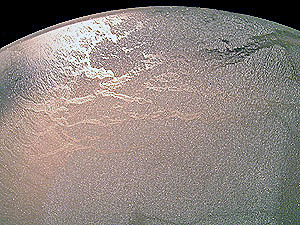 Normal Top Surface of a Molded Pyrex Blank Note edge ground by manufacturer and dedritic surface pattern Hopefully, you will be able to find one good surface, without close to surface bubbles, cracks or discontinuities to deal with. This surface should become your mirror surface, the surface you will grind and polish. Don't Forget The BackOnce you have determined the front of your mirror, check the back. The important thing about the back is that it need to be flat, both for working on the mirror and mounting the finished product in your telescope. Most mirror blanks today are fine, but if yours doesn't have a good, flat back due to some molding defect, you should grind it flat before you grind your mirror. 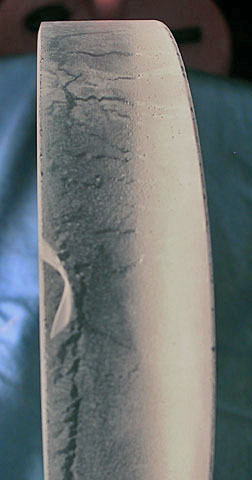 A Bad Crack! (Edge View) This is not a surface problem, but something that is well penetrated into the glass and will develop into into a chip if further stressed. A few high spots can be taken off with a carborundum stone (see page on Beveling the Edge) and some water. Or you can grind the back against a piece of plate glass with some #60 grit and water (see page on Rough Grinding) if a larger area needs work. 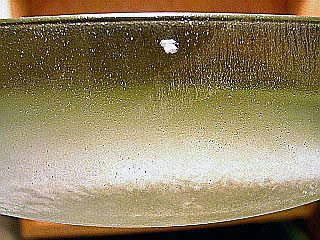 A Bad Bubble! (Edge View) Large and Close to the Surface Harmless Surface Pinholes and a Sleek cover the Edge of this 12" x 2" blank Back to the ATM Index Page |
||||