|
||||
Materials & ToolsIntroductionThis page will describe the necessary materials and tools you will need to make a mirror. It will only list what we feel are the minimum equipment required; additional, optional equipment is described on other pages in this series, under the topic to which it applies. As always, we describe the most common and accepted tools and materials - items that we feel will give the novice the greatest chance of success, and without being excessively expensive. Please consult our list of ATM Suppliers for ideas about where to purchase these items. Topics on this page: Mirror Blanks, Grinding & Polishing Tools, Grits & Pitch, Storage Containers, Grinding Stands, and Miscellaneous Items. 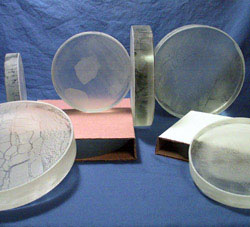 6" & 8" Pyrex Mirror Blanks Patterns on surfaces and edges are mold marks, splotch on 6" is a grinding mark by the manufacturer. Two blanks are in their protective cardboard shipping sleeves. These blanks are destined for the Stellafane Convention mirror making demonstrations. Mirror BlankThis is the focus of all your work - you will turn this flat piece of glass into an accurate parabolic telescope mirror. We recommend a full thickness Pyrex blank for mirrors up to to 12" in size. Full-thickness means the diameter to thickness ratio is 6:1 (i.e. an 8" full thickness mirror is 1.3" thick). Any mirror that is less than 6:1 thick is referred to as a thin mirror. Thin mirrors cost slightly less, weigh less, and cool down quicker. But they are much more susceptible to problems with ground in astigmatism and distortion due to support in the telescope unless additional precautions are taken. For your first mirror, it's just not worth the trouble or risk - buy a full-thickness blank. We recommend Pyrex over plate glass. Today, the cost difference is minimal, and Pyrex has two advantages:
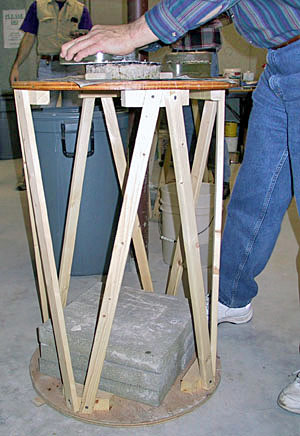
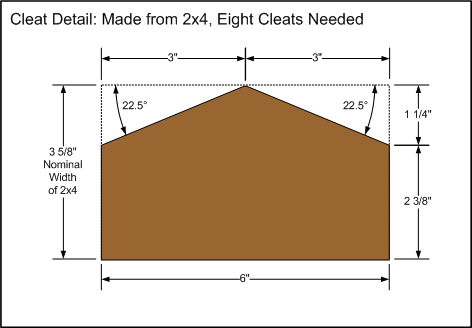
Many fine mirrors have been made from plate glass, so if that is all you can obtain, don't be discouraged. But if you have a choice, we recommend Pyrex. 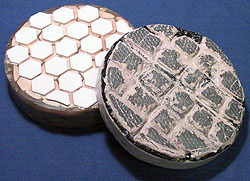 Tile Tool & Pitch Lap The tile tool is well used, with two layers of tiles on it. The pitch lap has had channels opened several times, and is covered in pink cerium oxide. Micro faceting (from pressing with a plastic mesh) can be easily seen on the faces of the lap. These are both quite serviceable - regularity and perfection is neither necessary nor desirable in mirror making tools. The Tools: Grinding & PolishingYou will need two tools: A hard tool for rough and fine grinding, and a soft tool, or pitch lap, for polishing and figuring. Traditionally, the pitch lap was made on top of the grinding tool. We recommend using plaster disks for tool substrates, and that you use separate disks for these two tools. Grinding Tool: We recommend using a plaster and tile tool for grinding: The are inexpensive and easy to make, and they work really fast. See How to Make a Tile Tool. Traditionally, a glass tool was used, but these are more expensive, and work slower. If you make or buy a grooved glass tool, you will gain some of the speed advantage of a tile tool. Pitch Lap: We recommend making your pitch lap on a separate plaster disk that has been molded to the curve of your partially ground mirror. See Pouring a Pitch Lap. If you choose to follow tradition and pour it on your grinding tool, you eliminate the possibility of returning to fine grinding should you get a bad scratch or other problem as you no longer have a tool that mates with your mirror. 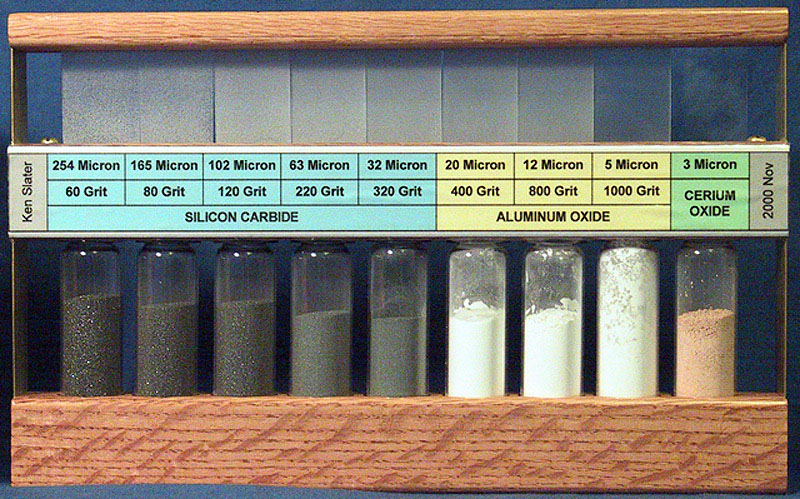 Grit & Polish Display (Click image to Enlarge) A Display of Silicon Carbide Grit (Gray), Aluminum Oxide Grit (White), and Cerium Oxide Polishing Compound (Pink) Above each vial is a microscope slide ground with that grit so that you can see the progression of smoothness. Grits & PitchGrits and Polishing Compound are the consumables in the mirror making process. Grits, typically of Silicon Carbide or Aluminum Oxide, in various grades, are used as an abrasive between the mirror and tool to grind the glass. Pitch is used to make a soft, conforming pitch lap for polishing and figuring. It is used with a Polishing Compound such as Cerium Oxide, which is actually a very fine, smooth abrasive. See our page on Grit, Pitch and Polish for quantities and sizes needed. 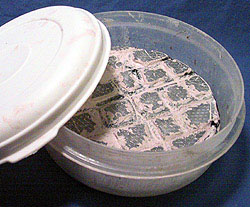 Lap Stored in a Food Container which are also great for mirror storage. Storage ContainersYour mirror and pitch lap are both fragile and need to be protected when not being worked on. Your lap needs to be stored in a container that will not rest on the lap's surface (and deform it). Some people wrap their mirror in a clean cloth or towel, and store it in box. For the lap, you can use a zip-closure food storage bag, inflated with air so that the bag does not rest on the lap's surface. 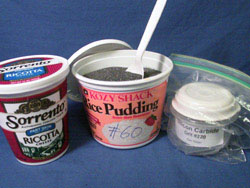 Grit Storage: Recycled food containers, especially yogurt containers, make great grit storage containers. The grit at right is bagged for longer term storage. The most popular storage solution today are round plastic food storage containers, which come is sizes just right for 6", 8" and 12" mirrors. If your grit came in bags, you may also want some sort of hard sided container to store it in while you work. You will need something that seals well, as you do not want your grit to get contaminated. Glass or plastic bottles or plastic food storage containers work well here; a plastic spoon can be used sprinkle grit on you mirror as needed. 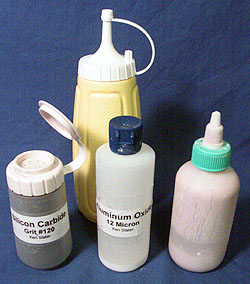 Dispensers: Picnic style Salt Shakers, Squeeze Bottles and Mustard Containers are all useful for dispensing abrasives. When storing grit, we always use a plastic bag in addition to the stiff container. You will be surprised at how many grit particles are caught by this bag! Only have one grit container open at a time, all the others should be away from your work and securely stored. Picnic style plastic salt and pepper shakers that seal up are handy for course grits; they can be sprinkled on the mirror directly. Finer grits and polishing compounds are often pre-mixed with water in a suspension; here plastic squeeze bottles (also squeezed-style mustard containers) can be used effectively. 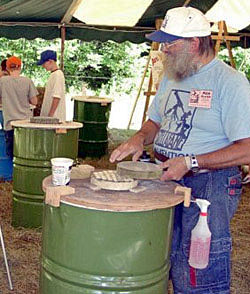 Grinding on a Barrel (a 55 gallon drum) under the tent at the 2000 Stellafane Convention. Plywood top is clamped barrel with thumbscrews. Grinding StandYou have a lot of choices here, try to find something that fits in your workspace and is comfortable for you. Traditionally, mirror makers used a wooden barrel, and phrases like "Walk around the Barrel" are still in common use by ATM's. But few use wooden barrels anymore. Steel or Plastic 55 gallon drums are the current best approximation: a plywood work surface is fastened to the top and the barrel can be partially filled with water to give it ballast.  Turntable Clamped to Counter Everything in place ready to grind! If you can't get hold of a barrel, you can build an approximation of one. A square wooden grinding stand or a wooden disk attached to a vertical pipe sunk in a bucket of concrete - there are endless possibilities. Your grinding stand should be about waist high, and it needs to be stable, as you will be vigorously pushing it from all directions. 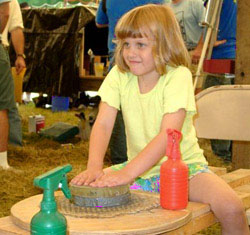 Grinding on a Bench with Turntable at the 2000 Stellafane Convention. Note the use of a non-skid mat instead of cleats. If you can't fit a stand, build a simple turntable out of plywood. You can clamp this to a kitchen counter, or a bench or table. You do not need a fancy pivot; a screw sunk in the base and a blind hole in the turntable is more than adequate. You do not want your turntable to spin freely, so a little friction is good. In general, given a choice, most people find it easier to "walk around the barrel", so you might consider one of the freestanding stands first. But many, many mirrors have been successfully made on turntables - which we use at the Stellafane mirror courses due to lack of sufficient space. You need a way to hold your mirror or tool. Three cleats or two cleats and wedge are the traditional method. Recently becoming popular is to use a disk of non-skid mat, sold as draw liners in supermarket or discount stores, or as router work holders in home centers. These have a checkerboard patter of rubber bumps and holes, and grip really well.
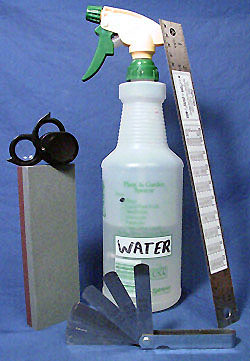 Miscellaneous Items An eye loupe sits on a carborundum stone. A steel ruler, with a table of common sagittas attached, rests on a spray bottle. In the foreground, a feeler gauge shows off several of its blades. Miscellaneous Items
|
||||
|
Back to the ATM Index Page |
||||