

Installing a Spider or Vane in the Tube
Installing a spider or vane in a telescope tube is not very dependent on the type you are using; the major variation is how many holes you will drill. The procedure given here will work for four or three vane spiders, two vane holders (including our curved-vane diagonal holder), and many other types.
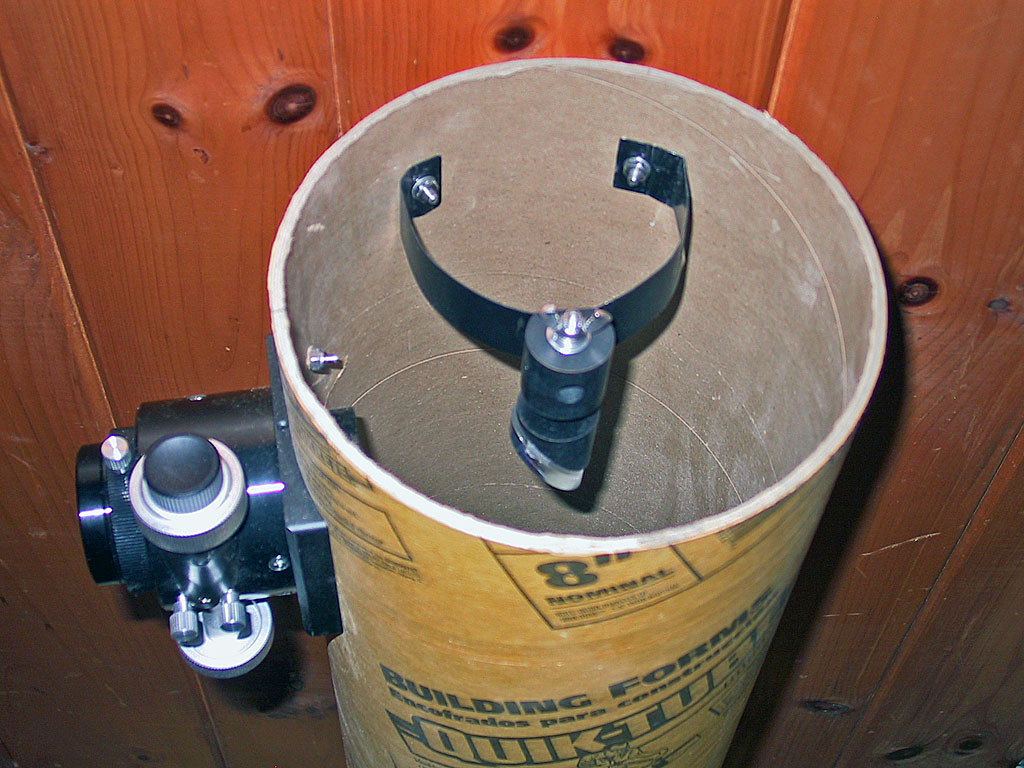
Our goal is to hold the diagonal mirror in the center of the tube directly under the focuser. Most holders allow the diagonal to be moved along the optical axis of the tube a little bit (usually by adjusting the threaded rod that attaches the diagonal holder to a hub), and they allow the diagonal to rotate, so final adjustment of getting the diagonal exactly under the focuser is usually easy. A properly sized spider will almost be self centering, some are a bit undersized with long mounting bolts (see photo at right) and that allows you to make centering adjustments. Vanes, especially curved vanes, may take some more care and effort to get centered (and often a small bit of bending the vanes is involved).
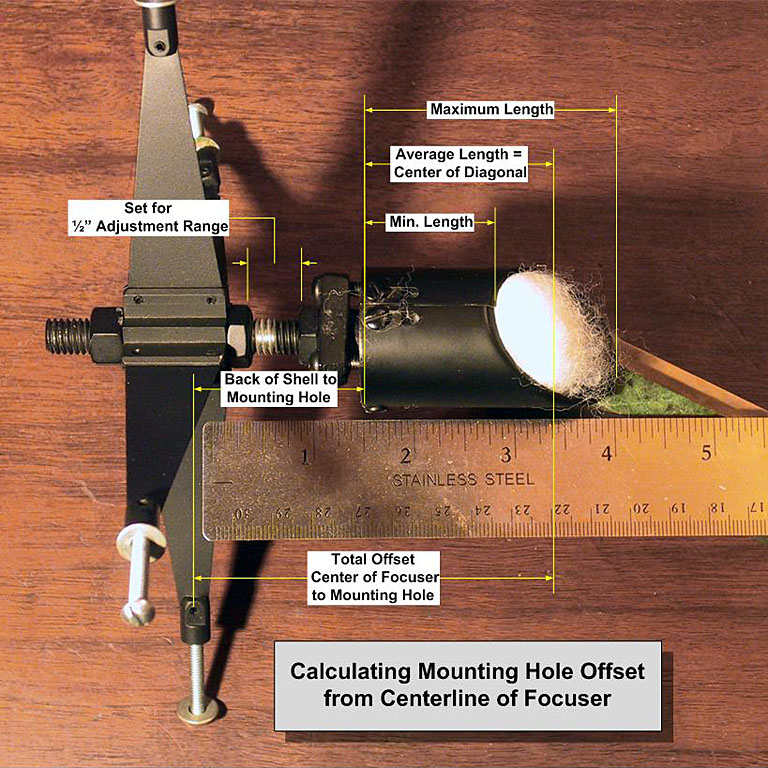
Inset from Front of Tube: Our immediate challenge is to determine how far from the front of the tube to drill the mounting holes. We must calculate the mounting hole offset from the focuser, and then we can calculate the offset from the front of the tube. Referring to the photo above, adjust your holder so there is about ½ inch of adjustment range between the hub and the holder. Your threaded rod should be long enough to give you at least that amount of adjust towards the primary mirror also - about 1 inch total adjustment range, and we measure with the holder near the center of that range.
Now we want to measure the distance from the center of the diagonal mirror surface to the center of the mounting bolts or holes. Note that you can measure the shell lengths if you have a shell type holder; if your diagonal is glued on, you need to measure to the mirror surface. Since it is difficult to measure where the center of the elliptical diagonal is, we measure the shortest length and the longest length, add them together and dived by 2, which gives us the center length. To this, add the distance from the back of the holder to the mounting bolt or hole. This total length is the distance forward from the centerline of the diagonal mirror and focuser to the bolt holes. You can subtract this from the distance from the front of the tube that you mounted your focuser, to give you the distance from the front of the tube to drill the bolt holes.
Here is an example using our curved-vane diagonal holder:
- Set adjustment gap to ½ inch.
- Minimum Length, Surface of Diagonal Mirror to Back of Holder: 11/16 inches
- Maximum Length, Surface of Diagonal Mirror to Back of Holder: 2 inches
- Length, Center of Mirror to Back of Holder: (11/16 + 2) / 2 = 1.34 ~= 1-3/8 inches
- Back of Holder to Vane Mounting Hole: 1-1/8 inches.
- Center of Diagonal Mirror (and Center of Focuser) to Vane Mounting Hole: 1-3/8 + 1-1/8 = 2½ inches
- Front of Tube to Focuser Center: 4½ inches (from the Newt-Web design)
- Front of Tube to Spider/Vane Mounting Holes: 4½ - 2½ = 2 inches
Rotational Orientation: Our curved-vane spider must be mounted so the hub attachment bolt is 90° from the focuser axis. Three or four vane spiders can be mounted at any rotational orientation, but if you want your telescope to look well made you need to plan how to orient them. Usually a four vane spider is oriented at 45° to the focuser axis (so that two vanes are equidistant from the focuser). A three vane spider follows the same rule; in this case one vane is in line with the focuser on the opposite side of the tube.

Layout: Measuring from the font of the tube is easy, getting the positions of bolt holes along the circumference of the tube is harder. Our suggestion is to make a cardboard disk the exact inside diameter of your tube, with the center clearly marked and the hub drawn in. Then draw radial lines to represent the focuser axis and the vane positions. Make a couple of finger holes to aid in positiong this device in the tube, and we can place the disk in the tube to easily mark the radial positions of the bolt holes.
An added bonus for curved vane spider makers is that they can lay their vane and hub on this diagram and bend their vanes to the proper curvature (you can do this by hand, just bend a little at a time all along the vane). The goal is to bend the vanes such that the hub is centered. You might need to adjust the bolt hole locations a bit doing this. We found out we had mis-measured one vane leg, and it was ¼ inch too long, so we re-bent it to make a bit of a longer mounting ear on this one vane and adjusted the bolt hole location.
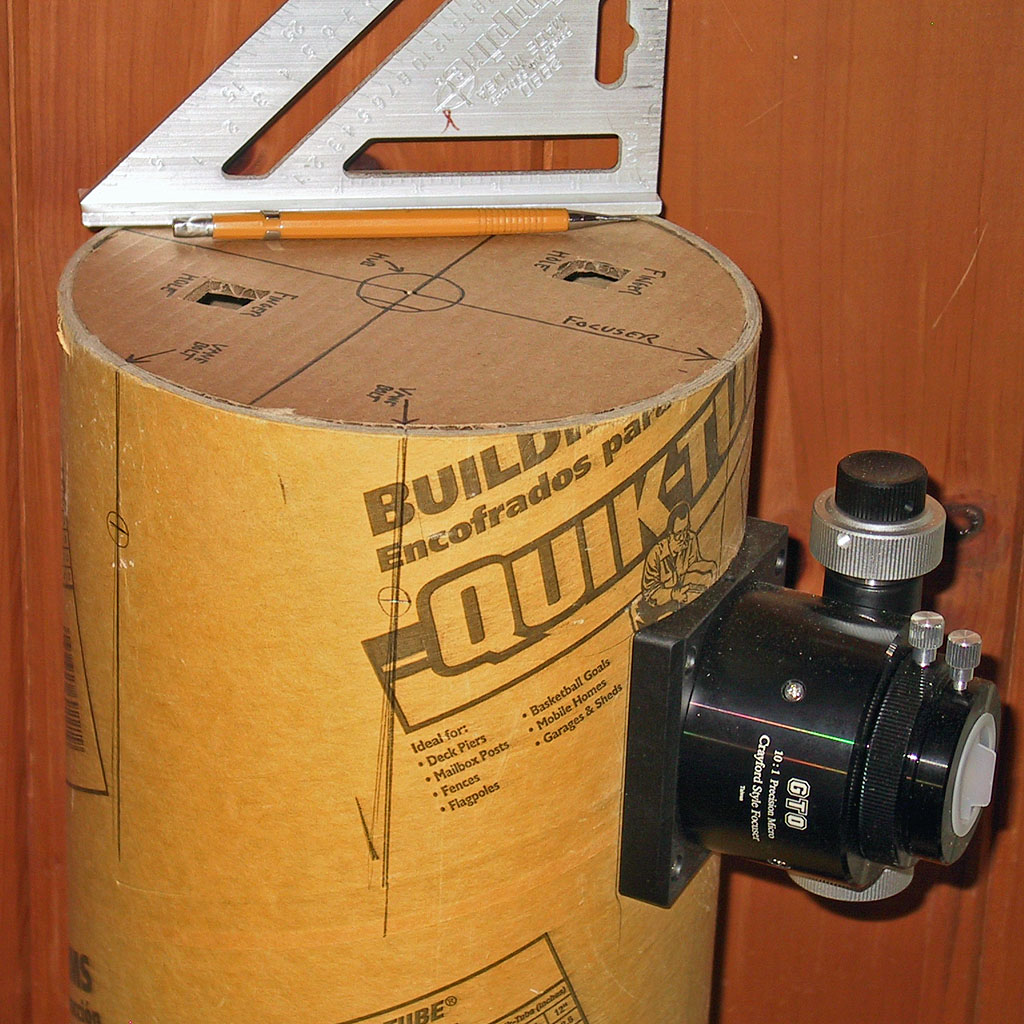
Marking the Tube: Place your layout disk in the front of the tube - it should be a close enough fit to stay in place. Line up the focuser arrow with the line you drew when you laid out the focuser location (if you recall, we suggested drawing a line the entire length of the tube to aid in laying out other components with respect to the focuser, which was the first to be installed). Now, use the marks you made for your vane bolt hole locations to mark the edge of the tube (Since we are using a two vane holder, we only need to mark two holes - if you are using a spider, you will need to mark three or four holes).
Extend these marks down the tube a few inches. We used the square pictured in the photo - but it is still difficult to make these straight on the curved tube. You can see in the photo there are a few lighter marks that 'wandered' a bit on us before we figured out how to hold the square firmly while drawing the lines. Now, using the measurement you calculated above, mark down from the front of the tube where the bolt holes will go. We put large circles around ours so they would be easy to see (the circles are not the size of the holes we drilled!).

Drill & Install the Hub: Remove the disk, select the proper sized drill bit, and dill out the mounting holes (We are using #10 bolts, and therefore used a 3/16 inch drill). You may want to place a small block of scrap wood behind each hole to reduce tear-out when the drill comes through the inside of the tube. Now remove the diagonal holder from the hub and mount the hub and vanes in the tube using suitable hardware.
Now, slip the layout disk back into the tube and snug it up against the hub from the rear. Use it to check that your hub is centered and adjust it if it is not. For a curved vane holder, you might need to bend the vanes a bit (we had to make about a ¼ inch adjustment). For a three or four vane spider, you most likely will need to adjust the lengths of the mounting bolts to pull the hub one way or another.

Install the Diagonal: Now carefully assemble the diagonal and it's holder to the hub. In our 8 inch tube our large hands were a tight squeeze but we did it. In smaller tubes you may have to remove and then reinstall the the hub assembly after replacing the mirror and holder. Be sure to keep your fingers off the mirror surface. To recheck centering, you could mark a hole the size of your threaded rod in the center of your layout disk, and insert the disk from the front of the tube to check that the threaded rod aligns with the hole.
Tighten the vane to tube bolts, but don't tighten up the hub yet, we need to do a very rough alignment, both to verify the diagonal can be aimed properly, and to prepare for mounting the primary mirror and testing the telescope.
Rough Alignment of the Diagonal: Your diagonal holder should offer three adjustments: (1) Distance from the front of the tube (usually by screwing a threaded rod that passes through a hub); (2) Rotation (again usually by twisting the diagonal on the threaded rod); and (3) Tip (done in a variety of ways; most often by three adjustment screws on the back of the diagonal holder; in our curved-vane spider done by twisting the hub on the vane).
We want the diagonal to be centered under the focuser (distance and rotation) and to look right out the back of the tube (tip). To some extent, all of these adjustments interact, so you will have to iterate to get to the desired position. The photo at right provides a good illustration of what you want to see when you have completed rough adjustment. If you are using a 2 inch focuser, put your 1¼ inch adapter in to reduce the opening and making it easy to center the diagonal.
On the next page we will mount the primary mirror and check to make sure our telescope will focus.
Previous: Mounting a Diagonal on a Holder
Next: Installing a Primary Mirror in the Tube
Back to the Build a Dobsonian Master
Index