

Restoration of the
Hartness Turret Telescope
by Jim Daley, Springfield Telescope Makers
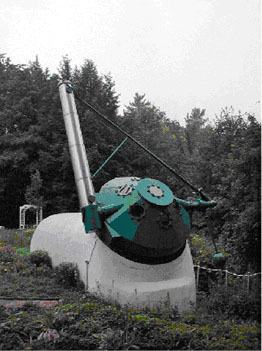
[2000-Jul-26] The year was 1974 and the Hartness equatorial turret refracting telescope had, over a period of 61 years of service, become close to unusable. Having recently led the project of restoring the Porter turret telescope (1970-1974), I was asked to evaluate the Hartness instrument and propose a restoration plan. A visit to inspect the Hartness scope revealed the following serious problems. The steel optical tube that supports the objective was rusted through and rain water had begun to collect on the 90 degree prism (by Brashear1 that directs the beam into the turret. After examining the prism with a flash light from within the turret it became clear to me that the rusty water had damaged (etched) the surfaces to such an extent that re-polishing would be necessary. The tube would absolutely need to be replaced as it was well beyond patching. A big surprise was in store for me when the 10-inch Brashear objective was examined in full sunlight. There it was, sitting in a beautifully turned bronze cell, with the crown and flint elements inexplicably cemented together! The cement was crazed and separated over half the area. I had been told that a little water was causing the appearance and it probably only needed cleaning! Astronomical objectives larger than ~4 -inch aperture are often oiled but never cemented to my knowledge. Why were these precious elements cemented? I never learned the reason.
July 2004
So, in the fall of 1974, a meeting was held with the Hartness House owners and with their endorsement the Springfield Telescope Makers volunteered to restore the instrument. I was asked to head up the project agreeing to personally restore the optics with Fred Schleipman taking on the job of fabricating a new tube. Fred’s job was by far the most labor intensive but he got a good team together and began construction on a stainless steel replacement. Other areas of the observatory were in bad shape and various club members took on these refurbishment’s which included water proofing the cement outer structure, a project that would haunt us for the next 26 years, along with many other mechanical details connected with the clock drive.
For my part, it was first necessary to carefully remove the prism and objective in its cell from the rusting tube structure and transport them to my home workshop. After close inspection of the 3-inch prism my worst fears were confirmed, the surfaces at 90 degrees were badly etched and would need to be re-ground and polished flat again. The 45 degree, internal reflection, surface was in fair shape and only required an hour or so on the pitch lap to restore. I thought of the prism as a warm-up for the big job ahead, separating the objective’s elements, so I finished the work in just a few days.
Well, the moment had come, the elements must come apart, but how? Having no knowledge of the cement material and finding no one who could relate its history, left me with little else to do but to “take the plunge” and that’s just what was done. Reasoning that the cement was failing from thermal shock, then more of the same should finish the job! The lens was removed from the cell and the edges (rims) marked with pencil indicating the skyward face and rotation position so that I could reassemble them as they were. The bathtub was filled with hot water about 3-inches deep and the objective’s flint surface submerged, then with just a light “pop” the elements came apart, swimming happily away on each other!
After cleaning off the cement with turpentine and acetone, the lens elements, separated with 3 foil spacers, were reassembled ready for the new tube. One thing that seemed odd was the patina on the flint outer surface looked more pronounced than the crown. Also some evidence of cleaning marks showed on that (flint) surface. At the time I reasoned that internal (within the tube) dewing or condensation had occasionally occurred which produced the strong patina. The rub marks on the surface were , I thought, from taking the cell off and cleaning the condensation. As you will soon see, this observation contained a vital clue.
I became curious about the optical correction of the doublet and since the new tube was months away, ample time was available for evaluation. The lens, back in its cell, was brought to a 12-inch diffraction limited Newtonian collimator at my workplace for testing. The lens was set up and squared on to the beam and a pinhole image observed in sodium light with a low power microscope. The view revealed an incredibly poor image, just loaded with pure spherical aberration. This lens was, apparently, just plain terrible and confirmed the last users comments that it would not resolve planetary detail very well! How was this possible, Brashear’s objectives were known to be superb. As an aside it should be mentioned that I had never viewed through this telescope so had no direct knowledge of it’s quality. Just on a hunch I turned the lens around front to back, still in the cell of course. To my amazement and relief a perfect Airy disk appeared in the microscope. This lens was obviously a flint leading2 type. After a short discussion with the late Scotty Houston the mystery was solved. Scotty informed me that Brashear designed and made all his objectives that way! Scotty was nearly right, however, as Bart Fried recently informed the author, Brashear did make some doublets with the crown leading after 1886. The observed patina and harmless rub marks on the flint, the vital clue, attests to the 50 or so years of use with the flint element facing the sky! The bad performance must have started after cementing (sometime in the 1950s) and, pitifully, it was reinstalled in a way that was standard for a doublet. If only the surfaces had been carefully marked when disassembled for cementing, but then again the cementing was so technically wrong to begin with! The reason, as I’ve said, will probably remain unknown. A possible explanation may be that fogging between the elements of the capped lens was occurring in the hot sun under certain conditions of humidity as the telescope is, after all, outdoors. The cementing would fill the airspace and prevent the fogging!
After further tests in white light, which showed the normal secondary color of a fine doublet, the lens was reinstalled in the cell, flint leading, and carefully boxed to await the day of installation in the summer of 1975.
This story ends well as the Hartness Turret telescope was successfully restored and has provided fine images ever since. (See Sky & Telescope Nov 1975 “Gleaning for ATM’s” for related article and restoration photos) Much of the recent maintenance has fallen on the shoulders of Charley Thayer who has taken a strong interest in preserving the scope. His recent work includes replacing the hundreds of steel tube screws, which have rusted badly, with stainless versions. He has also devised and installed a special gasket to seal a very bad oil leak around the exposed shaft ends in the clock drive gear box. And on it goes! Oh’ I forgot to mention our haunting, 26 year, water proofing project for the “white elephant”. Well it seems that Charley’s latest rubbery “paint” might be just the thing, stay tuned.
Epilogue
[June 22, 2004] The year is 2004 and the Hartness House is now under new management. The new owner has shown a strong interest in using the instrument and has asked for the STM’s help in inspecting the instrument and correcting any problems in its operation. Because the instrument was little used over all the years since the 1974 restoration, I had no knowledge of its current condition. We always showed the instrument to the convention goers' as part of the Museum tours and the Hartness staff would show it to interested guests. As such, the turret was little more than a “museum piece”, seldom used, but more or less outwardly maintained.
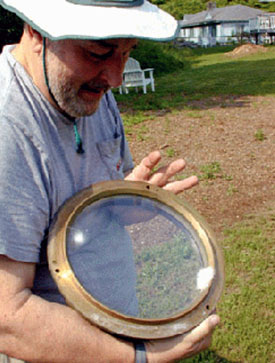
On April 24 I looked through the optical path at the daytime sky to judge the optical clarity. Things did not look good, the prism had massive blemishing and deposits and the objective had cocoons around its edge and in the path. The prism was removed and with the help of Alex Leonenko, the new owner, was cleaned as best we could. It is clear that the prism’s skyward face will need a bit of time on the pitch lap to remove some light blemishing, however, the surface quality in no way precludes beneficial use of the telescope. Paul Valleli was present during the prism cleaning and he agreed to help me clean the objective at the May meeting day.
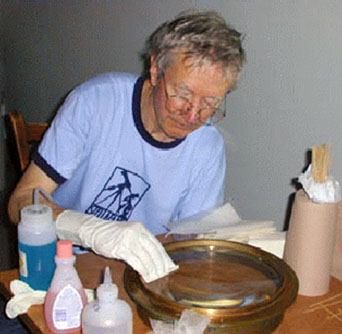
It’s May 15 and Paul and I removed the objective and began the cleaning process. First, we cleaned the back, cocooned, surface using mild detergent and Q-tips and distilled water. The cocoon fibers were really “stuck-on” but after a half hour of work they were finally skimmed away. A water wipe followed by good old Windex, very lightly applied to an optical tissue, finished the job nicely. The front surface was similarly cleaned which allowed a good view of the internal surfaces. They (R2&R3) looked somewhat hazy as one would expect after 30 years. We agreed to separate the elements at some time in the future and clean the inner surfaces. We saw no real optically harmful effect from the slight internal haze. The objective was reinstalled and we looked at the alignment using a point source at the focus. Something was not right: the reflection showed the optical axis of the system to be displaced. Paul and I agreed to fix this at the June meeting day.
It is June19, and Paul and I attacked the misalignment problem. With the 1-1/4-inch adapter removed we observed severe clipping in the path. Using a laser alignment tool in the reworked 1-1/4 adapter that I had machined to aim true, we observed the beam exiting the objective well aligned in Declination, but offset in RA. Paul reasoned that it was the prism position. I pulled the prism assembly out a little and the offset got worse. It seemed the prism cell was pushed home against its stops as a nice clunk was heard. Just on a hunch I pushed on the heavy cast iron cell with all I had: wham, in it went, this time against the real stop. The alignment is now next to perfect.
The rest of the afternoon was spent using the telescope to project sunspots and what beautiful resolution did we all enjoy. Fortuitously, attendees to the Scientific Instrument Collection in the University (SCIU) will visit the Harness Turret on Sunday, June 27 as part of a tour which includes our beloved Stellafane. This tour ends a 4-day international SCIU symposium held at Dartmouth College.
Oh, Charlie’s rubbery paint is still holding-up fine!
Back to the Early History Page
The author is indebted to Bart Fried for pointing out some errors and omissions, now corrected, in the above article.
1 John A. Brashear (1840-1920) -- A lens maker of Pittsburgh, PA. (His telescope lens making plant was located in Allegheny, PA which was later incorporated into Pittsburgh.) Hisunique flint leading form came from Charles Hastings, a close associate who supplied Brashear with the prescription, was used in all of his many telescope objectives and culminated with the beautiful 30-inch f:18.5 Thaw Refractor which is the principal instrument of the Allegheny Observatory, however, the historic Brashear objective is now retired and replaced with a new objective lens. The actual optical design (computation) of Brashear’s objectives was the work of Dr. Charles S. Hastings, of Yale University. One claim for the flint leading form was the thought that flint weathered better than crown and dewed less. The makers claimed that there were certain optical advantages as well, although, they did not specify what they may be. See S&T April 1991, Bart Fried, The Masterful Techniques of John A. Brashear pg.432-433
2 After further research we find, (Jacobs “Fundamentals of Optical Engineering” pg 188-199), that the objective is called a “Steinheil or flint-in-front objective”. The authors claim the design is more susceptible to weathering of the exposed flint element and less abrasive resistant than in the normal crown glass leading type objective. Matt Considine has investigated the weathering of flint glass and found that Hastings performed tests and determined that the flint glass of the day did weather better than the available crown. On the positive side the design apparently shows less zonal spherical, however, at the cost of a steeper field curvature.