|
||||
Mirror Making OverviewThis page will give a brief overview of the mirror making process. The goal is not to provide detailed instructions (which are provided elsewhere on this site), but rather to give you a high level view to get you oriented and comfortable with the whole process. Also note that there are often several alternative techniques to accomplish any given step; we only present the most common or well-accepted ones here. 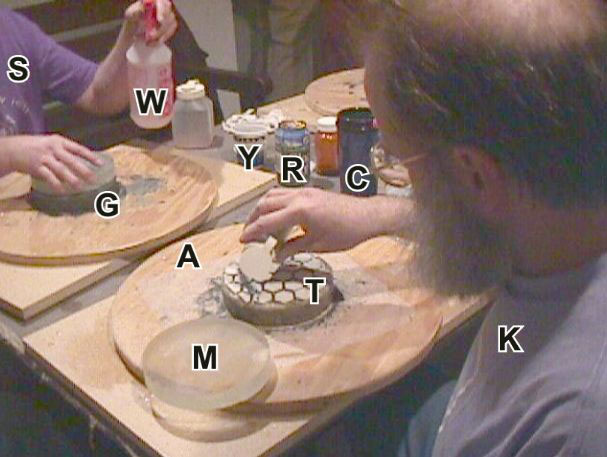 Mirror Grinding at the Spring 1998 Stellafane Mirror Workshop in the McGregor Observatory Rough GrindingThe purpose of rough grinding is to start to cut a spherical concave surface into the mirror blank. For a 6" mirror with a 48" focal length, the depth of the curve is 0.047". A full sized tool is rubbed against the mirror blank, with a wet grit mixture, to abrade the glass (and also the tool, which becomes convex). Simple materials are used as illustrated in the photo above and description below: Mirror blank M is sitting to the side on plywood turntable A, while Mirror Maker K is sprinkling Silicon Carbide Grit (black particles) onto Tile Tool T from a plastic salt shaker in his hand (attached cap hides the holes). Mirror Maker S chooses to apply grit from Yogurt Cup Y with a plastic spoon. The grit is kept wet with water (to lubricate the grit and trap glass dust) from Spray Bottle W. Mirror Maker S is grinding with one hand, Mirror on Top, with a solid Glass Tool G on the bottom; he will rotate the mirror and tool in opposite directions frequently and at random angles to ensure grinding strokes will curve the entire surface of the mirror and tool. One charge of grit and water, called a Wet, lasts about 10 minutes in rough grinding. Rough grinding will take 4 to 6 hours in total for a mirror this size. Note Soda R and Coffee C to keep grinders working steadily. For more details, see our Rough Grinding page. Fine GrindingThe purpose of fine grinding is to smooth the surface generated by rough grinding and to get "good contact": that is, grind smooth matching spherical surfaces on the mirror blank and tool. Smaller and smaller sizes of silicon carbide grit is used in the first stages of fine grinding, and then a switch is made to even smaller and finer grades of Aluminum Oxide grit. 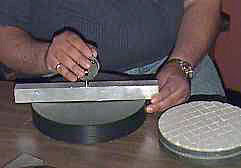 Measuring Depth of Curve The same tools and equipment are used as in rough grinding. For the finer grades of grit, many people find it easier to pre-mix them with water in squirt bottles and apply the grit and water to the tool and mirror together. Between each size of grit, all the equipment, clothing and people need to be washed and cleaned to prevent a rouge particle of larger grit from scratching the increasingly smooth mirror surface. The desired depth of curve is precisely achieved in the early stages of fine grinding by varying the position of the tool and mirror (Grinding with Mirror on Top increases it, grinding Tool on Top decreases it). The photo above left shows a mirror maker checking the depth of curve during fine grinding. A metal straight edge (ruler) and inexpensive automotive feeler gauges can also be used. At the end of fine grinding, the mirror surface is smooth to the touch but still has a grayish, non-reflective, dull surface. For more details, see our Fine Grinding page. Polishing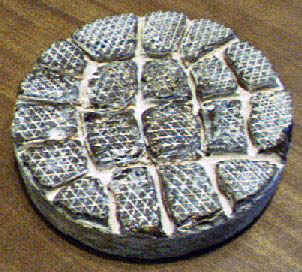 A well-used 6-Inch Pitch Lap Polishing will result in an optically smooth surface on the mirror - again we polish with a goal to make a smooth, polished concave spherical section. We abandon the hard tool in favor of a Polishing Lap - a stiff substrate covered with Pitch. This is a very viscous material that can be pressed into good contact with the mirror surface. The photo at right shows a well used, deeply channeled pitch lap on a concrete disk substrate. The pattern on the pitch facets is Micro Channeling produced by pressing a nylon mesh into the pitch. An ultra fine abrasive slurry, typically Cerium Oxide, is poured on the lap and becomes embedded in it. The lap is then pressed onto the mirror with weights to achieve good contact. The polishing strokes begin. With good contact there is high friction, and polishing is the hardest work during mirror making. Polishing should take between 4 to 6 hours for a 6" mirror. Figuring & Testing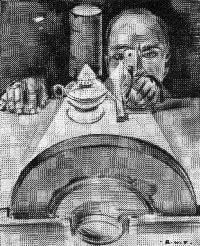 Early Mirror Testing When done with polishing, we have an optically smooth concave spherical section on the surface of our mirror. The purpose of figuring is to very, very slightly deform this sphere into a parabola so that our mirror will focus all incoming rays of light to a single point. Using a special stroke with our polishing lap, the center of our mirror is deepened with a smooth transition from the edge. We verify that we have an initial sphere and later the resulting parabola by using the knife edge test. The test can verify that we have accomplished our goal, or indicate how the surface must change. Different strokes with the polishing lap work on different zones on the surface, and we can use these to figure the surface into the ideal parabola. The drawing at left by Russell Porter shows a knife edge test being made in the early days of mirror making (~1930). The mirror, with its back to us, is in the foreground. Note the kerosene lamp with a metal hood and pin hole being used as a light source (flashlight bulbs or light emitting diodes are used today). The mirror maker is looking at the telltale shadows past a sliding knife edge. Beside the source of illumination, nothing much more has changed with this simple yet extremely accurate test, which allows a mirror maker to figure mirror to a fine parabola. Aluminizing An Aluminized 4-Inch Mirror reflects a textured ceiling. Once the surface has the right figure, it needs to be made reflective. This is accomplished by coating the mirror with a thin layer of aluminum. The process requires a high vacuum and special equipment. Most amateurs have this done by an optical coating vendor (check our Links Page for vendors). The photo at right show an aluminized 4" mirror. The black ring is used for telescope alignment, the apparently mottled surface is the reflection of textured white ceiling in the room the photo was taken. SummaryMirror grinding and figuring consists of four major steps (plus aluminizing). Rough and Fine grinding use hard tools (glass, tile or metal) and harder then glass abrasive grit (Silicon Carbide or Aluminum Oxide). Polishing and Figuring use a soft pitch tool and ultra fine abrasive (Cerium Oxide or Rouge). Up until figuring, the mirror maker uses strokes with random mirror and tool rotation which naturally results in a spherical section. In the final steps of figuring, this spherical section is "deformed" into a parabola with a special figuring stroke. Details of each step are provided in subsequent pages, along with plans to build your own tester - go back to the Stellafane ATM Index Page to find and read them. |
||||