Rough Grinding
This page describes the rough grinding process.
Before You Start
Use this checklist to make sure you are ready to start rough grinding:
You may click on the hyperlinks in the above checklist to visit the pages where we discuss each of these
items. When all the check list items are done, you are ready to start grinding!
Warning!
With any glass grinding operation, you must work wet, to prevent glass dust from entering your lungs.
Always keep the glass and tool wet to prevent glass dust from becoming airborne. Never grind glass dry!
Inhaling glass dust can result in Silicosis, a serious lung disease.
Keeping your work wet is a proven technique to prevent inhalation of glass dust. Keep your work and
wet and you should not have to worry!
|
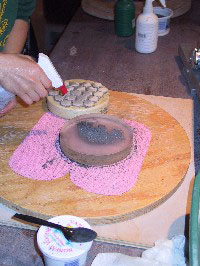
Rough Grinding or "Hogging Out"
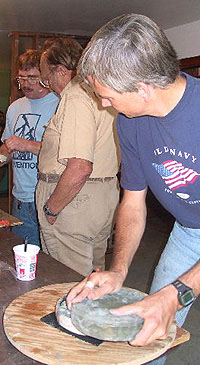 Peter uses the Chordal Stroke
on a new 8" Mirror
Rough grinding is often called "Hogging Out", as your goal is to remove the majority of the
glass needed to form the curve of your mirror. It is not particularly elegant work, being the noisiest and messiest
part of the whole mirror making process.
GOAL: You have completed rough grinding when you have:
- Removed enough glass to reach you target sagitta (±0.001")
- The curve you have ground extends evenly and smoothly to the edge of the mirror.
ABRASIVE: Use your coarsest grit. This is usually for #60 Silicon Carbide, but may be #80 for 6" or
smaller mirrors, and might be #40 for very large mirrors.
TOOL: Use your hard tool (Glass or Tile). Start with the tool on the bottom.
STROKES: Begin with the Chordal Stroke
and as the curve spreads towards the edge end with the
Normal Stroke (See text below for transition
information).
PRESSURE: The harder you press, the faster the grinding will go. But pressing
is hard is tiring, and you need to grind over a period of time, so don't press so hard
that you wear out easily. If you don't press at all, grinding will go much more slowly,
but it will still get done. Some people use barbell weights on top of the tool or mirror
so that gravity provides the pressure instead of them.
TIME: A 6" f/8 or 8" f/6 mirror will typically be rough ground in 3 to 6 hours or work, depending
on mirror size, grit size, pressure applied (more pressure means short wets but more glass removed) and personal
work style.
PROCEDURE:
Start with the Chordal Stroke at 40%
overhang. Do about 15 Wets, which is about 15 to 20 minutes of
work. Be sure to rotate you tool and mirror (or rotate you tool and walk around your grinding stand) about
every 5 to 10 strokes. This is critical in all stages of grinding, so get in the habit now.
 The Spreading Curve
Curve Depth
Greatly Exaggerated
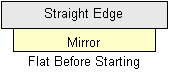
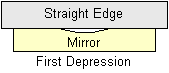
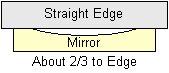
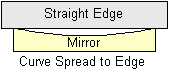
Then stop and measure. Clean your mirror by dunking it in a bucket
of water. Just use a straight edge to see the initial, central depression in the mirror, like the second
picture from the top at right. Then measure your sagitta, to see how deep
you have dug the hole. Your goal is to get to your target sagitta just about the time the curve spreads
to the mirror's edge.
You would like to be at about 1/4 of your target sagitta and have the curve about 1/4 of the mirrors
diameter at this first stage. These are very rough goals, don't try to hit them exactly, just get close.
If your are short of these goals, do a few more wets until you get close. If you feel you are going too
deep too fast, reduce the chordal stroke overhang to slow deepening and put the work of grinding towards
spreading the curve. Similarly, if you have curve that is wide and shallow, increase the chordal stroke
overhang to concentrate the grinding work on deepening the curve. Do more wets, and
clean the mirror and tool about every 10 wets.
Once you have achieved the initial 1/4 sagitta, 1/4 curve diameter goal, continue on with anther set
of wets with less overhang on the chordal stroke (perhaps 30% to 25% overhang) to get to a curve that is
about 1/2 of target sagitta and spread to about 1/2 of the mirrors diameter. Stop and measure with a straightedge
for curve spread and check your sagitta about every 15 minutes, and adjust your stroke overhang as necessary.
In order to spread the curve outward to the mirror's edge, you keep reducing the overhang of the chordal
stroke. In the last stage, you will want to reduce the overhand to nothing. At this point, convert to using
the Normal Stroke for the remainder of
your work.
With the curve out to the edge of the mirror, check you sagitta. If it is not deep enough, do more wets
with the Mirror on Top. If it is too deep, flip the mirror and tool positions, and do some wets with the
Tool on Top, which will wear the edges down and reduce the depth. Using these techniques, you should be
able to get within 0.001" of you target sagitta
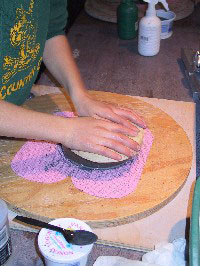
FINISHING UP ROUGH GRINDING:
 Cleaning a Turntable
Check: that the curve is really to the edge of the glass everywhere, and that you
are at or very near your target sagitta.
Bevel: Have you reduced or eliminated your bevel? If so, now is a good time to put it back to
where it needs to be. Instructions for How to Bevel.
Clean: Now is the time to clean everything, and make sure none of your coarse grit is lurking
about to cause a scratch in the next stages. Start by cleaning the mirror and tool,
and put them safely aside in a clean place. Then clean you work area, including your grinding stand or turntable,
water buckets, spray bottle, and anything else that may be hiding that odd piece of grit. Finally, clean
yourself. Change your clothes and take a shower. Clean under your fingernails, also, a favorite grit hiding
place. You must clean thoroughly between each grit - this is the first of many cleanings!
CONGRATULATIONS! You have finished rough grinding. On to Fine Grinding
What is a "Wet"?
A wet is one unit of work on your mirror, begun with a spray of water, a charge of grit, and then grinding
until the grit breaks down and you are no longer doing useful work, or on finer grits until the wet dries out.
It doesn't matter if you spray or sprinkle first - I like to spray first, but the young man I was photographing
(below) preferred to sprinkle the grit first.
For rough grinding a 6" mirror, about 1/2 teaspoon of grit is used per wet. With finer grits, proportionately
less grit is used per wet. Grits in the25 micron range are often premixed with water to form a slurry, and water
and grit are squirted onto the work together from a plastic squeeze bottle (not a spray bottle).
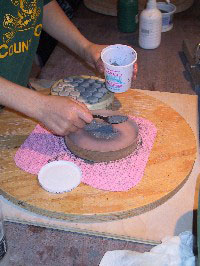
Sprinkle on Grit |
Spray on Water
Always Work Wet! |
Grind Until Grit Breaks Down
or Work Dries Out |
Cleaning the Mirror & Tool
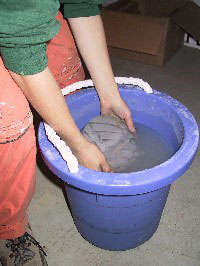 Cleaning a Mirror
in a Dunk Bucket
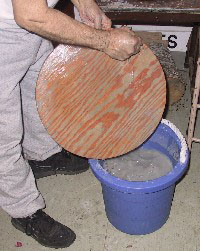
After several wets, your mirror and tool will be covered in a gray mud of ground glass and spent abrasive.
You will need to clean them off periodically, because the mud will inhibit efficient grinding or you need to
take a measurement. You need not do this after every wet; every 5 to 10 wets is typical practice.
The best way to clean is to use a plastic dunk bucket. Just dunk the mirror and tool into the plastic bucket
filled with water a swish a bit; all the mud will wash right off and fall to the bottom. DO NOT RINSE MUD
DOWN YOUR DRAIN - it will build up into a hard cement and you will be calling the plumber very shortly.
To clean out your dunk bucket, you can pour off the water down a sink drain, then scrape out the gray mud into
a plastic bag, or hose it out in your yard (it is very harmless and inert stuff, not much different than beach
sand).
If you need to dry off the mirror for a measurement, a soft cloth towel or paper towels will do the job.
|