

Reading Ronchigrams
What is a Ronchigram?
A Ronchigram is the image of the mirror you see in a Ronchi Tester. The Ronchi Test was invented by Vasco Ronchi circa 1923. Typically a Ronchigram has a few or many vertical bands when outside or inside of focus, but sometimes you also see bands that curve into loops or blobs. At focus, there is at most one vertical band, and at this point the results look much like the Knife Edge Test (but it is better to use a knife edge for this purpose). Remember that the closer you are to the focus, the fewer the bands you will see. As you move away from focus in either direction, more and more bands will appear.
We suggest using the Ronchi Test to set up your tester, to check your mirror to see if it has a spherical figure, and to check for edge problems. For everything else we recommend using the Foucault, or Knife Edge, test. Because our tester can switch easily between these two tests, it is easy to use the best test for the subject at hand.
Selecting a Ronchi Grating
To use the Ronchi test, you replace the knife edge in a Foucault tester with a Ronchi grating, so the that both the illumination and your view of the mirror pass through the grating (Our Tester is designed to make this easy, but most any tester can be adapted to do this test). So now you need to consider what type of Ronchi grating to use.
The first choice is the grating material. Currently, two materials are popular: Etched Glass and Printed Film. The film can be of very high quality if printed on a very high resolution professional phototypesetter, or it can be printed on overhead transparency film at home on a laser or inkjet printer (We offer patterns for printing here). Etched Glass has excellent line quality, holds up well, but is fairly expensive. Some folks report that the thicker glass gratings have larger diffraction effects than film. High quality professionally printed film can also have excellent line quality, and can be up to 10 times less expensive than glass. Printing on consumer grade equipment, laser printers generally produce better lines than inkjet printers, but both suffer from lower quality line edges, and hence lower quality Ronchigrams (however, the sample Ronchigram (below) was made with a home-printed 100 LPI screen on a very old laser printer, and as you can see, it does work pretty well). We would recommend trying to purchase a high quality film grating, see out Vendors List for sources.
The other choice is to select the Line per Inch (LPI) of the grating. These can vary from 50 to 500 LPI, but typical amateur values are 85 to 133. As the line count goes up, diffraction effects blur the bands and you get overlapping shadows, and at some point that makes the whole thing useable. The faster the mirror (the lower the focal ratio) the more increasing the line count helps (Both Foucault and Ronchi testing have lower senility with faster mirrors). For a typical "middle of the road" mirror (6 or 8 inches, f/6 to f/8), a 100 or 133 LPI grating will work well. People who work with very large mirrors (>= 16") favor coarser gratings, but theory says this lessens the sensitivity of the test. So if you are doing a typical first mirror, getting a 133 or 100 LPI grating should serve you well.
Position Matters & Movement Helps
It is critical that you know if you are inside or outside of focus when reading Ronchigrams - their meaning changes on either side of focus. Whenever you are doing the Ronchi test, find the focus point first (see our Tester Setup page), then move towards the mirror if you want to test inside of focus, or away from the mirror if you want to test outside of focus. Usually, moving about ½ inch to either side is about right; or move until you get 4 or 5 pairs of bands in view (like the image below right).
When trying to pick out subtle curves in the bands, moving the bands can help. Use the lateral control on your tester (the control you would cut the knife edge into and out of the beam with) and you will find the Ronchi bands will move from side to side as you view them. It is often easier to pick up a hook at the edge or a subtle non-parallel feature when you do this.
Inside ROC the Ronchi test is most sensitive to central evaluation, and outside ROC it is most sensitive to edge zones. So if you are looking for edge problems, test outside of focus. Our sample Ronchigram (below) certainly highlights this rule - the hooked bands indicating a turned down edge are much easier to pick up outside of focus than inside of focus.
The Ideal Ronchigram
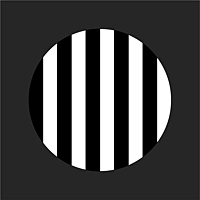
Ronchigram of an ideal Sphere
The perfect Ronchigram is seen when your mirror has a perfect spherical surface. Of course, the reality is that a real Ronchigram is never quite perfect, due to a variety of imperfections in the tester, the mirror, and the air in between. Most notably, the band edges are never quite as sharp and clean as the ideal drawing would suggest. None-the-less, we present the drawing of the ideal Ronchigram here so you will know what absolute perfection looks like.
The perfect spherical figure will produce absolutely straight and parallel Ronchi bands that are evenly spaced. As you will see below, any deviation from the perfect sphere will alter the bands in some way from this ideal. We will review the most common non-spherical patterns below. The ideal Ronchigram of a perfect sphere looks the same on either side of focus (other figures do not).
Reading a Sample Ronchigram
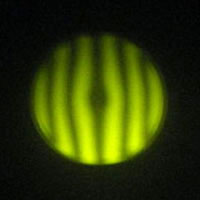
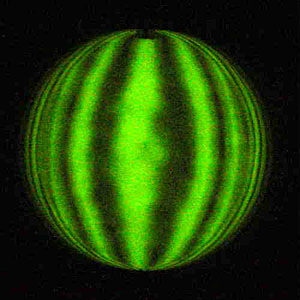
Ronchigram .4" Outside Focus

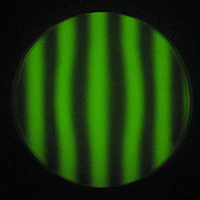
Ronchigram .4" Inside Focus
The Ronchigram at right, taken by Richard Junget of Minnesota using a Ronchi grating printed on transparency film, is a good example of what you might see right after you finish polishing and do your first test. This Ronchigram was taken 0.400 inches outside of focus.
There are three things you should notice in this Ronchigram:
- The major curvature of the bands are outward (away from the center).
- There is bulge in the band at the center of the mirror.
- The ends of all the bands hook outwards (away from the center) at the edge of the mirror.
These observations, and the knowledge that the Ronchigram was taken outside of focus, tell use the following things about the condition of the mirror:
- The overall mirror surface figure is of an Oblate Spheroid (flatter than a sphere).
- There is a small raised dimple in the center of the mirror.
- The mirror has a turned down edge (flatter than the overall surface curvature).
The lower right Ronchigram of the same mirror shows how the bands change when viewed inside focus. Also note that many features of interest are not as easily discernable from this position; we advise checking both inside and outside of focus, in both cases moving the bands side-to-side while viewing, to maximize detection of issues. Four to six bands are a good number to have on the mirror for these visual tests, although technically the test is most sensitive with many more bands showing, However, it is harder for inexperienced testers to pick up problems with the much narrower bands.
We get a lot of information about this mirror by just knowing how to interpret the way the Ronchi bands bend on the mirror. You can use the table below to interpret your own Ronchigram.
Ronchigram Tables
The tables in this section catalog common Ronchigram features and tell you what they mean.
| Overall Band Curvature | Inside of Focus | Outside of Focus |
|---|---|---|
 Curves Away From Center |
Overcorrected | Oblate / Undercorrected |
 Straight and Parallel |
Spherical | Spherical |
 Curves Into Center |
Oblate / Undercorrected | Overcorrected |
"Oblate / Undercorrected" means the mirror surface is an Oblate Spheroid and is 'flatter' than a sphere.

"Overcorrected" means the mirror surface is deeper than a sphere and could be a Prolate Spheroid, Parabola or Hyperbola. Use the Foucault Test to determine what it is. If you are just trying to get to a sphere, you need to work on flattening out the surface of your mirror.
Note that bands that curve away from center can curve so sharply that they curve back onto themselves and form little blobs, not bands, as shown at right.
| Band Ends | Inside of Focus | Outside of Focus |
|---|---|---|
| Hook Outward | Turned Up Edge | Turned Down Edge |
| No Hook | Good Edge | Good Edge |
| Hook Inward | Turned Down Edge | Turned Up Edge |
You can examples of hooked band ends in the two sample Ronchigrams in the Reading a Sample Ronchigram section above.
| Ring Seen in Bands | Inside of Focus | Outside of Focus |
|---|---|---|
| Ring Bulges Outward | Raised Ring | Depressed Ring |
| No Ring | No Problems | No Ring |
| Ring Bulges Inward | Depressed Ring | Raised Ring |
We are looking for good examples of this case. They will be added when found.
| Bands at Mirror Center | Inside of Focus | Outside of Focus |
|---|---|---|
| Bulges Outward | Depressed Central 'Hole' | Raised Central 'Hill' |
| Straight & Parallel | No Problems | No Problems |
| Pinches Inward | Raised Central 'Hill' | Depressed Central 'Hole' |
| Examples for "Bands at Mirror Center" | ||
|---|---|---|
 Shadowgram, knife from left. |
 Ronchi Inside Focus |
 Ronchi Outside Focus |
The outer third of this mirror is a good sphere, while in inner two-thirds have a Central Depression or 'Hole'. You can see where the hole starts in the Ronchigram by where the otherwise straight and parallel bands start to bend. It is easier to see this on the inside of focus Ronchigram than the outside of focus one, but it is there in both if you look. | ||
Surface Roughness
You can see surface roughness (which is not a good thing - mirrors need to be smooth) in a Ronchigram. The two pictures below of the same mirror which has been figured close to a parabola have very rough band edges and discolorations in the light (green) areas. If these artifacts move while you are viewing, they are likely air currents. If they are static, you are looking at a mirror with a rough surface which should be corrected. Compare this rough surface to the much smother surface in the photos directly above.
 Rough 10" Inside Focus
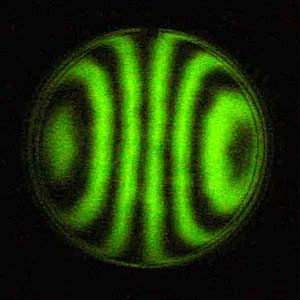 Rough 10" Outside Focus
Note that this mirror does not have a turned down edge, although the band edges hook outwards at the edge of the right photo. This is how a paraboloized mirror looks in the Ronchi test, and the hooking in this case is there because the outer bands are closing around on themselves. Hooking is only an indication of TDE when the bands are generally straight and parallel and then make a sudden hook only at the edge.
Astigmatism
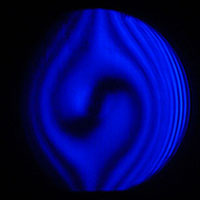
Astigmatism in a 32" f/4
Photo by Michael E. Lockwood
If you have been faithful in "walking around the barrel", or rotating your tool and mirror randomly while you work, you should not have any astigmatism, But it does happen, so this section will tell you what it looks like in the Ronchi test. Should you have astigmatism, please fix it right away, as it is very difficult to figure a mirror well when it is astigmatic.
What is astigmatism? It is when your mirror surface is not a figure of revolution (sphere, spheroid, parabola or hyperbola); instead, the figure varies along different diameters. This is just like astigmatism in the human eye. In a non-astigmatic mirror, you can rotate the mirror about it's center, and you will always see the same image. In an astigmatic mirror, as you rotate the mirror about it's center, magnifications and focus will change, and hence the image will have different distortions as the mirror is rotated.
Severe astigmatism can manifest itself as "S" shaped bands in the Ronchi Test, or more commonly the bands will undergo a clock-hands like rotation as you move for inside to outside focus. Assume you have a Ronchi grating with vertical rulings - you would expect to see vertical bands, straight if the mirror is a good sphere, curved if it has some other figure, but in all cases the ends of the bands would be vertically aligned. With an astigmatic mirror, you would see the whole band pattern rotated to one side while inside focus, and then as you move to outside focus, the would rotate to the opposite side.
In mild astigmatism (more likely), you will see a subtle "rocking" of the bands as you move from one side of focus to the other. The is not the normal synchronized bending that occurs with non-spherical mirrors, with astigmatism, the tops of the bands will be moving clockwise while the bottoms move counter-clockwise (or vice-versa).
 Sample Ronchi for Windows
output
Sample Ronchi for Windows
output
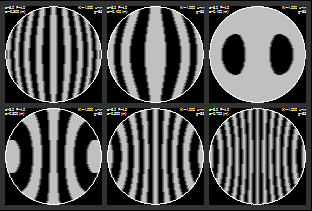
Ronchi Test Simulators
Several people have written Ronchi Test Simulators, currently Ronchi for Windows is one we would suggest is worth using. Why would you use a Ronchi Simulator? It can help you understand which figures produce what patterns, a good way of getting familiar with the test. The simulator will not simulate defects, only perfect conic sections. The conic section you want to simulate is specified by the conic constant: Infinity is flat, positive is the family of Oblate Spheroids, zero is a Sphere, between 0 and -1 is the family of Prolate Spheroids, -1 is a Parabola and less than -1 is the family of Hyperbolas.
You can download Ronchi for Windows Version 2 from our website. It is also available from the article Simulating the Ronchi Test by the author of the program, John D. Upton.