
Building the World's Largest
Schupmann Telescope
by Scott Milligan, Springfield Telescope Makers
Page 2 of 7
Assembling the Team
The first hint that I had perhaps crossed over the invisible line separating dream from reality was during July of 1987, when I first shared my enthusiasm for the Schupmann concept with coworker and fellow ATM Phil Rounseville. Phil and I had first met in 1983, shortly after I had joined the Amateur Telescope Makers of Boston. We had since been working together at Optical Systems and Technology, in the demanding and sometimes frustrating business of optical fabrication and testing. We quickly discovered our mutual interest in telescope making and astronomy would often keep us at the shop after regular working hours had passed.
At first, I envisioned the project to be an individual effort. Almost immediately, Phil expressed his enthusiasm, despite the fact that neither one of us had the slightest idea as to where such an instrument could be permanently housed, or what it would cost. Ignoring these practical difficulties for the moment, we outlined the course of our dream.
The first imaginary dragon slain was the question of aperture. We both agreed that ten inches was the absolute minimum to consider, since anything less would probably not give enough image brightness at the really high magnifications that the Schupmann design was purported to excel at presenting. But was ten inches really the optimum aperture? Jim Daley's design worked at f/10: the largest optical test table available at Optical Systems and Technology was twelve feet long. Clearly, a twelve inch f/10 instrument would fit on this bench. Having read that the world's largest currently operational Schupmann was a 12.75" instrument housed in Stuttgart, Germany, spurred us to consider the possibility of building ours just a silly millimeter larger . In our minds, we had already made the leap from 10 to 12 inches; the fact that the possibility of owning the world's largest Schupmann presented itself as a mere sidestep from 12 to 13 inches meant that the die was cast: were we to actually build this telescope, it would be 13 inches in aperture.
Harry Vandermeer, President and founder of Optical Systems and Technology, offered immediate and generous support for our plans. Not only did he arrange to allow us use of OSTI facilities after working hours, but he also secured from Schott Glass Technologies, Inc., a donation of the raw glass blanks for the optical elements. OSTI also supplied material and labor hours to make the necessary optical tooling we would require to do a professional job. The only condition placed on our acceptance of this largess was that the finished telescope would become the property of a non-profit organization. The amateur Telescope Makers of Boston had already agreed to spend up to $3,000.00 to fund construction of the tube assembly, and the Springfield Telescope Makers had decided to construct an observatory in memoriam of a recently deceased member, Douglas McGregor. Phil and decided to begin the optical fabrication work as soon as raw materials could be made available.
Fabricating The Optics
After contracting with a local machine shop to make aluminum holders for the lens elements and pitch laps, we began the tedious task of making the test plates to check the radius and figure of the convex surfaces. Although Daley's booklet points out that only one concave test plate is needed to build the design, (for the first surface on the main objective), we theorized that having test plates for all of the convex surfaces would allow us to pinpoint the exact nature and location of residual figure errors without ambiguity. In order to test as large an area of each aperture as possible, we decided to make the test plates for the main objective out of ten inch full thickness Pyrex blanks, while the test plate set for the corrector convex would be eight inch diameter Pyrex.
Phil and I began by fine grinding the convex and concave curve generated test plate blanks against each other. As fine grinding progressed, frequent use was made of sphereometers to ensure that the radius of curvature was accurately maintained. We found that with some practice, sphereometer readings were repeatable to within .0001-.0002 inches.
Care was exercised at this stage, lest the grinding slurry become too thin, which could cause the glass disks to cement themselves together. (The classic technique of grooving the grinding tool is not possible, since the "tool" is to become one half of the test plate set.) After progressing through a 5 micron fine grind with white aluminum oxide lapping powders, pitch laps were made on aluminum tools, and a quick polish was given to the concave member of each test plate set. Once polished, the radius of curvature was accurately measured, using either an instrument called a "radius bench," or a Ronchi tester and tubular inside micrometer. Subsequent adjustments to the radius of curvature were then made by varying the geometry and speed of the polishing strokes.

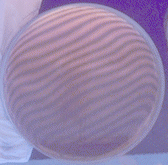
test plate set in the interferometer.
When the concave radius measured accurate to within plus or minus .005" (the long radius of 763 inches on the second side of the main objective was measured with a repeatability of plus or minus 3/8 inch,) the concave plate was set aside, and the radius of the convex plate was adjusted to match the concave. Once the radii of the two matching plates were equalized, the surface figure was smoothed by working one half at a time, so as not to lose control over the radius. Figure 2 shows a ten inch diameter test plate set under evaluation during this process. Quasi-monochromatic light is used to enhance the visibility of Newton's fringes.
During the in-process testing of the large diameter test plates we noticed that the amount of time for the glass to reach thermal equilibrium was always at least 30 minutes. Prior to reaching equilibrium, the appearance of the Newton fringes would vary in number and in shape. Most vexing were localized distortions which indicated either true errors in surface figure, or the presence of thermal gradients across the glass disks. We also noticed that the weight of the upper disk was sufficient to introduce astigmatism into the match, unless care was taken to "float" the glass stack on foam rubber pads, in much the same way that a well designed mirror cell "floats" its objective.
Altogether, the time spent making three sets of test plates probably amounted to about 300 man-hours. This alone is probably reason enough to heed Jim Daley's advice and make only one concave plate for the outer surface of the main objective. Additional reasons to follow this course would soon become apparent.

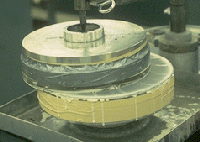
the big lens.
With the test plates out of the way, work commenced on fabricating the lens elements. Both the lens blanks and the Pyrex grinding tools had their curves roughed in on a curve generator, which saves much time and elbow grease, if one is available. Fine grinding then began in the usual way. To attach the lens blanks to the rotating spindle, pads of 1/4 " thick foam rubber were inserted between the glass and the radiused surface of the corresponding aluminum lens holder, and the lens was then secured to the holder by lightly wrapping the edge with 2 inch wide masking tape. Care was taken to insure that the tape is not wrapped so tightly that the glass blank is being pulled downwards at its edges. The generated Pyrex grinding tools for each surface were then grooved using a diamond cut-off saw, and the tool and lens edges were beveled before any grinding began. The diameter of the grinding tools for convex surfaces were sized about 90% of the lens surface diameters; the tools for concave surfaces were correspondingly oversized by about the same amount. This arrangement allows work to progress with the concave surface (whether tool or lens) always on top, without giving up the ability to control radius of curvature.
Page 1 Page 2 Page 3 Page 4 Page 5 Page 6 Page 7
Back to the McGregor-Schupmann Page