
Building the World's Largest
Schupmann Telescope
by Scott Milligan, Springfield Telescope Makers
Page 3 of 7
Fabricating the Optics: Continued

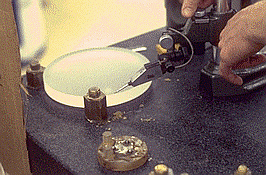
on the corrector.
As soon as the curve generating marks had been removed from one side, the lens blanks were measured for wedge error and center thickness. Wedge errors were marked for orientation, and then removed by applying hand pressure to the high side of the wedge with the lens on top and the spindle rotating at 10-15 rpm.
A Word Concerning Tolerances
At the time when tolerances needed to be set for our project, I had neither the knowledge or the analysis tools to investigate the sensitivity of the Schupmann design; I therefore played it safe, and established tight tolerances on every construction parameter, to assure a successful outcome. Having since gained some experience in the field of lens design, I decided to perform a hindsight-aided tolerance sensitivity analysis.
Allowing for the use of suitable compensators, I found that radius of curvature errors of plus or minus .1% on all surfaces produce essentially no image degradation; these tolerances could, in fact be doubled without harmful effect. Wedge errors of .005" are easily tolerated (because the design is optically "centered" at the adjustable field mirror), and the center thicknesses can be off by .05" to .10" (or even more in the case of the big lens.) Try building a conventional doublet or triplet to these tolerances, and you will quickly find that image quality drops to zero. The only tolerances which matter to the Schupmann are the figure accuracies and smoothness of the optical surfaces! This is particularly true of the reflective (convex) surface of the L2 corrector, where a given figure defect, because the in-glass reflection, introduces a corresponding wave front error of almost six times greater magnitude than would be the case if the same defect were located on one of the refracting surfaces.
Polishing

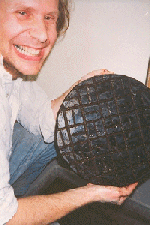
a freshly made lap
for L1.
Once the fine grinding operation had been completed for both surfaces of a lens, pitch laps were poured onto the same radiused aluminum tools that had doubled as lens holders during the fine grinding operation. A mixture of roughly 2 parts "Gugolz # 64" to 1 part "Gugolz # 73" pitches was used; the working temperature was always between 68 and 72 degrees Fahrenheit. The laps were poured onto the heated aluminum disks, and after a suitable cooling period, were pressed against the corresponding (wetted) glass surface in the usual way.
Since the definition of a "suitable" cooling period varies with many factors, I'm afraid that there can be no better guide than experience to judge when the lap is ready for the initial pressing. Groove patterns were laid out using a grease pencil and straightedge, and then the grooves were cut-in using a razor blade. No rubber mats or pitch "molding" techniques were used, however we did find that irregular fracturing of the groove edges could be minimized by cutting the laps under water. We also found that the quality of the contact made by the lap and (particularly) the large lens during polishing could be markedly improved if the pitch facets were either divided in two (by cutting additional grooves), or else by LIGHTLY scoring the pitch facets diagonally with a razor blade. Pitch thickness of the finished laps was about 1/4" for the big lens, and maybe a bit less for the corrector.
Page 1 Page 2 Page 3 Page 4 Page 5 Page 6 Page 7
Back to the McGregor-Schupmann Page