Test for a Sphere
Before You Start
Use this checklist to make sure you are ready to test for a sphere:
- You have completed Polishing.
- You have access to a Mirror Tester that has a Ronchi Screen for the Ronchi test.
Testing for Sphere
Introduction
On this page we will describe how to test your mirror for a spherical surface with a good edge. A 'bad' edge would be one that is turned down (common) or turned up (less common). Normally, we do this test after polishing is complete and before we start to parabolize, as a spherical surface is the standard starting point for parabolization. As you figure to sphere, you will repeat this test until you have achieved a good sphere.
It is sometimes possible to get in a situation when parabolizing that the best strategy is to 'start over' and go back to good sphere as a parabolization starting point. In that case, we would use this test at that time to know we have returned to our desired starting point, a good spherical surface with a good edge.
We choose to use the Ronchi test for this step. Experience in several mirror classes shows this test is easier for a novice to master than the Foucault test, and it does a better job of highlighting edge problems. This does require the mirror maker to obtain a Ronchi Screen, but low cost plastic film screens are available in the market and work fine (although a much more expensive glass screen will produce sharper bands). You can use the Foucault test to test for a sphere, and this is the classic advice given by all major ATM books. We briefly describe what a spherical surface looks like on our Understanding Foucault Testing page if you decide to use the Foucault Test instead.. Edge problems may be harder to detect with the Foucault test, they will appear as dark and light rims on the edge on what should be an otherwise 'gray' mirror, and they will shadows will move with knife edge motion.
It is possible, although not common, that your mirror might be close to a parabola when you finish polishing. If you test for a sphere andt you are overcorrected for a sphere (mirror surface is more deeply curved than a sphere), then this possibility exists. In this case you might want Test for a Parabola*; if indeed you happen to be nearer a parabola then a sphere then you should move on to Figure to a Parabola*.
Tester Setup
Please refer to Setting up your Tester. Set it up for the Ronchi Test, which is what we will use for testing for a spherical surface and good edge.
Nomenclature
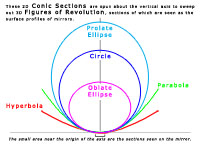
We will be using the terms Undercorrected and Overcorrected. These are relative to the surface figure we are targeting, in this case a sphere. An undercorrected surface is flatter than a sphere, and an overcorrected surface is deeper than a sphere (note that a parabola, our ultimate goal, is an overcorrected sphere). The progression of figures of revolution are:
Flat Plane - Oblate Ellipsoid - (increasingly flatter to left) Sphere (increasingly deeper to right) - Prolate Ellipsoid - Parabola - Hyperbola
Think of the Oblate Ellipsoid as an egg laying on a counter, while the Prolate Ellipsoid is an egg standing on end.
Astigmatism
Astigmatism is not common, and if you have been rotating your work while grinding and polishing you should not have astigmatism. But it does happen, we have certainly seen astigmatic mirrors every so often in mirror class. We suggest you mark the edge of your mirror (a small piece of tape works well) and as you are testing for a sphere, rotate the mirror on the test stand by 45° and 90° without changing anything else. Any significant changes in the appearance of the bands, particular a rotation of the bands, indicates astigmatism. Stop and correct this immediately - you will not be able to successfully figure an astigmatic mirror. You can read more about Detecting Astigmatism on our Reading Ronchigrams page.
Testing for a Spherical Surface
Many more diagrams and much more detailed information is on our Reading Ronchigrams page, which intended to be used with this page while Ronchi testing. We have included links to the relevant sections of this page in the procedures below.
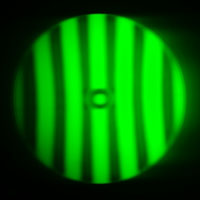
Adjust your tester such that 5 or 6 dark bands show on the mirror inside of the radius of curvature. Examine these bands for sharp, straight, parallel edges, which would indicate an ideal sphere and edge. Fuzzy edges could be due to a low quality grating or mirror surface roughness, which would need to be corrected.
More likely, the Ronchi bands are not perfectly straight and parallel, but have some curvature, bends or hooks in them. This is why we test, to understand what the surface figure of our mirror currently is, so that we may apply figuring strokes to correct it. Here we will review the most common shapes your will see; check the Reading Ronchigrams page for less common shapes.
IOU, or Inside-Out-Under, is an easy way to remember a common Ronchigram pattern: If the tester is Inside RoC and bands curve Outwards, then you are Undercorrected (these are the major shape of the bands, there may be zonal anomalies superimposed on these dominant shapes). Conversely, IIO, or Inside-In-Over, means that if you are testing inside RoC and the bands curve inward, then you are Overcorrected for a sphere. Hooking at the edge indicates edge problems, see below. Rings, bulges at the center or similar small-scale distortions of the bands indicate zonal problems - see the Reading Ronchigrams page for more help in interpreting these shapes.
Repeat the above tests by setting up to show 5 or 6 dark bands on the mirror outside the radius of curvature - some defects are more easily seen on the opposite side of 'focus'. The meanings of the band curvatures reverse outside of focus to be OOO and OIU (If you can remember IOU and OOO, then you should be able to derive IIO and OIU).
When examining a Ronchigram, it is helpful to move the bands across the mirror using the lateral (knife-edge cut-in) control on your tester. The human eye and brain can pick up more detail when the image is moving slowly. Edge defects stand out particularly well under motion.
Looking for Edge Problems
We put edge problems in a separate topic because they are so common and so important to deal with. Having a bad edge effectively reduces your mirror's useful diameter; worse it can scatter light into the field of view and lower contrast.
Edge problems show up as sharp 'hooks' at the end of the Ronchi bands, which indicate a sharp change in slope of the mirror surface. IOU (Inside-Out-Up) and IID (Inside-In-Down) tell you what you have to deal with (OOD and OIU when outside of RoC).
Be sure to test both inside and outside of RoC, as different edge issue are easier to see on one side of RoC then the other. And rolling the Ronchi bands from side to side on the mirror can really help you see subtle hooks at the edge.
The sharp turn on the hook from the straight, parallel main bands indicate the inner edge of the turned zone - you could trace a circle through these points to show the zones size.
Next Steps
- If you have a good sphere with a good edge, proceed to Figure to a Parabola*.
- If you need to figure to a good sphere with a good edge, proceed to Figure to a Sphere*.
*Page not yet available.
Back to The ATM Main Page or Back to Introduction to Figuring.


