

|
with 7 photos
by Walt Hamler
664 Tuscora Drive
Winter Springs, FL 32708
2004-Apr-03
Go to Walter Hamler's Astrophoto Page.Late last year, 1999, I had a sudden desire to build another telescope. I had build several
back in the 70's and 80's with a moderate amount of success, but after a kid came along and a move to Florida,
priorities had changed. Now, with older children (almost ready to leave!!) and semi retired, I decided I needed
another scope.
After looking through several issues of S&T and other publications, and visiting a few of the
many websites, I decided on a 10" Dobsonian. My last scope was a 12.5" Dob than I sorely missed, but I didn't
want to tackle another 12.5" after so long a time. I must say that the "sticker shock" of commercial scopes as
well as parts to make one really got me! I finally decided to order a mirror from Coulter, as it was obvious
that I could buy a ready made mirror as cheap or cheaper than doing it myself. Besides, I figured it would take
me 5 or 6 months to finish a mirror, so buying might be faster as well. NOT!!
I called Coulter in early January as an initial inquiry, and then called back around the end
of the month to place my name on the list. I wanted an f/7, but was told they could only offer f/6.3, and some
were due in soon from the coating company. Ok with that, I said save me one, and proceeded to gather up the
materials and further info to build amount.
I must pass along thanks to Ray Cash for his
web pages (This site is no
longer available...Webmaster) with all the info available
and plans for the Dobsonian scopes. The resource lists really make getting all your ducks in a row an easy
project. Because of that, and some extra time available, I had the mounting essentially complete by mid
February, but still no mirror from Coulter. The last call to them informed me that a crate of supposed 10"
mirrors arrived, but upon opening they turned out to be 8" instead. That's when I decided to call Willmann-Bell.
Less than a week later I had the kit in hand. I literally started grinding that evening.
One website I visited was Bob May's
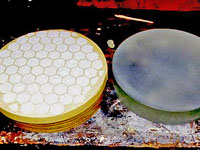
on using a metal pipe end to generate the rough curve and then make a tool using ceramic tile and dental stone.
Our club in Bowie, MD had made a tool using the hex-tile before, but we epoxied them to two laminated and
fiberglassed plywood disks. It worked fine, but the epoxy and fiberglass was a sticky mess, and the dental stone
approach had appeal. So, what the heck, I tried it!
First, I couldn't find a cast iron end cap the appropriate size (around 4 to 5 inches), so
got a 4" closet flange instead. I screwed a short PVC nipple into it for a handle, and started grinding with the
60 grit. Amazingly, the center hole starting coming in like magic, and by 10PM that evening I was down to .050"
sag and almost out to the edge!! Now this was FAST! A few more sessions around the barrel the next day and I was
ready to try the dental stone technique.
There are several good sites on the web (Russ Durkee ,
ATM
Resource List) that talk about and show how-to-do pictures of the process. Needless to say it works. The
thing that impressed me the most about working with the dental stone/hex-tile tool is the grit has the ability
to move about freely increasing the rate of work. Also, there was absolutely no problems with sticking, even at
the 5 micron stage! I used so little grit at each stage that I have enough left to make several more mirrors!
Plus, I still have the 2nd blank that came with the kit, so there is another 10" in my future!
The polishing went a little less trouble free, but still relatively painless. In past mirrors
I had used a button-lap mold to make the polishing lap, but this time I couldn't find one readily, so I made a
sawed lap. Labor intensive!! I must admit, though, that all the literature tells you to be patient and any lap
can generally be whipped into shape. It proved to be true, as once I had good contact, the polishing proceeded
as expected. The figuring also went smoothly, until I too late realized that I had overcorrected and had a
hyperbola, about a 30% overshoot. Several sessions of cold pressing and short strokes got me back to a nice
looking parabola. I decided that I would confirm my figure with a Mosby Null test and ordered the slide from
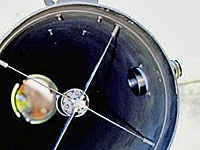
Willmann-Bell. I also had ordered a secondary so was able to finish the tube unit and star test as well. The
star test looked very nice, classic diffraction pattern, nice airy disc, and the same inside and outside focus.
The confirmation was the Ronchi grating test. With only 2 bars showing, they were as straight as a board, with
no sign of a turned edge. I was very pleased!!
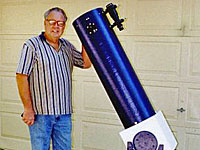
As far as the mount and tube unit are concerned, two points are worth noting . First, the
little rollers that I used to allow the tube to rotate. The eyepiece stands at 70" at the zenith, so it's nice
to be able to rotate the tube at lower altitudes for better eyepiece presentation. The other item is the two
aluminum rings I placed inside the tube at the mirror cell mounting point and the spider mounting point. This
strengthens the sonotube so the bolts/screws can be tightened securely.
All in all I'm very pleased so far. As I write this, the mirror is off to the coater,
hopefully back in a couple weeks. I'm really looking forward to some pleasant evenings at star parties, or just
in my own backyard, enjoying the majesty above!!
|