|
||||||||||||||||
Fine GrindingFine Grinding Page Contents
Before You StartUse this checklist to make sure you are ready to start fine grinding:
You may click on the hyperlinks in the above checklist to visit the pages where we discuss each of these items. When all the check list items are done, you are ready to start grinding!
Fine Grinding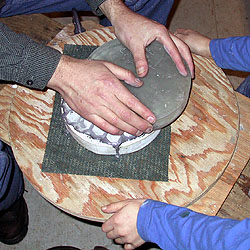 A father-son team fine grind using #220 grit on a bench with a turntable in the 2001-02 Stellafane Mirror Class. Fine grinding refines the basic shape you have ground into the surface of the glass with rough grinding. The sequence of ever finer grits that you use smoothes the rough surface that was made in rough grinding, and prepares you for polishing. You are also refining the shape of the surface to be a section of a sphere; it is likely that rough grinding left you surface as only a crude approximation of this shape. Throughout fine grinding, you must pay attention to maintaining your desired focal length. You must measure you sagitta and adjust your ratio of tool-on-top and mirror-on-top times to keep at your sagitta target. GOAL: You have completed fine grinding when you have:
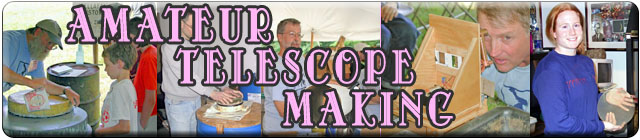
ABRASIVES: You will use a sequence of ever finer grits to smooth your mirror surface and get it ready for polishing. There is no set grit sequence, but typically each step in the sequence is approximately half the size of the prior grit. A typical grit sequence for an 8" mirror that did rough grinding with #60 grit would be:
Often, #320 Silicon Carbide is used instead of 32 micron Aluminum Oxide, and #500 is used instead of 20 micron; any of these combinations will work well. See our Guide to Grits for more information. TOOL: Use your hard tool (Glass or Tile). You will alternate Tool-on-Top and Mirror-on-Top to maintain your depth of curve (sagitta). STROKES: Use the Normal Stroke (1/3 Center-over-Center) for all of fine grinding. PRESSURE: You can press hard while using the coarser grits, and more pressure should make grinding go faster. You should reduce pressure as the grits get finer. When you get to 12 micron or below, the weight of the tool or mirror should be sufficient to accomplish the grinding, and you should not need to press at all. There is a risk of inducing scratches with excess pressure at the smallest grits sizes. TIME: A 6" f/8 or 8" f/6 mirror will typically be fine ground in 10 to 14 hours or work, depending on mirror size, grit size used, pressure applied (more pressure means short wets but more glass removed) and personal work style. This is very approximately 1 to 3 hours per grit. PROCEDURE:For each grit in your sequence:
After you finish with #220
Planning ahead for polishing can save you time. You will need to make a pitch lap for polishing and that requires a plaster disk which requires at least a week of drying time, if not more. You can pour the plaster disk to the curve of your mirror anytime after you have finished with #220 grit and have good contact. See Making A Plaster Disk. Use the Normal Stroke, which is a one-third center-over-center stroke. Most beginners tend to make the stroke too long. Remember, a 1/3 total stroke is 1/6 overhang on each edge -- one inch for a 6" mirror, 1.3 inches for an 8" mirror. You can start with either the tool or mirror on top. You should aim to do equal amounts of grinding in each position to maintain your sagitta. There is no set schedule for flipping the stack over, but most people do this when they dunk their mirror and tool to clean them up, perhaps every 5 to 10 wets. Be sure to rotate you tool and mirror (or rotate you tool and walk around your grinding stand) about every 5 to 10 strokes. This is always critical to prevent astigmatism and to make sure you get closer and closer to the ideal spherical surface shape. At least every half hour, you should stop and measure. Clean your mirror by dunking it in a bucket of water. Measure your sagitta to see if it has changed. Then, use the following table to adjust the ratio of wets of Mirror or Tool on Top:
If your sagitta is too deep, then do more work with the Tool on Top; If it is too shallow, then do more work with the Mirror on Top. When you get it back to the desired value, then go back to doing equal work in both positions. As the grit you use gets finer, it will take longer to change the sagitta and you can measure less frequently. Check for good contact on your first and second fine grinding grit (normally #80 and #120) by using the Pencil Test. Correct contact issues before moving to finer grits. Once you have achieved good contact, you normally won't lose it, so further checking on finer grits is usually not recommended. Depending on your grinding style, it will take between one and three hours of work on each grit. To determine if you are ready to move on to the next finer grit, Inspect your Pits for uniformity.
CHANGING TO A FINER GRIT: When you have determined you are ready to move on to a finer grit (When to Switch Grits), you should do the following: Check that you are making progress towards "good contact", which is ATM-speak for getting really spherical. Use the Pencil Test to see how you are doing on your first two fine grinding grits, and don't move on until you have achieved good contact. Check your sagitta, which you should be doing about every half hour on the coarser grits, and about every hour on the finer grits, as noted above. Instructions here. Bevel: Have you reduced or eliminated your bevel? If so, and you are at #220 grit or larger, you should put it back to where it needs to be. See How to Bevel. Caution: Beveling when using finer grits carries a very high risk of scratching your mirror surface. It is best to leave #220 with a good bevel, which should last thorough the rest of grinding and polishing. In all cases, thoroughly clean the mirror and work area to prevent the coarse grit particles from the carborundum stone from scratching your mirror. 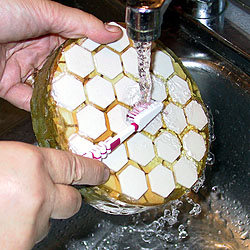 Cleaning a Tile Tool with an old toothbrush and plenty of water. Clean, Clean and Clean Again: Now is the time to clean everything, and make sure none of your coarse grit is lurking about to cause a scratch in the next stages. Start by cleaning the mirror and tool to clear away the "mud" that is made while grinding. But now, you must clean them especially well. Use an old toothbrush or other stiff bristled brush to clean out every nook and cranny in you tile tool. Make sure your mirror is sparkling clean, and no grit is hiding in any surface pits on the edge or back. Then put them safely aside in a clean place. Next, clean you work area, including your grinding stand or turntable, water buckets, spray bottle, and anything else that may be hiding that odd piece of grit. Finally, clean yourself. Change your clothes and take a shower. Clean under your fingernails also, a favorite grit hiding place. You must clean thoroughly between each grit - The penalty for missing a piece of coarse grit is a potential scratch on your mirror, and perhaps a need to go back to coarser grits to grind the scratch out. CONGRATULATIONS: When you have worked through all your grits, When to Switch GritsAt the Stellafane Mirror Class, many students are very tentative in making the decision to switch grits, and instructors are often called in for second (and third!) opinions. So this is obviously an area that beginners have some doubt about. Therefore, we will present several techniques and a lot of information to help you here -- use the techniques you are most comfortable with. 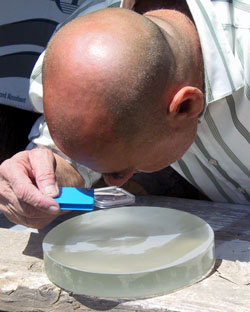 Checking for large pits with a hand magnifier in the bright sun Hogging out, or rough grinding, removed a lot of glass in a short time with very coarse grit, but that left a very rough surface behind. Fine grinding, and later polishing, has as a major goal to smooth that surface through a series of successive refinements. The criteria for switching grits, therefore, is: Criteria: You want to grind with your current grit until you have eliminated all the larger pits from the previous grit. For example, after hogging out with #60, you want to fine grind with #80 until all the #60 pits are gone (replaced by smaller #80 pits). General Advice: You must examine a large part of the surface, and you must check both center, middle and edges. Most, but not all, mirrors are done at the center before the edge, so pay particular attention to the outer one inch. Magnifier Technique: The classic technique is to use a low power magnifier to examine the mirror surface in bright light. The larger pits will shine brighter and appear larger. You can use a hand magnifying lens, or if you have a lower power telescope eyepiece (approximately 25mm), you can look in it backwards to use it as a magnifier. Many people find it easiest to shine a light through the mirror blank when examining the surface for pits. Laser Pointer Technique: Holding a laser pointer at a 45 angle to the mirror surface, scan the laser over the surface. Big pits will light up much brighter. No magnifier needed. Sample Plates: If you are having trouble judging pit sizes, make up some sample plates. Using scrap window glass cut into small squares, or microscope slides, grind your sample plate with a single known grit and then label it. Your sample plates will have only pits of the given grit size, and you can use them as a reference when examining your mirror (which will possibly have two or more pit sizes present). This has helped a number of students in the Stellafane mirror class gain confidence in judging pit sizes; the author uses the set shown below, neatly mounted, for use in class (yours can be loose, and labeled with a pencil on one edge). 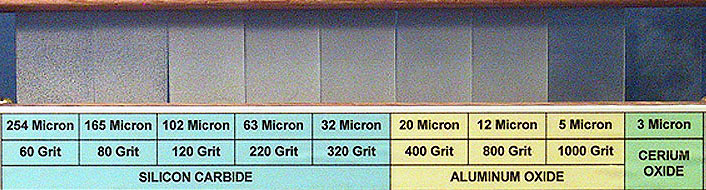 A set of sample plates made from half microscope slides used as a reference for pit sizes. Scratches
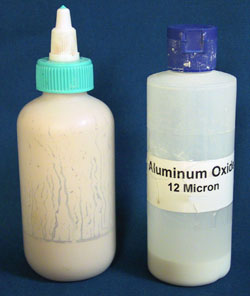
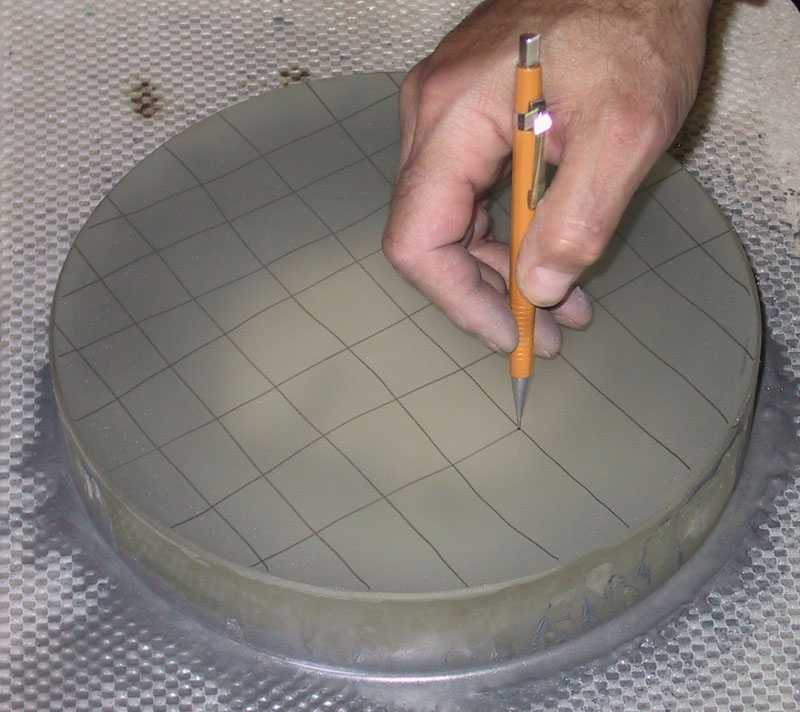
The Pencil Test: Do You have a Good Spherical Surface?The Pencil Test, also called the "Sharpie" test (after the name brand permanent marker), is used to test for "Good Contact". This is ATM talk for having a good, closely mating, spherical surface on your mirror and tool. Only if you have a good sphere will you have good contact -- other surface shapes will have hills and valleys, and will not have good contact. When to use: It is best to check this at your first or second fine grit, usually #80 or #120. If you wait until you are using finer grits, it will be difficult, if not impossible, to correct any bad contact problems you may find. Procedure: The procedure is simple. Use a #2 pencil or permanent marker to to freehand draw an approximately 1 inch grid on your mirror (See Photo PT1). Then grind one wet, or at least grind "once around the barrel", with the normal stroke (See Photo PT2). Dunk the mirror, pat (don't wipe) it dry with paper towels, and examine the remains of the grid (See Photo PT3 - Click to expand, you can't see very much in the thumbnail). Analysis: If the grid you drew is uniformly ground off, or uniformly dimmed (as in photo PT3), then you have good contact, a well mated mirror and tool that is a good approximation to a section of a sphere. However, if the grid is not uniformly ground off, you probably have "bad contact" and need to correct it. Obviously, in high spots the grid will be gone or dim, and low spots it will be darker and closer to the unground density. Cures for Bad Contact:
After achieving good contact, check you bevel, and re-bevel if necessary at this time. See How to Bevel. Then return to the normal fine grinding work. |
||||||||||||||||
|
Back to the ATM Index Page |
||||||||||||||||