
Building the World's Largest
Schupmann Telescope
by Scott Milligan, Springfield Telescope Makers
Page 6 of 7
Finishing the Lens

null test.
Convinced that we were on the right track, Phil and I focused all attention on finishing the corrector lens. After a few more polishing spells, we obtained the interferogram shown in figure 11; the small residual astigmatism present was judged to be unimportant, since the final adjustment of the objective lens tilt during system assembly would be an effective compensator for astigmatism.
Considering the small time investment needed to make the Ross null test, and the high degree of figure correction it enabled us to obtain on a relatively difficult component, we concluded that Ceravolo and Stoltzman deserve some credit for clearing a path for our success in this area.
Hiatus
Meanwhile, construction had started on the building that would eventually become MacGregor Observatory. I might have more to say on this subject, were it not for two factors which mandate that I gloss it over : first, I don't presume to have the necessary space in this magazine to do proper justice to a story which is fascinating in its own right. Second, it is not my story to tell, because as it begins, I was about to fall in love with the woman who would eventually become my wife. In fact, during the next three years I would become engaged, get married, change jobs three times, and build a house. Suffice it to say that my involvement with the construction of the observatory was minimal, and little or no forward motion occurred to the Schupmann optics during this time. But I became a happier person.
Resurrection
As the winter of 1994 approached, people began asking me "when will the optics be ready?" Since honor, and a desire to go on living demanded that the answer to this question be "soon," I decided that it was time to tackle several tasks that were holding up completion of the optics. First among these was the need to build a white light test device. The need for a white light test device stems from the fact that both spherical aberration and chromatic aberration vary as the spacing between the L1 and L2 lenses is varied; this means that to get accurate correction for spherical aberration in the system test, the spacing must first be adjusted to eliminate color. I designed my tester to use a fiber bundle input, which is reimaged onto a small hole that accepts pinhole or slit apertures.
The reimaging optics are two collimating lenses; the collimated airspace between the lenses serves as a perfect place to insert various narrow band filters, allowing the test device to function in either polychromatic (white light) or monochromatic mode. A right angle prism scrounged at a Stellafane swap table is cemented to the plano surface of the second collimating lens; this places the body of the tester off to one side, and allows the observer's eye to get close to the image under test.
A second, vital piece of test equipment, which my frequent job changes had made no longer available to me was a vibration isolated test bench. Repeated spasms of equipment envy had left me able to recite the brief tutorials on vibration isolation systems in the Newport and Melles Griot catalogs almost by heart; from these, I learned that an imperfect, yet probably adequate isolation system could be constructed using nothing fancier (or more expensive) than a set of inner tubes and a pile of wood. Since the alternative was to take a second mortgage on my house and actually BUY one of the systems that these companies are trying to sell via these tutorials, I decided that I had absolutely nothing to lose by taking the low road.
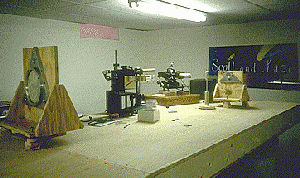
As it turned out, the table that I was able to construct for a total cost of less than $300.00 and one weekend's labor, performed BETTER (for the task at hand) than some $20,000 setups that I had used or watched others use in the industry. Here's what I did: Two 2 x 6's, 16 feet long form the side rails, which are separated by six 2 x 6's 4 feet long to create a frame 4 feet wide x 16 feet long. Sheets of 3/4" thick AC plywood are attached to both sides of this frame via drywall screws (I wanted to be able to disassemble this beast later on). This structure forms the table, which floats on five 13" (inside) diameter inner tubes. The whole thing is supported by five 50 gallon drums, into each of which 100 lbs of sand has been poured to dampen vibrations. Plywood disks cover the drum tops. Figure 12 shows a picture of the result.
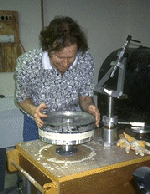
Figuring the big lens on a homemade polishing machine.
Using this set-up, we were able to perform a second system test, this time knowing that the L1 to L2 distance was correctly set for zero color. A microscope yielding a magnification of 100x was used to view the F/10 Airy disc in auto collimation. With the spacing adjusted for zero color, a LUPI (graciously lent by John Buccini of Buccini instruments) was used to evaluate the double-pass interferogram. This test showed that although overall smoothness and symmetry were good, there was about 1/4 wave of something that could best be described as over corrected spherical aberration still present.
Phil and I resolved to fix this last problem by figuring the front surface of the main objective lens, using a full size lap and the "W" stroke familiar to all who have made parabolic mirrors by this method. New laps were made, and figuring was done in short spells of 5-10 minutes work, followed by a look at the system test. After about 3 or 4 such spells, the "seagull" figure error was gone. Replacing the LUPI with the white light source and the microscope, we saw that the double-pass Airy Disc showed ring structure at the in-focus position, and the out of focus Airy Patterns exhibited good symmetry on both sides of focus. The only noticeable image defects were a slight astigmatism, which we were confident would be taken care of by adjustments to the final alignment in the tube assembly, and a brightening of the outermost region in the Airy Pattern inside of focus, indicating a slight up-edge in the wave front. We decided to stop work, and begin integrating the optics into the tube assembly.
Page 1 Page 2 Page 3 Page 4 Page 5 Page 6 Page 7
Back to the McGregor-Schupmann Page